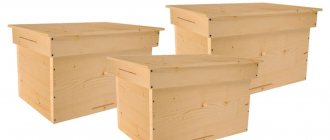
How to make a hive from plywood and polystyrene foam with your own hands
Most often, hives are made from wood, but keep in mind that such building material is quite expensive, but the house itself will turn out to be inconvenient and heavy when moving around. For this reason, at the moment, most beekeepers know how to make a hive from plywood and foam plastic with their own hands with drawings, photos and step-by-step instructions, and we will consider everything in as much detail as possible.
Plywood for the hive. So, if we talk about plywood, it is thin-thick slabs made of soft or hard wood of coniferous and deciduous trees, which are glued together.
This building material is often used in the production of furniture, and even in the field of construction. Its thickness and strength depend on the number of layers of plywood.
What are the pros and cons of plywood hives?
A plywood hive, like any other material, has advantages and disadvantages. They allow you to calculate everything correctly and prevent unforgivable mistakes in the apiary.
Among the advantages:
Small mass. Cheap assembly. Strength. Insulation materials can protect a bee colony quite reliably from the cold. The humidity level is low - mold does not develop. During the ripening of honey, the evaporation of excess moisture from it is ensured. It will be environmentally safe, both for humans, in terms of consuming honey collected from such a plywood hive, and for the insects themselves. You can make different types of structures, for example, a beehive like a lounger, or a multi-body one. There are practically no restrictions.
But still, such a plywood house also has its tangible disadvantages:
The small thickness of the plywood sheet does not allow making a full-fledged warm hive from this material alone. It is necessary to use additional insulation, for example, polystyrene foam or polystyrene foam. Due to the fact that you will need to purchase insulation, additional costs arise. This is taken into account at the production stage.
Weighing the pros and cons, there is no doubt that you can easily make such evidence yourself. Their weight is light, so they can be used when a mobile apiary is planned or when it is necessary to periodically transport bee colonies to a new honey harvesting site.
General information
About materials
The quality of the materials will largely be determined by the impregnation used, which will affect the plywood’s resistance to wear, as well as the effects of fire and moisture. When choosing plywood for a hive, you need to give preference to high quality materials, on which the life of the bee house will directly depend. Plywood must be made using compounds that do not cause any harm to insects. It is advisable to select slabs that are entirely made from soft hardwood, but you can also use plywood, whose internal layers are made from softwood.
Advantages and disadvantages of plywood hives
Hives made of plywood are very often used by beekeepers more and more often, since this design is convenient and also has a high degree of reliability. The most widespread houses are those using polystyrene foam as insulation. The main advantages of plywood hives include the following:
Long service life.- Ability to assemble various structures.
- The material is available.
- Light weight.
- Obtaining a comfortable microclimate for bees.
- Strength.
But the main disadvantage of a hive made of plywood will necessarily be insulation. A material suitable for this purpose would be polystyrene foam, which will be lightweight and have excellent thermal insulation properties.
Varieties
Several types of bee houses can be made from this material. Most often performed:
Sun lounger. Double-walled hive or the so-called Dadana. Multi-hull design.
Let's look at the process of building each type step by step.
Plywood lounger
The beehive bed has a horizontal orientation and is a cabinet-shaped box with three compartments or more. The simplest designs consist of 16 inserts into which wax honeycombs are placed. Thanks to special frames, you can easily enlarge the hive. This option is easy for beginners to work with, since the hinged lid makes it possible to immediately inspect the insects’ home.
But, despite the fact that the hinged lid provides access to the entire hive, the design is quite cumbersome. Therefore, if you plan to move it from place to place, it will be almost impossible to lift such a product, especially when it’s full of honey.
Double-walled hive – Dadana
Due to the specifics of the product, this option is perfect when there is a sharp drop in temperature in the autumn and spring. Dense thick walls ensure the preservation of temperature inside the bee colony, which means they minimize possible insect diseases.
It is necessary to clearly understand that the Dadan hive is covered with plywood sheets over the entire area of the outer walls. Moreover, there is a gap between the main body and the casing, which is filled with polystyrene foam for additional insulation.
For those who are going to independently cut the material and assemble such a hive, it is necessary to take into account that if the apiary is planned to be moved, who better to make a small structure. Maximum 10-11 frames.
Multihull version
This option has a vertical design orientation. The hive has several buildings (shops) that are used to collect honey, as well as 2-3 buildings for housing a family of insects.
Thanks to modularity, you can create different combinations by rearranging sections. This allows you to get one or another effect. In addition, if a more mobile apiary is needed, hives with 8-12 frames are made.
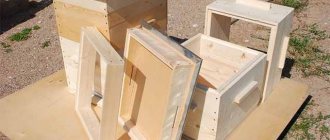
Preparing parts
Preparation for assembly begins with choosing a drawing that will help you build hives from plywood and foam plastic with your own hands. You can make it yourself or find a ready-made one. The most popular, but easiest to make variety is the sun lounger. For other models, the construction principle is little different, only the configuration changes. Plywood sheets should be dry and durable. To make them crumble less, grinding is carried out on a machine or with a hacksaw. This will also increase the reliability and quality of the hives. You can immediately buy sanded wood sheets with a smooth surface. This will provide protection from moisture, which will increase the strength and durability of bee houses. It is better to choose coniferous plywood as a wood species. If the assembly is being carried out for the first time, then experienced beekeepers advise starting with simplified designs. The simplest model is hives with two bodies, having 12 hundred frames. Inside the bee house, the walls are taken in length and width - 45 cm, height - 31 cm. These parameters may vary depending on the thickness of the wood sheets.
- box - a body made of nesting walls in the front, back, sides and wooden slats;
- roof - various options are used;
- bottom – removable or in another form;
- gate valves with tap hole;
- store - a device used to increase the volume of the hive if necessary;
- legs;
- hundred frames.
Dimensions of the parts used, which must be followed with maximum accuracy:
- frames - 12 pieces of 450 by 310 mm or 435 by 145 mm, but when making an independent drawing;
- nesting walls – 450 by 306 mm;
- hole for the tap hole – 15 mm (with a removable bottom, a niche for a rectangular tap hole – 250 by 5 mm);
- foam blocks thickness – 50 mm.
After preparing the parts, they proceed directly to the construction of the plywood hive.
If you have not yet decided what material the structures will be constructed from, then listing the main advantages of plywood will come in handy:
Tools and materials
Before you begin directly manufacturing a particular structure, you need to prepare the following materials and tools for work:
- Wooden boards of the required thickness are needed to create the frame.
- Sheets of plywood. When assembling the house, you must immediately take into account that the fibers of the material in two layers are perpendicular to each other.
- PVA glue, which can reliably fix and resist the influence of moisture.
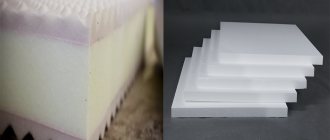
- Foam plastic, the thickness of which must correspond to the gap between the two walls of the housing or be no less than the thickness of the wall of the product itself.
- Nails for fixing structural elements and each other. In some cases, self-tapping screws are used.
- Saw on wood.
- Measuring tools such as a ruler, flexible meter, square to maintain squareness, and pencil to mark.
Double wall hives
In the apiary, where from autumn to spring the air temperature drops significantly, insulated versions of bee houses made of plywood are installed. Adding another layer of material around the perimeter of the body at some distance from it and inserting filler into the resulting gap helps improve the microclimate inside the hive.
The structure will retain heat while remaining quite light if polystyrene foam blocks are placed between its plywood walls rather than sawdust. With careful handling, it will last a long time and will not crumble.
If it is necessary to move, it is not recommended to make the structure too spacious - a house with 10-12 frames is best suited for mobile apiaries.
The outer layer can be added to any hive design. It should be thicker than the inner frame to protect the bee nest from cold and high humidity.
Features of a hive made of plywood and polystyrene foam
Plywood hives have the following positive features: They have a durable frame. Maintains the temperature inside the structure comfortable for insects. With proper ventilation, the design allows the bees to exist fully in the hive. The insulation is protected from damage and coloring. In addition, they are quite easy to make yourself. It is also important for the beekeeper to understand that a hive made of plywood, which has foam inserts, becomes quite warm. Especially if you compare it simply with a house made of boards.
Blueprints
They select drawings with dimensions, but also all other dimensions. According to the assembly sequence according to the available sketches, perform the following actions: Assemble the frame, fixing the elements together with screws or nails. In this case, it is better to glue the joints with PVA, the composition does not allow moisture penetration. It is necessary to secure the walls with plywood and nails.
Attach the sides with screws. Monitor the process all the time with a corner and a clamp. A slot is made on the front wall and the tap hole shelf is nailed. The internal elements of the hive are made. These are elements - cross walls, lids, frames, feeders, etc. Then the general cover and liner are completed. Nail insulator to protect against precipitation. Don't forget about the tap valves. Fill the cracks with tow and cover with varnish. Design legs so as not to place the hive on the ground. Eliminates reproduction
mold debris along the lower plane.
If you follow these recommendations, it is quite easy to assemble the hive structure yourself from plywood insulated with foam plastic.
Hive assembly
Algorithm for assembling a hive after preparing all the elements:
- Fasten the plywood parts, checking for alignment on one side. The front and back parts are made with recesses for honeycomb frames.
- Make a hole in the center of the panel for the tap hole.
- Place foam blocks in the space between the layers.
- Make ceilings on the inner walls.
- Build a roof and bottom.
The body consists of 2 elements: outer panels, walls for the nest equipment. Assembly begins by fastening two plywood sheets with glue and strips. Cut plywood is placed between the bars to insulate the house. Additionally, fastening with nails is carried out. A hole is made in the outer front sheet for the tap hole.
The entrance is also made from wood sheets. It consists of several parts: strips, sidewall and valve. The last step is to make the flight board. Then the entire structure of the taphole is assembled and glued to the outer part of the front wall of the housing.
The magazine is assembled according to the same scheme as the body. Elements: side walls; internal, external panels for front and rear parts; nesting walls on four sides; planks; foam blocks.
The roof is designed and assembled based on the parameters of the store with the body. The main elements are external and internal walls. If the roof is made with a slope, then the sizes of the panels are changed. It is covered on top with a thin sheet of iron, roofing felt or film for insulation.
What material is best to make bee hives from?
Initially, wood was used for hives. Without going into details, let's say: he was chosen by the inhabitants of the amazing bee community themselves. Keeps warm perfectly. It is easy to process. Breathing. Durable. Practical. Available for sanitization. In modern conditions, it has mobility, disassembly, and interchangeability of components.
Innovators are desperately fashionable. Innovators dream of using construction fiberboard, chipboard, etc. to make beehives for bees. I would like to immediately warn beginners. No matter how attractive and colorful the displayed samples may look, do not give in to temptation. They contain toxic volatile substances that negatively affect our bees. Chase aesthetics and simplicity - you will lose your apiary!
Features of "lounger" hives
They are completely devoid of the described drawback with windage. Such bee hives are not afraid of hurricanes. The increased bottom area allows you to stand firmly on the ground. The inconvenience is a fair amount of weight. Moving them is not an easy task. Therefore, they are placed in hospitals. Over the past fifty years, their presence among nomadic beekeepers has practically not been observed. This type of hive is not favored by industrial beekeepers. Their adherents are exclusively elderly people who feel sorry to throw away bulky “chests”. They are familiar, like a home, yard, village. The frame size of the hive varies from fourteen to twenty-four. There are rare specimens of thirty frames!
The main counter-argument of opponents: the unnatural movement of the bee colony. Mother nature intended to move upward. Immediately the beekeeper forces him to move horizontally. I don't know how convincing the argument is. They once gave me such an old twenty-frame miracle. He consistently took at least a flask from his plot in any year. He served for another fifteen years until he retired. Yes, you have to scrupulously go through the frames and waste precious minutes. Nothing. I don’t regret spending hours on a good family.
Which hive type is best? Buy or make your own?
Residents of Russia who dream of bee farming always face a difficult question. Where to start - buy ready-made hives or make them yourself? There is no clear answer. Decide on a solution to the problem. Calculate the economic costs. If the goal is intra-family consumption, treating beloved relatives, then the purchase of tools, machines, lumber will cost a pretty penny and will significantly increase unjustified expenses. Of course, we must not forget the time spent making bee hives with our own hands. Time also costs money.
If carpentry has already been established, there are certain capacities, think about it. You will need high-quality drawings of bee hives. Fitting requires the highest degree of craftsmanship. That is why the vast majority tries to purchase factory-made hives. They undergo appropriate certification and are unified. Payback is quick. Quality is put at the forefront.
Manufacturing technology
Since plywood does not retain heat sufficiently, and the bee house must be kept warm and dry, such products are necessarily insulated with foam plastic. Even so, the entire hive remains lightweight and easy to use, keeping the bees cozy and safe.
It is necessary to be guided only by proven schemes, since the entire structure can be distorted and it will no longer satisfy your goals. The entire hive collection technology goes through five stages:
- The preparatory part is when you cut out blanks from plywood according to existing drawings, and also prepare polystyrene foam and wooden blocks for fastenings.
- Basic assembly of the box or body - care is required, since plywood is easily damaged during fastening (glue or nails are recommended, self-tapping screws can crumble the material).
- Assembling the bottom - removable, with mandatory screwing to the box and eliminating gaps, or non-removable as part of the main assembly.
- Construction of a store (optional).
- Roof construction.
All top parts must be installed on the bottom. After completing the assembly, you can install the cassettes and start releasing the bees into their new home.
Reviews
Pavel V.
“I made 2 test hives from plywood in my apiary that year. Small, for 12 frames. The bees are happy with everything, they collected a lot of honey over the summer and overwintered well. I want to put together a couple more, it’s quick, I’ve already prepared the material.”
Anna L.
“My grandfather kept bees only in plywood hives all his life. He is already over 80, and still tolerates them himself - light, even full of honey. With them in the summer it is convenient to move to the place of collecting nectar.”
Oleg D.
“I think it’s a worthy replacement for wood. True, it lasts less, but also costs less. But you need to take good plywood, check what it is glued with, so that evaporation does not start in the sun. It’s important to seal the cracks, otherwise parasites can get in between the walls.”
Hives made from quality plywood are cheap and easy to make. Their service life is comparable to wooden structures. Foam is well suited as an insulating insert, which allows you to maintain warmth in the bees’ nest in winter and during frosts.
How to design a hive
For work you will need the following tools and materials:
- plywood;
- Styrofoam;
- PVA glue;
- screws, nails;
- wooden blocks;
- board 25-30 mm thick;
- ruler, pencil;
- saw.
Hive sizes
To properly design houses, it is important to know their characteristics. When making plywood hives, standard dimensions inside the body are adhered to. For sun loungers, the parameters should be as follows: 810 * 450 mm with a height to the roof liner of 355 mm. Inside the Dadan hives you need to ensure dimensions of 450 * 450 mm and a height of 310 mm, which allows you to accommodate 12 frames. Ruta hives with dimensions of 450*375 mm and a height of 250 mm are designed for 10 hundred frames.
During the manufacture of hives, the beekeeper can adjust the dimensions, but the frames in any case must be installed taking into account the following parameters:
- the distance between the side bars of the frames and the walls of the hive is 8 mm;
- the distance between the centers of adjacent frames is 38 mm;
- frame thickness 30 mm;
- folds for frames 11*20 mm.
About Dadans and simplification of assembly
Note: Assembly can also be done without any grooves - butt-to-joint, which greatly simplifies the task.
The detachable bottom for Dadan plywood hives is assembled not only from new boards, but also from waste. For example, you can use old boxes made from 20mm boards.
To make a 40-mm bottom, such boards are knocked down crosswise - a two-layer part is obtained, all defects in which are puttied on the outside before painting. Two tapholes 25 cm wide are cut into the bottom trim.
If the assembly is carried out end-to-end, installation begins with the inner box of the case. Then the frame bars are stuffed on the outside. They are installed at the top, bottom and corners.
In places for round tap holes, it is also necessary to attach wooden blocks. The holes are drilled with a downward slope of 15-20 degrees to prevent moisture from getting inside.
After installing the outer plywood, bars are stuffed along the bottom of the cases so that there is a 1 cm protrusion at the bottom. This part is needed for the unrebated installation of the cases - it serves as protection against thieving bees and strengthens the structure.
Dimensions of parts for the two-body Dadan proposed here: 450 by 310, 470 by 310, 510 by 320, 530 by 320 - everything is made in 4 pieces. Plywood 10 mm.
Share a link to the article on social networks:
- Author: Maria Sukhorukikh
Rate this article:
- 5
- 4
- 3
- 2
- 1
(0 votes, average: 0 out of 5)
Share with your friends!
Overview and design characteristics
The Dadanovsky hive is named after the famous beekeeper from France Charles Dadanov, who was the creator of this design. The hive is a single or double body design with 10, 12 or 14 frames. The cubic load-bearing part is equipped with a fixed bottom. The roof is extremely simple, as are, in fact, other structural elements. In general, the Dadan hive, in addition to other advantages, is also distinguished by its ease of use.
On a note ! The single-hull version of the hive (regardless of the number of frames) is good because it is easy to transport and prepare for wintering; it is convenient to monitor the condition of the bee colony and, if necessary, prevent swarming in a timely manner.
Modern parameters of the Dadanovsky hive:
- nesting area – 435x300 mm;
- frames – 435x135 mm.
How to make a Dadan hive (Dadanovsky hive) with your own hands
Video: Classic hives Dadan
A large audience of beekeepers like double-hulled hives for bees. The beauty is that you can charge them in advance. They are swapped, forcing the bees to collect nectar more actively. As you understand, remarkable male strength is welcomed here. Not everyone can handle such heavy lifting. You can't do it without an assistant. It’s nice that they are content with the only pitching at the end of the season. Not very suitable for wandering. But with proper care, it is great for wintering in the wild and in the open air. They are suitable for industrial plants. This is facilitated by the high frame. There is enough food for a long time.