A decorative egg nest is an unusual decorative item that can be used to decorate a gift or create a beautiful piece of furniture. You can make a decorative nest using improvised materials at home.
Let's look at several options on how you can do this quickly and easily.
Product options
Shapes and sizes can be very different: from a pocket gift nest to a full-size nest with the purpose of attracting storks to a summer cottage for nesting. Numerous photos of branch nests posted on the world wide web will help you make such crafts yourself.
Before starting work, you should decide on the purpose of the nest. Further instructions will help you understand how to make a nest for a stork with your own hands without outside help.
Required materials:
- tree shoots;
- bird feathers;
- hay, straw;
- thin rope or thread;
- glue, scissors;
- plastic plate or foam.
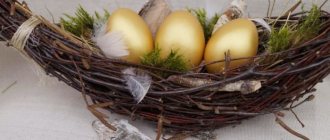
A finished decorative nest, intended for placement in the garden, can be painted, quail eggs, devoid of contents, can be placed inside, and then installed on a tree.
How to make a nest from branches: making a decorative decoration simply and quickly (100 photos + video)
On the eve of Easter, the question of festive decor becomes especially popular. A homemade egg nest will be a great holiday decoration.
The craft can be made either independently or together with children from scrap materials. So, how to make a nest from branches with your own hands?
Varieties of crafts
In fact, there are many ways to make crafts. This can be either Easter decor, a gift for loved ones, or a decorative nest to decorate the garden.
Also, a nest made from branches can become a prop for a newborn photo shoot or a decoration for a child’s room.
By imagining a little with your baby, you can make a real nest for the firebird.
What can you make a nest from?
There is absolutely no need to buy special creative materials at a high price. If you use your imagination, you can come up with many ideas for creating crafts.
What materials can be used?
- Hay or straw.
- Branches of trees or shrubs.
- Twine or other thick threads.
- Bird feathers and much more.
In addition to basic materials, you will need scissors, thread, and glue. The nest can be of absolutely any shape and size.
Making a nest with your own hands
How to make a nest from branches? First you need to prepare materials for work, namely branches for the base, scissors, glue, a disposable plate or polystyrene foam to create the shape of the future nest.
We take a plate or a circle cut out of foam plastic and, using it as a stand, begin to assemble the nest. We lay small branches around the perimeter, connecting them with glue.
Thus, we continue to form a nest of the required height. It is necessary to lay out the walls of the nest in several layers, intertwining the branches and fixing them with glue.
Next, you need to fill large gaps between the branches with hay, straw or twine.
We move on to the interior decoration of the “home” for the chicks. To do this, cover the inside of the nest with a thin layer of glue and lay straw on it.
Using scissors, carefully cut off the protruding ends of branches and straw.
Decor of the finished nest
How to decorate a homemade nest? A finished nest without decoration will not look spectacular.
In order for the resulting craft to become an attractive decoration for the interior or summer cottage, you need to decorate it.
You can do this in several ways:
Quail eggs will look good in a small, cozy nest. Before placing them in the nest, it is necessary to remove the contents by making a small hole in the shell. Eggs can be painted with permanent acrylic paints.
A larger nest is decorated in a similar way with chicken eggs.
To decorate the fairy bird's nest, you can use large walnuts or tennis balls, pre-painted with spray paint. Eggs in gold and silver shades will look original.
An excellent option for decorating a nest made of branches would be smooth pebbles that are suitable in size.
Beginning of work
The basis can be a round plastic blank made from a disposable plate or polystyrene foam. Small branches are attached to it using glue, which are attached to the base with a thin thread.
Then bundles of hay or straw are placed and glued on top of the branches, which are held together with threads for strength. Using scissors, the nest is trimmed, the inner surface is smeared with glue and a layer of hay is placed on it.
For authenticity, you can place bird eggs or their imitation in the nest. In particular, quail eggs look good, the contents of which can be blown out or eaten.
For a fabulous effect, walnuts painted with gold or silver paint, as well as table tennis balls, are suitable.
Round-shaped stones are also suitable for these purposes. You can buy small chicks in the gift shop and place them in the nest along with the eggshells.
Metal threads and feathers of fantastic birds taken from hairpins are also used.
Nest from branches - 60 photos of how to make a decorative ornament with your own hands
Very often, many parents are faced with the problem of creating various crafts for children. In this case, the child can receive an assignment either from a kindergarten teacher or a teacher at school, or maybe on his own initiative. A dry branch is ideal for this type of activity.
At times, an ordinary piece of driftwood can turn into a cute animal or intricate decorative objects. One of the most popular crafts is a decorative bird's nest.
A composition of branches will perfectly decorate the interior of your home or wonderfully complement your garden; it can be made from any available materials collected from nature or the territory of your own home.
There are many ideas for designing a decorative nest. You've probably come across many different descriptions and step-by-step instructions with photographs of a nest made from branches. The composition can be a small Easter souvenir or a huge nest to attract the attention of storks.
Very often, the appearance and size of a decorative miracle depend on the intentions of the developer himself. As an example, photographs of small children sitting in nests made of branches are now very famous.
Materials and tools
What types of raw materials and equipment will be needed to build a nest?
To develop an artificial nest with our own hands, we will use previously prepared materials and tools:
- some hay;
- small tree branches;
- thick thread;
- bird feather;
- scissors;
- colorless glue;
- plastic plate.
Spray paint can also be useful for painting the nest; it will add an element of magic to it. If possible, you should stock up on quail eggs in order to put them into the prepared composition.
Of course, you need to remove the contents of the eggs in advance and save only the peel. Next, we need to figure out where to place our nest of branches. Someone will definitely “plant” it on a tree, this will require additional materials: large tree branches, leaves where we will place the product and transparent glue.
Creating a decorative miracle with your own hands
How to make an artificial nest with your own hands? First we need to form the base of our nest; for this we will need flexible small stems or a disposable plastic plate. Instead of stems, you can get by with vines, straw, grass or algae. You can gather these materials yourself or purchase them from a gardening store.
There is an alternative to this method; to do this, you need to make a small hole in the center of the bowl or foam. Next, the branches are attached to the base with thread or transparent glue. Carefully place straw or seaweed in a circle on the surface; for reliability, they can also be fixed with glue.
Next, take a large bunch of stems and bend it into a ring to form an English letter U. If you don’t get a closed ring, you need to add more branches. Then you need to tie the ends with thread or wire. If there are a lot of small, dry and hard leaves on the branches, you can braid them together without auxiliary devices.
But there are situations when it is difficult to connect the base of the nest, then you should glue the ends of the composition to each other and wait until the glue dries.
It is not advisable to use glue if your nest will be placed outside. Unless the cut plants retain the shape you want, you should hang the bunch on the porch of your house for a day to dry. The fresh stems of some plants can be woven without much effort, but you will benefit from choosing straw or grass.
Creating the second part of the decorative nest
To do this, you need to take a small bunch of branches and fold it into a smaller ring. Next, insert it into the large nest and lightly push it down, just like that, the base of your nest is formed.
To connect the rings with each other you need to use threads and glue, this way you will add strength and reliability to your composition.
Designer design (decoration and finishing) of the nest
So, the base of the artificial nest is ready. Professionals advise: for a small decorative nest, quail eggs will work wonderfully, in which you need to make a neat hole in the center and blow out all the contents.
Birds spend the whole day searching for scraps or pieces to make their nest cozy and secure. Of course, it won’t be very difficult for a person to do this much faster, but don’t rush and you will get great pleasure from searching for delightful objects in the forest, in nature and in the area of your home.
Some ideas for beginners
If you plan to keep a nest in the yard of your house, then you need to choose only materials collected from nature for it, and not use anything that can cause damage to the birds. It would be wise to use feathers and eggshells from quail or other suitable poultry.
For example, in the United States, it is illegal to collect the feathers of several types of birds, even if they are harmless and do not spread deadly diseases. In Russia, a similar law has not yet been introduced, so if you just collect feathers and do not disturb the bird, you are in no danger. But it is worth remembering about personal hygiene, you need to wash your hands with detergent.
Collect stems, dry leaves and moss of beautiful and unusual appearance and color.
If the artificial composition serves as decoration for the interior of your home, then you can use threads, colorful paper and confetti.
To complete your composition, you need to place the eggs in the nest. You can use marble pebbles or tennis balls, or put in real bird eggs, you need to decorate them or draw something unusual or make a carving using the necessary tools.
You can also give the nest a metallic tint, adding a little mystery. Feathers of fairy birds, taken from ordinary decorative hairpins, are also used.
So, to decorate an artificial nest from branches, you can use everything that the creator might like: multi-colored ribbons, bird feathers, beads, dried flowers, straw and even moss.
Creating a decorative nest with your own hands is not only a pleasant pastime, but also a benefit to our little feathered friends.
Popularity of storks in Ukraine
Another legend says that these birds brought bunches of grapes to the Zaporozhye Cossacks in Tatar captivity and thereby saved them from hunger. There are similar legends in Moldova, where this bird is a symbol of viticulture.
- A DIY mailbox is a beautiful decoration and a useful addition to a suburban area
- A house for children is a place where a fairy tale becomes reality, we create it ourselves
- Bridges for a dacha - a picturesque element of the landscape in a suburban area
Sculptures of storks have recently become increasingly common in cities, villages, courtyards and dachas. The sculpture of a stork on the site not only serves as decoration, but is also a way of self-expression for the owners of the territory.
The variety of compositions with storks allows you to choose the one you need, showing your taste and aesthetic imagination.
For tendril-bearing plants - vertical and horizontal supports
When using heavier vines, not only vertical, but also horizontal rails must be reliable. Even a gazebo or a gazebo or pavilion can be designed with plants. It is also worth considering the weight of the stems for cultivated plants - fruits or berries. This helps avoid disturbances during active growth or harvest.
These designs are suitable for antennas such as:
- Clematis;
- Grape;
- passionate flora;
- Laginaria;
- Rating.
Making a nest for a stork
Creating an imitation nest from branches with your own hands is quite simple. Such a composition, when using real branches, will look much more attractive than a sculpture purchased in a retail chain.
Through this process, which requires patience and focus, true creative satisfaction can be obtained.
The following description will help you understand how to make your own nest from branches. Young branches that do not break and are more flexible than old or dried ones are more suitable for making a nest.
It should be noted that there is a ready-made metal base on sale, to which you can easily attach a vine, and its design includes parts that secure the lower part of the sculpture. To give special stability to the figure, its metal legs are welded to the base.
The sculpture can be placed in the following places:
Roofs. The nest is attached to the rafters using nails or screws.
Trees and stumps. Trees can be cut down not at the root, but higher from the ground. On such a high stump, the figure of a stork will make an indelible impression.
After installing the nest, you should attach the stork figure to it using fishing line that will not be noticeable. In strong winds, the sculpture should be secured with additional supports.
Where can I place it?
After the process of making the craft reaches the finish line, you can think about placing the product. So, the following options are offered:
In the house. You can decorate any room in an apartment or house with a nest - the personification of comfort, family and warmth. The decoration looks especially good with a container of cereal or painted eggs placed in it.
On the street. A decorative nest for the garden is an interesting addition to any fence or a custom feeder for outdoor birds. You can try to find new residents by hanging a nest on the top of a tree.
As a present. A standard packaging box with a bow or a boring package is nothing compared to a bird's nest design. To give it a festive look, all you have to do is sprinkle the craft with glitter and add a shiny ribbon to the weave.
A decorative nest is one of those crafts whose simplicity of manufacture hides originality, practicality and incredible aesthetics. All that remains is to find suitable branches to decorate the interior of the living room or garden with an original accessory.
Features of the placement of the stork figure
On the ground, it is advisable to place the sculpture in a well-lit place, not far from the bushes.
If there is a pond on the site, then the sculpture of a stork will give it additional attractiveness.
A stork in a nest personifies family values and therefore such a sculpture should be installed in the place where the family spends most of its time.
The figure should be positioned so that the stork's head is directed towards the house, not away from it.
How many nests do you need to make?
It depends on you, but it is advisable to do 2-3 of them, no more. You don't want to attract too many birds to your yard, otherwise they may often disturb you with their singing when you want to be completely alone.
Although, it’s up to everyone’s discretion: for some it’s suitable, for others it’s not. Remember, comfort is the most important thing in such places.
Nest
For many peoples, the stork symbolizes good luck, peace and prosperity. Therefore, rural residents have always sought to attract storks to their yard to hatch chicks.
If there are no conditions for nesting storks in your area, you can make his figure yourself.
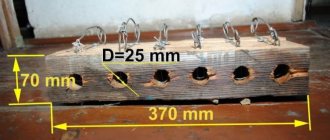
To attract storks, a nest should be built no further than 1-2 km from its feeding areas (swamps, water meadows) and no closer than 0.2-0.3 km from existing nests, to avoid conflicts between birds.
The place for the nest should be chosen so that nothing interferes with the stork’s approach. The nest is built at a height of 4-10 m as far as possible from power lines. In this case, the socket support must withstand a load of 30-40 kg.
The frame for the nests can be bicycle wheels, welded steel reinforcement, platforms made of poles, boards.
On the platform, it is necessary to make an imitation of an old nest from dried branches in a layer of 0.2-0.3 m, and place straw and dried manure in the center.
Bunches of brushwood can be secured next to the nest, and the edges can be sprayed with lime to make it look more like droppings.
In the Non-Black Earth Region, storks nest mainly on trees and poles.
In trees, nests are placed on sawn-off tops or on a large side branch near the trunk. Branches that interfere with the approach should be cut down.
At the top of a tree that has a fork, you can cut off the branches at the base and make a platform at the fork.
Nest care
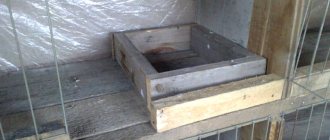
Caring for nests for laying hens is much easier if they are made with an egg collector. They are much cleaner, there are no remnants of accidentally crushed or pecked eggs. This means that there is no need to regularly clean the bottom grate from dried protein-yolk residues and shells.
This place should be a comfortable place, which means cozy, clean, dry. Caring for it consists of daily replacement of the bedding and cleaning of the tray.
Disinfection and ventilation of the bottom should be done at least once a week. At the same time, you need to clean and ventilate all surfaces and fastenings.
To combat parasites, it is recommended to periodically fumigate the entire room with special bombs for caring for the poultry house.
Parts of the structure and its fastenings should be inspected for damage, strength and rigidity.
On the eve of the onset of cold weather, it is necessary to check and, if necessary, replace all insulation, and in the future strictly control the temperature of the laying hens; it should not fall lower than +15°C.
Nest designs
- Pillars made of any material can serve as support for the nests.
- The wooden base for the roof nest is made from boards nailed to the crosspieces and then attached to the roof ridge.
- On top of this base, a platform, grate or wheel is attached with nails.
Only professionals can arrange a site for black stork nests.
Stork made of plastic bottles
Templates for the body and wings of the stork are cut out of plywood. To work, you will need plastic bottles of dark and light colors, screws and electrical tape.
- The templates are fastened with screws.
- Strips of white plastic, simulating feathers, are cut from milk bottles.
- The feathers are glued to the stork's body.
- Black stripes are used for the tail.
- The beak is wrapped with red electrical tape.
- The material for the legs can be wire, and the eyes can be purchased at a specialized store.
Firebird
Another interesting application can be made from ash and maple seeds. But before you get started, you need to prepare the following materials:
- maple and ash seeds;
- plasticine;
- colored cardboard;
- scissors;
- gouache;
- watermelon seeds, acorn cups and dried linden seeds for decoration.
Watermelon seeds and acorn cups can be pre-painted any color. For example, make watermelon seeds red and blue, and acorn caps white.
Draw a firebird template on a piece of paper and cut it out. Then we trace the template along the contour on colored cardboard and apply a thin layer of plasticine to the workpiece. After this, we begin to lay out ash seeds in rows from the wings to the body. When laying out the last rows in front of the body, the seeds should be trimmed a little to create more rows.
After the wings, we move to the tail, and attach maple seeds to the bottom row, and then again lay ash seeds in rows. Having reached the body, we cut the seeds again to make the rows denser. From the body we move to the neck, where it’s worth cutting off half of the seeds before attaching them to the workpiece.
We make the head from two maple seeds and one ash seed at the back of the head. We attach dried linden seeds to the top of the head. We decorate the finished craft with watermelon seeds and acorn cups, which can be attached using plasticine or glue.
Polyurethane foam stork
- The body parts are attached with tape to a plastic base.
- A beak is made from a nail.
- The legs of the figure can be made of steel reinforcement, electrodes or wire.
- The base is covered with polyurethane foam.
- Excess foam is then cut off.
- The figure is covered with acrylic paints.
- A nose made of wood is attached to the nail.
- The tail and wings are covered with feathers.
A stork sculpture is made in a similar way from a plastic canister, bottles and foam.