Features of construction
The chicken coop should be located away from noisy roads; it is advisable to choose a site in a dry and elevated place. Shadows from nearby trees and buildings should not fall on the windows of the poultry house. It is believed that the optimal place for a poultry house is the south-eastern side of the site. The structure for broiler chickens differs from a classic chicken coop in the following ways:
- It is best to arrange cages in 2-3 tiers to save space and costs on materials. The floor and foundation must be strong to support the weight of all the birds concentrated on the racks;
- to ensure normal air circulation and fresh air flow, the total volume of the room and the height of the ceilings should be slightly increased;
- It is necessary to carefully consider the heating system and wall insulation, since broilers are prone to respiratory diseases.
If strong winds are constantly observed in the region, then it is advisable to make additional fencing or plant a hedge of climbing plants. The construction itself can be started from scratch or you can use a former utility room, properly equipping it inside and out.
Calculations and dimensions
The volume and area of the chicken coop largely depends on the size of the flock. When calculating sizes, they are guided by the following indicators: 1 m2 is comfortable for 8-10 adults or 25-30 chickens. However, to keep young animals it is necessary to build a separate cage. To save space and ease of maintenance, wooden or metal cages are placed in racks on several tiers. The last level of cells should be located no higher than 1.5 meters from the floor.
Read also: Adjika Zamanikha: a finger-licking recipe for the winter with photos and videos
The size of the windows should be at least 1/12 of the entire area of the chicken coop. The thickness of all main walls is recommended within 20-30 cm. Ventilation holes are located 20 cm from the level and floor, at the same distance from the ceiling. When planning a ventilation system, you need to take into account the electrical diagram if you plan to use special devices and a thermostat.
You can read about building a chicken coop for laying hens with your own hands in this article.
For ease of cleaning and working with birds, it is recommended to purchase a small portable ladder so as not to reach the cages the full length of their growth.
Independent planning of construction, selection of all components and their transportation allows you to save a lot of money. To build a broiler chicken coop with your own hands, you will need the following materials (the list may vary depending on your poultry house project):
- wooden beam measuring 100x50 and 100x100;
- materials for building walls (plywood, brick, wood or foam blocks) and insulation;
- sand-cement mixture, slag and formwork boards for foundation construction;
- bricks or foam concrete for the basement;
- crushed stone and several sheets of polystyrene foam for laying under the concrete screed;
- roofing felt, plywood for roofs;
- roofing material - tiles or slate;
- metal plates for shelving under cages;
- wooden slats for mounting sectional partitions;
- antifungal coating (antiseptic), varnish or paint for treating walls from the outside;
- fastening tools and brackets for fastening drinking bowls and feeders.
It is not recommended to save on materials, since due to the microclimate in the chicken coop, boards and other elements can quickly become unusable.
Frequent manufacturing errors
General
Before you make broiler cages, you need to consider the mistakes. Any mistake often appears after the product is put into operation.
Even at the design stage, they forget to take into account certain nuances. Because of this, the entire structure of the building has to be redone. This mainly happens when they use poor building materials and forget to protect against rats.
No protection against rodents
Rats and mice chew through the wood and get inside the structure. To prevent this from happening, the bottom of the product should not be in contact with the ground.
To do this, a layer of broken glass is poured onto the ground, then a heat insulator is laid. Or they raise the structure a few centimeters above the ground.
Continuing the topic, we advise you to read the material from the article “How to get rid of rats in a chicken coop.”
Using unsuitable materials
Drywall, plastic, isoplat, chipboard emit toxic substances, causing harmful effects on birds. Therefore, they cannot be used to decorate the cage.
In addition, they tend to accumulate moisture. This leads to the formation of mold. Because of this, broiler chickens begin to have health problems. Mass mortality may begin.
Now let's figure out how to make a broiler cage with your own hands.
Features and Requirements
The cage will need a special room where the structure will be located. The issue of its manufacture must be taken with complete seriousness. If it was not possible to create good conditions, the chicks will develop and grow unsatisfactorily.
If you use home-made structures for the purpose of breeding broilers, then such maintenance has the following advantages.
- Small size in keeping chicks, since the size of the structure for broilers will require a minimum amount of space.
- Ease of maintenance of the structure. Broiler production cages are easy to maintain. Cleaning up trash and excrement is quite easy because the cage is equipped with a tray.
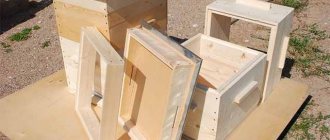
- Ease of construction. You can make a bird cage yourself using window structures.
- Possibility of safely keeping other pets located in the barn. When assembling structures for chickens, it is possible to eliminate the possibility of contact between broilers and other residents of the premises.
- The procedure for feeding the chicks is simplified.
There are some features of cages for meat breeds of chickens.
- When selecting building materials for the bottom of a structure, it is necessary to select one whose thickness is at least 2.5 centimeters. Moisture-resistant plywood is best suited. It is characterized by high wear resistance, is not subject to destruction under the influence of dampness and has a long service life.
- When the walls of the cage are made of rods, a distance must be maintained between two adjacent rods that will not prevent the chicks from gaining access to food.
- The manufacture of feeders requires special attention. To create them, thin sheet metal should be used. It is elastic, not subject to corrosion and is lightweight. It is necessary to ensure that food does not fall out of the feeder.
- Having clean and fresh water is extremely important for chickens.
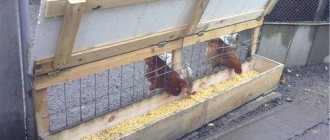
In order to ensure the most complete use of the entire premises, chicken cages are made in 2-5 tiers. Such structures are called batteries. Shelves with cages for breeding meat chickens are erected in several rows. In this option, the owner will, without much effort, take into account the features of his available usable space and make the most of all the advantages.
It is possible to deploy several similar racks in one room - you just need to provide the birds with good light (install lighting fixtures) and maintain the temperature regime appropriate for the growth of broilers using a heater. The structure of a stationary poultry house will directly depend on the drinkers and feeders with which the cages will be equipped in the future. They can be either mounted or installed inside cages. Basic requirements for these devices:
- comfort of use;
- their reach for both the owner and the birds.
Video
This video will tell you how to build a broiler cage yourself.
As you have already seen, raising broiler chickens is not at all difficult if you can properly organize the room where the birds will be kept. The most important condition for their active growth is the correct cage, in which the necessary temperature and lighting will be maintained. Its dimensions should allow for close contact with other birds, and the design should provide free access to food and water. The composition of feed for rabbits is presented at the link.
Zootechnical standards
Breeding broilers at home in cages is carried out in strict accordance with established standards. Only their observance will allow the birds to grow healthy and weighty.
In general, the technology for raising broilers includes the following nuances:
Day-old chicks are placed only in a warm room. It is advisable that on the first day after hatching the room temperature is within +32+34 degrees
Subsequently, this indicator begins to decrease (0.2 degrees per day), and by the end of the first week the temperature in the barn should not exceed +16+18 degrees. Air humidity also plays an important role, since the health of chickens and the rate of weight gain directly depends on it. It is important that the humidity in the room for chickens and adults does not exceed 50-70%. Attention should also be paid to the feeders, or more precisely, their number. If you use trough models, one container will be enough for two individuals. When using large round feeders, one instance will be enough for 40-70 animals. Young chickens are watered from vacuum drinkers (1 drinker per 50 birds), and for adult chickens it is better to install nipple models
One such drinker will be enough to provide water for 10-20 animals.
There are enough ready-made drawings of broiler cages on the Internet with different heights, widths and capacities. Knowing the size of the room in which the birds will live and the approximate number of birds, you can easily make such cages yourself. More detailed installation instructions can be found in the sections below.
Dimensions and room
The cage manufacturing technology itself is simple, but when making cages for broilers, you need to take into account the dimensions of the bird itself and the size of the room in which the livestock will be located (Figure 2).
On private farmsteads, it is enough to simply arrange the cages in the barn. But, if you are planning to raise broilers on an industrial scale, the cages are placed in several tiers and each contains 10-20 birds.
Figure 2. Ready-made drawings of cells with dimensions for making them yourself
The room for installing the cages must also meet certain requirements. Firstly, it must be dry and draft-free. Secondly, it must be warm enough inside, so you need to leave free space for installing heating equipment. In summer, the cages can be taken outside and placed under a light canopy, and at night or when the temperature drops, they can be moved back indoors. With this growing scheme, fresh air and natural sunlight significantly accelerate weight gain.
Lighting and air temperature
Raising large and healthy broilers in closed cages also requires compliance with a certain temperature and light regime. For example, young chickens in the first three weeks of life need lighting around the clock. As the birds grow older, the light is first turned off for 30 minutes, then for an hour, and the duration of lighting continues to be reduced until it reaches the optimal 16 hours (Figure 3).
In addition, as birds grow, the intensity of light changes. Up to ten days of age, the indicator should be 4 W, up to twenty days - 2 W, and after that - only 1 W.
Figure 3. Birds need proper lighting to gain weight.
Temperature is another extremely important indicator when raising broilers for meat. In order for you to be able to maintain a suitable microclimate in your room all year round, you will need to install not only heating devices, but also provide high-quality ventilation. It will help regulate temperature and humidity.
The fact is that in extreme heat, birds begin to drink more and often refuse food, which leads to a decrease in their weight. If the room is too cold, the opposite situation occurs: birds eat much more, but weight gain does not occur, since the birds spend all their useful substances to maintain body temperature. Taking into account this feature, the room where caged batteries or trays with cages are located needs to be kept warm all year round.
In addition, it is advisable to place chickens on the upper tiers of cages, regardless of their number. Warm air usually accumulates at the top and the young animals will feel much more comfortable there than at the bottom.
How to make your own chicken cage
You should start by preparing a drawing on which to write down the dimensions of all parts. You can use ready-made drawings or make your own with individual dimensions.
Examples of drawings:
The optimal size of a stationary cage: length - 1.5 m, height - 0.4 m, depth - 0.5 m. Mobile structures are reduced by 2-3 times.
Required tools and materials
To make a home for chickens, you will need to stock up on the following materials and tools:
- wooden blocks with a cross section of 20×30 mm;
- metal mesh with cells with a cross-section of 20×12 mm, rods 2 mm thick;
- metal corners;
- boards 2–3 cm thick;
- plywood sheets;
- door hinges;
- glass, plexiglass, polycarbonate for making doors;
- self-tapping screws;
- saw;
- screwdriver or screwdriver;
- roulette;
- pencil.
Step-by-step instruction
Let's look at the stages of building metal and wooden cages.
Metal construction
In a metal structure, the walls, floor and ceiling are made of lattice.
Step-by-step manufacturing instructions are as follows:
- Assemble the cage frame from beams.
- Assemble the roof frame from slats or beams.
- Cut the mesh to the required size for cladding the walls and roof.
- Attach the mesh to the frame.
- Make a roof by securing the mesh to the frame.
- Attach carrying handles to the frame.
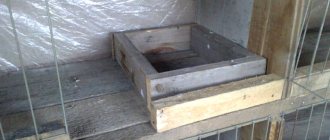
- Equip the cage with a retractable tray.
Wooden structure
Wooden structures are easier to make. In addition, the materials for its construction will be cheaper.
To make it you will need:
- Make a frame from beams, fastening them with metal corners. 10–15 cm should be added to the height of the structure, which will later go under the legs.
- Cut the side and back walls to the required dimensions from plywood sheets.
- Attach them to the frame.
- Attach the front wall in the form of a mesh.
- Secure the mesh floor underneath.
- Make a frame for the door.
- Insert glass or polycarbonate into it.
- Attach door hinges.
- Install the door.
- Attach a latch.
- Make a removable roof.
- Make a stand for the cage out of wood, 40 cm high.
- Make a retractable tray from a plywood or tin sheet that is attached to the stand.
Equipment for home breeding
In the workshops of poultry farms and large industries, batteries made of cages with chickens are located in 4-6 tiers. In the private sector, 2-3 tiers are quite enough. Cages or equipment for keeping broilers in them can be purchased industrially or made with your own hands if you have the necessary materials.
Cell structure:
- First of all, a frame made of wooden or metal guides.
- The main material of the walls and floor is mesh. This is an inexpensive and durable material that will provide the necessary ventilation and light penetration.
- The bottom is made of fine mesh to prevent injury to the chickens. But the size of the cells is sufficient so that the droppings fall on the underlying tray and do not accumulate on the floor.
- The front wall is in the form of a longitudinal lattice or mesh with wide cells, through which the chicken can stick its head and normally reach the feeder.
- A trough feeder is hung on the front wall of the cages for hand feeding.
- With mechanized, automatic feeding, in the center of the cage there is a feeder in the form of an inverted glass on a plate, the so-called “carousel” or “umbrella”.
- There is a trough or additional trays above the feeder for chicks up to 20 days old to make it easier for them to reach food.
- It is recommended to make the side and transverse partitions mesh for better ventilation.
- Drinking troughs or vacuum, nipple type are hung on the transverse partitions. For chickens under 10 days old, only vacuum ones so that the young ones do not splash water.
- Door on the front wall for catching and landing birds. For meat, inspection, initial settlement.
- The trays at the bottom should slide out easily to remove droppings.
- Large poultry farms use a mechanized belt manure removal system.
IMPORTANT: It is more advisable to place the smallest chickens on the top tier of cages, and the largest ones at the bottom. This way you will provide your kids with maximum light and warmth. In addition, birds of the same age get along with each other more easily
In addition, birds of the same age get along more easily with each other.
Recommended feeding, heat and lighting standards:
- chickens 0-5 days old need lighting for 23 hours, a temperature of 34 degrees and 15-20g of feed per day;
- at the age of 6-18 days, lighting is 20 hours, temperature is 28 degrees, food is from 25 to 80 g per day;
- fattening begins from 19 days, lighting 18 hours, temperature 25 degrees, feed 100-150 g/day;
- closer to slaughter from the 38th week, lighting is 16-17 hours, the temperature is approaching 20 degrees, feed is given 160-170 g/day.
Cages for a private home
In order to keep broilers in cages at home correctly, you need to prepare in advance. First of all, select a room, purchase the necessary equipment and purchase cages. You can build them yourself or buy a ready-made industrial version. You can use any room, for example, a barn. In summer, raising broilers in cages is possible outside.
You need to remember about the temperature regime. Overheating will adversely affect the health of the bird.
Equipment includes:
lamps for lighting, since chickens need high-quality constant light for proper development; special heating elements, since chickens need high air temperature - starting from 36 degrees, which gradually decreases to 18 degrees as they grow older; ventilation mechanisms necessary for the comfortable and healthy development of the bird. feeders and drinkers.
Raising broilers at home in cages involves purchasing or making a cage yourself. You can buy it by choosing from a variety of factory-produced models. In this option, all that remains is to choose the size and equipment of the cage. Many manufacturers sell cages with built-in mechanisms for supplying food and water, as well as automatic cleaning of the litter tray.
To make a cage with your own hands, it is advisable to first watch the video of broilers in cages at home. There are different cell options available. It will be easier to navigate the types - from which materials it is easier to make them and more convenient to use.
First, a frame is built. It can be made of either timber or a metal profile. Next, a grid for the walls and floor is attached to it. The walls can also be made of plywood, but if you install a grille, the ventilation will be much better. The bottom of the cages requires a fine mesh cage to avoid injury to the chicks. Some manufacturers install plastic pallets along with the mesh. Galvanized sheets are prepared and installed under the floor of the cage. It is advisable to make them removable for ease of handling and cleaning up litter.
When broilers are raised in cages, zootechnical standards must be followed:
On average per 1 sq. m. there should be an average of 23 heads, while the weight at the finish line should not exceed 40 kg. When gutter feeding, about 2.5 cm should be allocated per 1 chicken. When feeding from a round container, on average, there should be 50 individuals. When using a vacuum drinker, which is carried out in the first days, you need to maintain a ratio of 50 chickens per 1 drinker. Further, with the grooved version, it is enough to allocate 2 cm on the head. Compliance with temperature standards. When the chickens are still small, the temperature is maintained at about 36 degrees. Afterwards, decrease by 0.2 degrees daily. Thus, at week 7 the temperature should reach 17-18 degrees. At this level, adults should be kept in the future. You need to pay attention to humidity
It should be about 60%. The bird’s well-being, its respiratory system and its sense of temperature depend on the correct setting of the humidity. It is important to follow the light regime. If almost 24-hour lighting is needed for small chicks, that is, 23 hours a day should be illuminated with high-quality light
As they grow older, on day 7, you need to switch to the day/night mode. The photoperiod will be about 17-19 hours.
It will take about 70 days to raise broilers at home in cages. After this, the chicken begins to gain weight more slowly and consume more feed. Accordingly, it makes no sense to grow it further. But even at this age, the weight of the broiler will be about 2.5 kg.
Useful tips for arranging a chicken coop
How to make your own feeder for broiler chickens
We will need a large diameter polyvinyl chloride pipe. Prepare a tee, plugs and your tool with which you will cut the pipe. First, we cut it into pieces: 70, 20, 10 cm. We put a plug on a 20-centimeter piece, which will become the lower end of our feeder.
Chicken feeder
We put the tee on the top with its side. We insert the longest pipe and close it with a plug. We insert a 10-centimeter section into the remaining part of the tee. We attach the made device to the cage with the bird and pour food into it.
How to make drinking bowls for broiler chickens yourself
It is not at all necessary to buy store-bought drinking bowls. Let's try to make a nipple on our own in a few minutes. We will need: a plug, a plastic pipe - 1 m, a nipple.
First of all, we will drill small holes in the pipe at intervals of up to 25 cm. As a result, you should get at least 4 drinkers. We make a thread in the pipe by screwing a thread-cutting tool into it. We connect the two parts of the pipe. We place a prepared plug on one end to prevent water from draining. On the other we place a knee at an angle of 90°. The reservoir will be a small piece of pipe, which we will connect to the unoccupied end of the elbow.
Broiler drinker
We wrap the nipple well with a sealant and screw it in to the edge. This completes the creation of the drinking bowl. All that remains is to test the structure for possible water leaks and seal them.
Ready-made or homemade
If you make your own, the sizes of cages for broilers can be made different. At the same time, spend a minimum of money. Store models also have many advantages.
Features of finished products from stores in Moscow and other regions:
- no need to spend a lot of time on assembly;
- there are built-in heating and lighting systems;
- The model is equipped with automated systems for supplying water and food.
If the heating system or other elements are installed incorrectly in a homemade structure, the cage will fail over time. And it will become unsuitable for housing broiler chickens.
Step-by-step guidelines for building a broiler battery cage
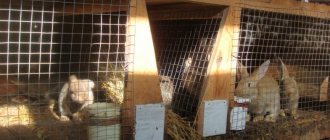
So, now that you have stocked up on all the necessary materials and taken out a bag of tools, let’s start making the most popular cage structure for keeping broilers - the “battery”. This multi-apartment bird housing may look different, but the principle of each option is the same as the others. In fact, these are multi-tiered rows of identical container cages made of wood, iron and mesh, with common walls.
Bird houses can be placed in any enclosed space
Let's take a step-by-step look at the instructions.
Step 1
As you noticed, in the list of required materials it was proposed to choose one of the following two materials:
- metallic profile;
- wooden beam.
The frame of the structure will be assembled from metal or wood according to your wishes. So, from the material you have chosen, you need to cut out six identical parts 170 centimeters long.
The frame is assembled from timber, as well as a metal profile
Step 2
Place 3 parts on top of each other so that there is a distance of 70 centimeters between them on each side. Secure them together on the sides and in the middle with three slats made of the same material as the main parts. If it is a profile, weld it, if it is wood, hammer it in with nails or screw in thick screws.
Install the vertical parts so that they are the same distance from each other
Step 3
Let's take care of the walls. They can be made from plywood or directly from metal mesh. Decide on the material and secure it on the right and left walls of the future structure, on the inside of the slats, as well as in the middle, on both sides of the slats.
Cell walls can be made of plywood or metal welded mesh
Step 4
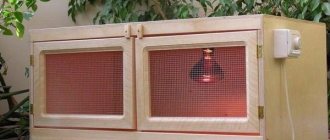
After the side walls we proceed to the front ones. They are made from meshes, regardless of what material you chose for your previous work. This is necessary to:
- the cage was freely ventilated;
- the birds received enough light and warmth;
- to easily install feeders and drinkers.
The front wall is made to open to allow birds to be seated and boarded
This part of the cage should open on one side so that you can take out or add a new animal. Place it on the hinges and attach it to the main body.
Step 5
We arrange the floors. They are also made from a fairly thick welded metal mesh, with cells of such a size that chicken feet do not fall into them. Weld the mesh to metal slats or fasten it to wooden ones so that six niches are formed for broilers, three on each side.
The floors inside the cages are also made of mesh.
Step 6
Secure pallets under each mesh. You can make them yourself, from sheets of metal, or you can buy ready-made ones from plastic. The main thing to consider is that each cell needs its own tray for collecting feces.
You can buy plastic pallets for cages, or you can make them yourself from metal sheets
Step 7
We attach feeders and drinkers to the outside of the cage doors. The feeders are placed along the lower edge of each cell on brackets made of galvanized sheet metal. The drinking bowls are hung approximately in the middle of the door. They can be made of metal or plastic pipes cut into two halves.
Improvised feeders and drinking bowls can be made from plastic pipes cut into two halves
Step 8
The roof for the top of the cage will be a sheet of plywood screwed to the main body. Some farmers prefer to make the cages entirely metal and also install welded metal gratings as a roof.
The roof of bird cages can be made of mesh or plywood.
So, we have a battery cage for keeping broilers, which takes up very little space. Easy to use and easy to maintain, it is perfect for novice poultry keepers.
Typical design for broiler poultry
To make a medium sized broiler cage, you will need:
- welded grating;
- plywood sheet;
- sheet of iron;
- metal profile or wooden beam;
- screws, nails, self-tapping screws;
- a set of carpentry tools (minimum - hammer and hacksaw).
Start by drawing up a drawing and work plan. This is easy to do even without special skills. Draw an image of one cell indicating the exact dimensions. The average-sized structure has the following dimensions:
- height - 350-470 mm;
- width - 700 mm;
- depth - 700 mm;
- the distance between the bars of the wall grid is about 25-50 mm;
- the distance between the rods of the floor grid is 12-25 mm;
- height above the floor (for the lower tier cage) - at least 275 mm.
Knowing the dimensions of one enclosure, calculate the dimensions of the entire battery and the amount of consumables for it. The rack consists of paired vertical “floors”. Under each tier with birds there is a tier with a dung tray. The total dimensions must fit into the area of the poultry keeping room. Consider increasing the depth of the future rack due to feeders and drinkers.
The cage frame is assembled from a profile or wood. The first option is more durable, but more expensive. In both cases, the material will perform a supporting function, so it must have sufficient thickness and strength. It is recommended to use timber with a cross-sectional area of 50×50 mm (vertical posts) and 50×25 mm (horizontal posts), as well as a profile of comparable size. It is advisable to coat metal racks with an anti-corrosion solution. The wood must be cleaned of chips and impregnated with paint and varnish.
Cages for broilers - what are their features and what you need to know
It is immediately necessary to emphasize that the cellular content of laying hens and broilers is very different. The first ones need a lot of space, shade, a comfortable perch for laying eggs, and an absolute absence of drafts. Others need to do the opposite - provide the brightest possible place, a ventilated cage, and limit the space to a minimum. When keeping broilers, the main task is to increase their body weight as much as possible in the shortest possible time. Otherwise, you can incur losses when purchasing extra feed and lose a lot of time waiting for the bird to grow up.
The stocking density of broilers is 2-3 times higher than in the case of laying hens. That is, per 1 square meter in a cage in winter there can be 3-4 or even 5 adult individuals. Thus, it is necessary to significantly strengthen the structure. To do this, you can use wooden boards knocked down into one plane as the floor. The thickness is at least 20 mm, and it is also necessary to make diagonal reinforcement from the bottom of the floor so that they evenly sag under the weight of the bird. Since the weight of a broiler often reaches 3.5-5 kg, it is necessary to count on 20-25 kg of load on the surface. The walls of the cage can be made with a large cell, up to 70x70 mm, if the bird is already large. The main thing is that she doesn’t run away. Savings in the manufacture of such walls will be up to 60% compared to the cages described above. You shouldn’t fool yourself with the roof either. You can put an ordinary metal sheet, stretch a plastic mesh, attach slate, a wooden shield - anything, as long as it is not thrown off upon impact. For reliability, you can fasten it with wire or simply place a cinder block on top.
Benefits of Cage Content
Cellular content has the following advantages:
- space saving - housing broilers will require less space than if kept on the floor;
- reducing costs for heating, lighting, ventilation;
- rational consumption of feed - chickens do not scatter it, as happens when kept in a chicken coop;
- accelerated weight gain – a decrease in physical activity leads to rapid weight gain;
- improvement of the veterinary situation - birds do not have contact with the entire population, but only with their cage neighbors, which reduces the rate of spread of infections and respiratory diseases;
- the ability to quickly stop the source of infection;
- ease of cleaning - droppings are removed from pallets daily, there is no risk that chickens will eat it or breathe ammonia fumes;
- simplification of livestock care, disinfection of cages and the entire premises.
With cage housing, the duration of fattening is reduced by an average of 5 days.
Numbers and calculations
Prepare wooden and metal structures for the frame. Keep in mind that the length of the racks should be more than 195 cm. The distance from the ground to the first tier is from 35 cm to 75 cm. The width of the frame is up to 2 m. The distance between the first and second row of cells should not exceed 6 cm. It is good if the slats will be 3.5-4 cm.
In the first picture you can see that the mesh front wall is divided into several sections, but in the last picture it appears as one solid structure. Both options are good in their own way. It all depends on the convenience and personal preferences of each person. However, a wall without disconnecting parts will be easier to install. It does not require the installation of separate wooden frames and other parts. There will be no hassle with it during the construction process. But, during operation, it is more convenient to open several doors at once, so as not to stick your hand far into the cage if you need to get a specific bird.
Modifications and additional equipment
To make full use of all available space, broiler cages are made with 2-5 floors. Such structures are called batteries.
Racks with cages for keeping chickens are lined up in several rows - as much as the room can allow and as far as there are enough materials to create them. In this case, the breeder can easily take into account the subtleties of the space he has and make the most of all its advantages.
You can place up to several such racks in one room - you just need to provide the birds with good lighting (install lamps) and maintain the temperature necessary for the growth of chickens by using a heater.
The design of a stationary poultry house will directly depend on the feeders and drinkers with which the cages will be equipped in the future. They can be either mounted or installed inside cells. The main requirements for these devices:
- ease of use;
- their accessibility for both the owner and the birds.
Disadvantages of cellular housing
The main disadvantages of this type of content:
- costs of purchasing finished cells or material for their manufacture;
- the need for daily cleaning, during which droppings are removed from pallets;
- increased risk of pecking among birds due to overcrowding;
- possible problems with the legs (they develop due to muscle atrophy against the background of low mobility and heavy weight);
- deterioration in the quality of the carcass due to the appearance of marks on the breast (this problem is common when kept in cages);
- lower taste qualities of meat and eggs than when kept outdoors;
- the need for complete disinfection of cages after slaughter of poultry.
Drawings of successful options
For chickens, homemade enclosures are made in the form of a battery or an ordinary common cage. To make a battery cage, follow these instructions:
- For the frame, 6 pieces of material 170 cm long are cut out. Metal or wood is used.
- The three parts are placed opposite each other, fastened with perpendicular slats using self-tapping screws or nails.
- Next, the resulting frame is covered with metal lattice or plywood. You can sew up 2 sides with plywood and 2 with mesh.
- The side walls are made with mesh to ensure good aeration. Feeders and drinking bowls are also installed in this place.
- A door is made in the front of the mesh through which new individuals are introduced.
- A fine metal mesh is installed for the floor. It should be so shallow that the chickens’ feet do not fall through.
- Fastening is done using self-tapping screws or nails.
- A plastic tray is attached to the bottom of each floor so that it can be removed. It is designed to remove waste.
- Feeders and drinkers are attached to the outer wall.
- The roof is made of plywood or metal. In hot weather, the metal gets hot, so it is recommended to use plywood.
Important! The holes in the outer wall should be large so that the head and neck of the chicken can easily reach food and water.
Necessary materials
To build a broiler cage, you must use the following materials:
- Durable plywood sheets. They are necessary to make the floor and walls for the cage. Using plywood, you can make an excellent cage battery for broilers of various ages. This kind of design is ideal for raising meat breed chicks.
- Metal parts. From these it will be necessary to obtain the main supporting structures of the cell. Since a bird house with small dimensions must withstand significant weight, it is worth making them quite strong.
- Wooden slats. They are necessary for corners and horizontal strips.
- High strength metal mesh. Its choice should take into account the need to withstand the weight of the birds. Using the mesh, you can make the walls of the structure and the roof.
For fastening it is necessary to use self-tapping screws or self-tapping screws.