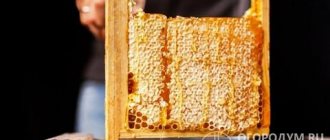
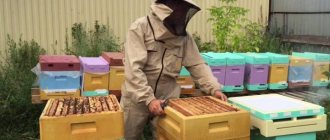
Beekeepers use evidence of several designs. When choosing a house, attention is paid to functionality, the possibility of further expansion, as well as the internal structure. The design of the beehive bed resembles a horizontal box with a sliding or hinged lid. Inside there are various compartments for keeping bees, four entrances, as well as a store for trays.
Appearance
Novice beekeepers do not always know which hives are used most often today.
There are several options for bee houses, one of which is a hive structure, somewhat reminiscent of a chest with a hinged or removable lid. It is called a lounger and is used not only by beginners, but also by experienced beekeepers. Comprises:
- The lower part, which is made blind;
- Folding lid;
- Separate sections in which you can place 2 bee nests in fairly comfortable conditions;
- 2 sets of tap holes, which are located at the top and bottom.
Advantages and disadvantages
If we consider the advantages of this design, we can highlight the following positive characteristics:
- It will be quite convenient for the beekeeper to work, since they can simply be moved by sliding them to the side. This makes it convenient to inspect the product inside;
- All elements are intuitively located, so it is easier to maintain;
- Large size allows you to accommodate 2 families;
- In addition, due to the increased internal space, you can easily acquire new brood;
- There is always the possibility of increasing the dimensions;
- It has been experimentally established that the amount of honey that bees are able to store in such a house will be greater than in other variations;
- When moving the apiary to another place in the spring, it is easy to move and put into transport. After all, such houses are easily installed one on top of the other, which allows you to significantly save space;
- Due to the fact that two families can be accommodated in such a bee hive, wintering is more comfortable - after all, they will warm each other;
- Frames are easily added to evidence without unnecessary disturbance to insects.
But, despite the many positive aspects, there are still some disadvantages to the beehive:
- Although this arrangement is lightweight, its footprint is larger than other types.
- The reduced air cushion that must be present can create some problems for the bee colony during wintering.
- Working with bees here will require taking into account certain design aspects. So, due to the fact that there is nowhere to install an additional extension here, with a large bribe you will have to collect honey earlier.
- When breeding bees, it should be taken into account that they are more prone to swarming. Therefore, it will be necessary to apply a set of special measures to eliminate this phenomenon.
Hive materials
The bee is a finicky insect. And as long as he doesn’t have a place to live. Therefore, hives are made from natural material – wood.
It has low thermal conductivity, as a result of which it keeps warm on cold days and cool on hot days. The tree “breathes”. It is well processed and durable.
- Modern building materials like chipboard are completely unsuitable for construction.
- Attractive monolithic slabs contain toxic volatile substances that make our bees so sick that they can be lost forever.
- However, polyurethane foam materials have appeared that have their fans. The industry has adopted them and produces lightweight, heat-retaining hives. This is a significant relief to the beekeeper's work.
There is still a drawback - these models require careful handling, since even a small impact can lead to loss of performance properties due to various deformations.
Content Features
It is necessary to take into account the features of keeping bees in such hives:
- The nest must be insulated in winter. This is especially true when houses are left under the snow.
- It will be better for the health of the insects if the owner leaves them a sufficient amount of beebread and honey for the winter.
- For a novice beekeeper, it is important to monitor carefully enough to ensure that bees do not swarm - measures against this must be taken in a timely manner.
- When active egg laying begins, additional light brown combs should be installed in the hive.
- Rearrange the sealed brood and the nest with the queen in the following sequence - the queen is closer to the entrance, the sealed brood deeper. There should be a sufficient number of gratings between them. This will increase your honey supply.
- In order for insects to enter the spring in a healthy state, they should be left with at least 20 kg of honey for the winter.
- Consider wintering methods in which a very tight frame should be placed between two families in one house. Keeping bees in beds in the amount of 2 families must be accompanied by this partition. Otherwise, in the spring there will be not two families, but one with one queen.
- Around mid-summer, replace the queen with a young individual. And in the late summer season, make sure that the family is enlarged.
Beekeeper's calendar
Some beekeeping experts argue that for the productive operation of this type of hive, in particular in the Vladimir version, only six types of work during the honey season are enough.
They are carried out in the following sequence:
- Between April 5 and April 20, adjusted for actual weather, clean the hive of excess frames and add foundation.
- The first days of May - the division of bees in each hive into two layers by separating them with a partition.
- Between May 10 and 20, leave one queen frame and one feed frame in the layerings where the queen cells were laid. Move the rest to other hives.
- Approximately May 25 - put up partitions in colonies where there were old queens, leave two frames with brood, one for food and about eight with foundation. Remove the rest behind the partition and open the entrance. In the evening of the same day, remove the partitions between the branches and the family, add about 10 frames with wax and drying.
- Beginning of July - remove all partitions between families, put as many frames with drying material and wax into the hive as its capacity allows. In the place where it is planned to form a club for the winter, the entrance is left open.
- End of September - simultaneously with pumping out honey, fence off the winter club on one side of the hive with a partition, and leave empty space on the other.
It is believed that due to minimal human intervention acting as an irritant, bees get sick less often, are more productive in terms of honey production and tolerate winter cold better. And the resulting honey has maximum healing properties and, in general, its characteristics are closest to the product from wild bees.
This method of producing honey in beekeeping is known as the baffle method .
Varieties
The main features and structure of the hive are that they are quite reliable, durable and easy to use. An essential characteristic is the horizontal option for expanding the socket. Moreover, this can be done in two directions at once.
It is also important to note that standard Dadan high products are used here. The overall dimensions of the frames are 30 cm in height and almost 44 cm in length. The frame device can be classified according to the number of installed elements.
16 frames
If 16 elements are arranged, it will be possible to place only one swarm in the house.
20 frames
When choosing which hive is better, a bed or another arrangement, you need to rely on the main characteristics of each of them, and what you want to get as a result.
If we consider the option of a house with 20 elements, it is worth noting that it is the most widespread. Most often, 2 compartments are used here, in which different families are located, or they can be placed separately in one of the parts of the bee nest.
A hive with 20 frames is a good design for novice beekeepers and, moreover, its moderate overall dimensions will facilitate the process of moving when leaving the apiary.
24 frames
Beekeeping with 24 elements allows for the full development of each family. The dimensions of the sun lounger for 24 frames according to GOST are:
- Height 635 mm.
- The length is 870 mm in the main part of the body and 935 mm in the enlarged part of the lid.
- Depth 560 mm.
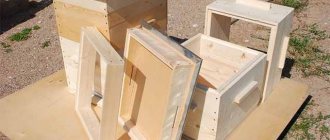
What does a hive-bed consist of?
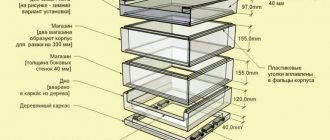
So, the design of the hive includes such elements as the bottom, body, extension boards, and roof. By the way, extension boards are necessary in order to limit insects from the insulation , and cover the entire internal volume of the house above the frames. It is imperative to make ventilation holes in two planks and fill them with a mesh (see examples of drawings below).
Bottom of the hive-lounger
Types by Methods
In addition to the number of frames, there is another classification of beehives. It is carried out depending on the shape of the main part of the house.
Kenyan
The main specificity of the Kenyan type of hive is the trapezoidal shape of the body. Sometimes it is also called African. A distinctive feature is its lighter weight.
Vladimirsky
The Vladimir hive is characterized by increased overall dimensions. It is most often used in central Russia. The number of hive inserts used in this case is 32 pieces. The benefits are:
- Ease of care.
- Easy access.
- Families can be formed by layering through a special partition.
But among the disadvantages are the rather large overall dimensions and heaviness.
Ukrainian
The main feature of the Ukrainian lounger is its increased height. It is also worth noting that there are two entrances on the front wall - and this allows you to comfortably raise two bee colonies under one roof.
The Ukrainian beehive lounger is designed for a high frame. This is its distinctive feature from the standard variation. Speaking about the overall dimensions in this case, it is worth noting that the width in this case is 300 mm, while the height reaches 440 mm.
Keep in mind that the unique design of the lounger with a narrow, high frame requires a special method of transportation. To ensure that the internal rows do not move, when leaving, the frame diagram inside is fixed with special strips.
The uniqueness of this design
The traditional version is a bit like a long box with a solid bottom, two compartments where the insects themselves are kept, and two upper and lower entrances in the body. Looking at these dimensions, we see that it turns out to be a large structure.
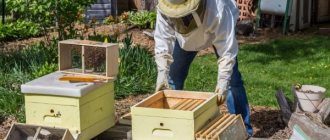
But why do many novice beekeepers like working with a hive? Making a beehive with your own hands is very simple. Working with this design is many times more comfortable and easier. Classic hives are heavy and more difficult to move to different places. Today, beekeepers most often use Dadan frames. There are different numbers of these frames in the building.
If we take the standard type, then there are 20 and 24 frames, non-standard ones with 14, 18 and 32 sections. The most popular types include a drawing of a hive-bed with 16 frames. In addition to Dadan's frames, Rutov's frames and many others are also used. A hive-lounger is a structure that is wider than it is tall. Keeping your swarm in such small houses is much easier and more profitable.
Manufacturing
If for some reason it is not possible to purchase a finished product, you can make it with your own hands according to the specified drawings and dimensions. To do this, you will have to prepare the appropriate components and tools.
Materials and tools
In order to make evidence for bees with your own hands, you need to prepare:
- Boards in the appropriate quantity, but keep in mind that their thickness must be at least 4 cm.
- Hammer.
- Nails for fastening, although you can also use self-tapping screws.
- Planer to achieve the desired smoothness.
- Wooden tongues.
- Electric drill.
- Otbornik and stuntgebel.
- Drying oil and varnishes, possibly paint.
- Various handles and hinges for attaching the hinged lid.
- Pencil for marking while cutting.
- Flexible meter.
- Square.
- Saw.
All this must be prepared in advance so that the production meets all requirements. Also remember that it is high-quality materials that allow you to make the best beehive bed with your own hands for 24, 20 or 16 elements.
Preparation
Before purchasing materials, determine the design that seems optimal for use. It could be a Ukrainian hive or a Vladimir hive. But, since their overall dimensions are different, it is first necessary to calculate the required amount of lumber so as not to spend extra money on purchasing unnecessary boards.
Drawings and dimensions
Drawings of a sun lounger with 24, 20 and 16 elements will help with this. For a design with 24 insert elements, the overall dimensions were given above.
As for the house for 20 pieces, its main parameters are:
- Height is about 440 mm excluding the cover.
- Length 870 mm.
- Depth 635 mm.
Also take into account all other dimensions, in addition to the overall dimensions, which are presented in the drawings.
Assembly
Initially, study the drawings of a Ukrainian hive or another type of hive, and then do:
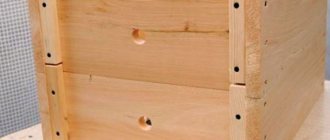
- Then, when working with them, cut out the dimensions of the boards, having previously marked them.
- Then assemble the box according to the existing diagram. Carefully ensure that there are no gaps between the joints of the boards. Otherwise, beekeeping in such hives will result in the freezing of the colony in the winter.
- Next, make markings along the inner surface.
- Nail the folds for attaching the frames in the future.
- Nail the landing board in the area of the lower gap along the front wall.
- It is necessary to install a 10 mm thick board to the upper rebate system.
- Only after this will it be possible to measure the width and length of the resulting body and make a lid using the obtained parameters. This way it will fit tightly to the base structure.
- Make special ventilation holes on the sides of the structure.
- Attach the mesh along the lower tap hole so that it can subsequently be moved and the resulting hole can be controlled.
- The central part of the body requires making 2 holes - if you plan to accommodate two families.
- For ease of transportation, it is necessary to provide for the installation of handles.
- A special base is made along the lower part of the body, on which the house will be placed.
Step-by-step instructions for assembling a hive-bed for 24 frames
Step 1 . First of all, cut and prepare a couple of bars for the bottom.
Step 2 . Sew 4 boards into a quarter, having previously removed the side chamfers (38x140x935 mm) in accordance with the drawing. Then attach a couple of bars to the shield, stepping back 5 cm from the edges (the structure will rest on them).
Step 3 . Assemble the side walls of the lounger in accordance with the presented drawing.
Step 4 . Also assemble the front and back walls. Do not forget to chamfer 19x19 in the longitudinal upper part of both walls under the ceiling planks and frames. Also cut 4 tap holes in the front shield.
Step 5 . Proceed to assembling the case . Tightly connect the walls to the bottom. Cut the ceiling boards to 10mm thickness.
Step 6 . To assemble the magazine attachment, you will need the back and front walls. Bevel 19x10 in the longitudinal upper part of the boards under the hangers of the half-frames , also select quarters in the transverse ones to connect to the side walls.
Step 7 . Using self-tapping screws and PVA glue, connect one quarter of the housing wall.
Step 8 . To make a roof that will fit on the body of a sun lounger or store, you will need strapping bars. Attach the strapping to the end/side walls of the roof (A and B, respectively).
Step 9 . Often the rear wall of the roof is narrower, and the front wall is wider. Thanks to this, the roof will be pitched.
Step 10 . If it is single-pitch, make a 35-degree cut in the side walls. Also, take care of the ventilation system in advance - make several 5x140 mm slots.
Step 11 . Next, connect the end and side parts of the roof. Now make a shield for it (22x660x1140 mm), joining 22x140x1140 boards into quarters, and then connect it to the roof body.
Step 12 . Proceed with the construction of the landing boards, which will be located under the entrances.
The drawing shows only approximate data
Step 13 . At the last stage, equip the hive with handles for carrying, treat it with drying oil and paint the outside with oil paint. Set the aperture and frames.
Expert opinion
Ponomarev Sergey Stepanovich
Beekeeper with 30 years of experience, Candidate of Technical Sciences
It is worth knowing that the design features of the hive may vary in detail, as mentioned earlier. For example, sometimes beekeepers make 2 diaphragm partitions, use hinges and make a folding roof, which, among other things, is also a wind barrier.
Insulation
Beekeeping in different regions requires different degrees of insulation of the house for these insects. Moreover, this is done both for multi-body structures and for horizontal arrangement and expansion of frames.
Both with one and the other design proceed as follows:
- On top of the main body, boards with a thickness of at least 40 mm are placed. This must be done in such a way that air space is maintained between the two formed walls, that is, a gap is formed.
- When the honey collection process is completed or since the onset of the first cold days and nights, this gap is filled with straw. You can also use sawdust.
- This is how a special pillow is formed, which helps to insulate the evidence.
- But it is necessary to take into account that with the onset of heat, it is necessary to immediately remove this insulation.