Artificial incubation of eggs is an important process when breeding chickens, and for some breeds it is generally the only way to replenish the flock population. The latter applies to broiler chicken breeds. For this purpose, purchased incubators or self-assembled devices are used. Among the factory models, the most popular is the Layer device from a domestic manufacturer, which has become widespread due to its low price and high quality of work. In addition, the device is small in size, which is convenient for small farms. In the article we will look at the features of the device, the pros and cons of this incubator.
Types of incubator
The laying hen incubator is presented in 4 popular models. Each has its own capacity and characteristics.
BI-1 for 36 eggs
It has automatic egg rotation, a drinking bowl for chicks, a digital thermostat, an ovoscope, and instructions included.
BI-1 for 63 eggs
The model has automatic egg turning, an analogue thermoregulation function, and comes with an ovoscope, water trays at the bottom, water drinkers, and instructions for use.
BI-2M for 77 eggs
The device has an automatic egg turning function, a digital thermostat, and an ovoscope. The kit includes drinking bowls for chicks, water containers, and a manual for use.
BI-2 for 104 eggs
The models have an automatic egg turning function, a digital temperature controller, an ovoscope, drinking bowls for chicks, water trays, and a poultry farming manual.
Manufacturer
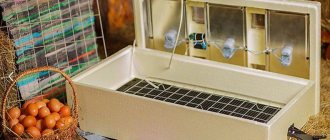
The Nesushka incubator was developed and produced by a domestic manufacturer in Novosibirsk. The device is designed for breeding most types of poultry (chickens, geese, ducks, quails, turkeys and others) without a brood hen. The body is made of high-quality foam, which ensures low weight and thermal insulation. The device has a glass viewing window, as well as a water container at the bottom, evaporators and a thermometer. If necessary, the incubator can work up to 20 hours without connecting to the network, but a backup battery must be purchased separately. Read about incubating turkey eggs in this article.
Depending on the configuration of the device, it comes with a manual, automatic and semi-automatic rotary device. The egg capacity differs; models are available for 63-104 eggs. Each device comes with instructions and a 1-year warranty card.
The laying hen incubator Bi-1 has four subtypes, differing primarily in the capacity of the tray.
The thermometer, depending on the model, can be digital or analog (settings are made manually). Fully automated versions also have a digital display and convenient buttons.
Advantages and disadvantages
Laying hen incubators have their advantages and disadvantages. The benefits include:
- Availability of temperature control functions of analogue and digital types.
- Setting the temperature manually or automatically.
- The foam body ensures lightweight construction.
- Retains heat well.
- The capacity allows you to incubate a large number of eggs from 36 to 104 at the same time.
- Possibility to raise different types of birds.
- Availability of a built-in moisture meter.
- Some models operate when supplied with 12V electricity.
- Acceptable price category.
A number of disadvantages are also noted:
- The fragility of the case due to the material, which is easily damaged.
- Odor accumulation.
conclusions
- The Laying Incubator is assembled by a domestic manufacturer, due to which it has a low price, ease of operation, good characteristics, is easy to use and does not weigh much.
- Depending on the model and configuration, the device is equipped with space for laying (laying) 63-104 eggs, an analogue or digital temperature sensor and a backup battery.
- There is a manual or automatic (automatic) device for turning the embryos, which simplifies the work process and if repairs are required.
- The humidity in the incubator can be adjusted/adjusted (increased or decreased) by adding or decreasing the area of water evaporation in the bottom tray.
- The device has a viewing window and ventilation grilles, thanks to which you can monitor (show) the development of embryos without disturbing the internal microclimate of future chickens.
Also read about whether a rooster is needed in the chicken coop.
Instructions for use
Each device comes with detailed operating instructions. It is almost the same for all models.
Thermoregulation
For normal operation, the incubator is placed in a room with a temperature of 20 – 25°C, but below 15°C. Sudden changes in degrees cause damage to the device. Depending on the model, there are 2 thermoregulation control modes: manual and automatic. The manual device has a display on which the temperature is adjusted daily.
The automatic incubator automatically sets the desired temperature, depending on the incubation period.
Humidity
All models are equipped with a moisture meter. The electronic display displays the humidity value, which allows you to monitor this indicator and, if necessary, carry out ventilation.
Selection and laying of eggs
After mating, the egg clutches are inspected. Select the largest and strongest specimens, with a dense, rough, even shell. Eggs that have been stored for no more than 10 days at a temperature of 10°C are suitable for incubation. From dark breeds of birds, the most brightly colored ones are selected. The bookmark is made according to the instructions:
- Remove the lid from the incubator, remove the grid and AUP.
- Warm boiled water is poured in, the grate is placed and the AUP is placed in place.
- Temperature by checking it with a mercury thermometer.
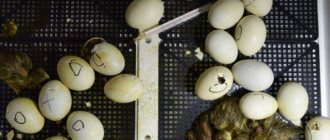
- After selecting the eggs, a mark is made on the shell to make it easier to monitor the turning.
- Place the eggs in the housing, 1 cell per 1 egg.
- A thermometer is placed inside to regulate the temperature.
- Close the lid.
- Connect to the network.
Rules for incubating eggs
During incubation, certain rules must be followed:
- Check the temperature regularly and adjust if necessary.
- When the water dries out, add water through the grate, disconnecting the device from the network.
- 2 days before the chicks hatch, eggs should not be moved or moved.
- Eggs are checked twice during the incubation period using an ovoscope or a bright lamp. On the 7th day and on the 11th – 13th day.
- If there is a power failure, the device is covered with warm clothing and moved to a warm room.
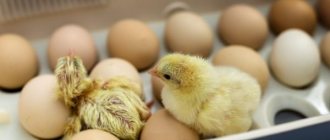
Chicks hatching
After hatching, the chicks are transferred to a room with a temperature of 37°C. To maintain the regime, you can use an electric lamp. If the chickens appeared 1 day earlier, then the temperature is reduced by 0.5°, and if 1 day later, then, on the contrary, it is increased.
Assembly and operation in domestic conditions
After connecting the device to the network for the first time, you need to wait for the microclimate inside to normalize, and only then begin laying the eggs for the first time. Even at this stage, you should check the stability of the voltage, as well as the operation of the temperature sensor, ventilation grilles and set the rotary device mode.
How to lay eggs on a wire rack, flip
Before the procedure, you need to select all the eggs and check for the absence of a dead embryo using an ovoscope. To control the revolution, you can make marks on the shell at this stage. You can only use fresh eggs that have been stored for no more than 10 days at temperatures up to 10°C. After setting up the incubator and connecting it to the network, you need to wait for the indicator to blink. Only then can you start laying the eggs, and after placing them on the grill, you can close the lid and put the device in a dry and warm place.
The average duration of work is 21 days. During this time, you need to control the temperature and humidity, and also monitor the rotation of the grate. The eggs need to be inspected twice with an ovoscope to check the development of the embryos. Even in a fully automated incubator it is impossible to achieve harmonious development of all embryos.
After each cycle, the chamber must be thoroughly washed with soapy water and disinfected. However, you cannot use ultraviolet light - it has a detrimental effect on the structure of polystyrene.
How to adjust: reduce humidity, adjust the mode completely
The level of humidity directly affects the quality and speed of development of chicken chicks. To regulate this parameter, it is necessary to reduce or increase the area of water, based on the table presented above. Some poultry farmers practice additional spraying (irrigation), but such a measure is necessary only for waterfowl.
Fans, thermostats
Each model of the Laying Incubator has a special viewing window for monitoring the development of embryos, as well as ventilation holes for air circulation. If the operating rules and optimal indoor climate are observed, there is no need for artificial ventilation of the device. However, if the temperature inside the device constantly increases or the temperature sensor fails, it is necessary to additionally control the heat level. This can be done using a heating source, a heat gun on low, or a regular household fan.
Scheme of the laying hen incubator.
Layer incubator structure
So, first of all, let’s clarify that the official one is the Novosibirsk Electrical Household Goods Plant, so we will consider its products.
The manufacturer offers several models of this incubator:
- BI-1 Incubator Laying hen for 36 eggs.
- BI-1 Incubator Laying hen for 63 eggs.
- BI-2 Incubator Laying hen for 77 eggs.
- BI-2 Incubator Laying hen for 104 eggs.
All models are equipped with an automatic egg turning device; we will look at it in more detail below; also, all incubators have a polystyrene foam (foam) body.
What is the difference between these models of Nasedka incubators?
As you already understood from the names, first of all, the difference is in the number of eggs that the incubators can hold - 36, 63, 77 and 104 eggs; in fact, you can choose an incubator with the required capacity.
But these are not all the differences; each model is also available in 3 configuration options:
- Option 1 is the simplest, with an analog thermostat.
- Option 2 – also with an analog thermostat, but with a connection unit for a 12V battery.
- Option 3 – with a digital thermostat and the ability to connect to a 12 V battery.
The backup power supply allows you to connect to a 12 V car battery in case of a power outage in the 220 V network. Switching to backup power is carried out automatically; a battery is not included.
If power outages happen frequently, it is better to purchase an incubator equipped with battery backup.
Essentially, before buying an incubator, you need to decide how many eggs you need an incubator for - 36, 63, 77 or 104 eggs, and then choose a configuration option, the simplest with an analog thermostat, the average one, but with a battery connection unit, or a more improved option with digital thermostat and battery connection.
The price of the Layer incubator depends on the configuration and averages 4,000 – 5,000 rubles in online stores.
Incubator User's Guide
When laying eggs for the first time, you should not neglect the recommendations set out in the instructions for the laying hen incubator. First of all, you need to choose a quiet room with a constant room temperature. The incubator needs to be installed on a table or bedside table. There should also be a place for a battery, a container of water and oats. Direct sunlight should not penetrate into the room.
Preparing the device for switching on consists of the following steps:
- inspecting the case for integrity and checking the availability of components according to the instructions;
- the grille is lowered into the body with the smooth side up;
- the coupling unit is inserted;
- the cover is installed;
- The device is plugged in; when the temperature reaches the set point, the indicator will flash;
- Turn off the power to the incubator, connect the 12 V thermostat and wait for the indicator to blink.
Selecting and laying eggs is the most important operation.
Before laying eggs and during incubation, it is necessary to monitor the development of the embryo. Eggs are selected fresh, stored in a cool room, and before laying they are checked for the presence of a fertilized embryo. To control revolutions, it is important to make marks on the shell with a simple soft pencil. They will help determine whether all eggs are changing position. If the process proceeds without deviations, then control through the device will show how the embryo gradually develops.
How to regulate humidity in a laying hen incubator
At the initial stage of incubation of chicken eggs, a humidity of 50 - 55% is required, in the last days of incubation the humidity should be about 80%.
In the Layer incubator, humidity is regulated by the amount of water poured into the cells at the bottom of the body; all cells need to be filled to evenly distribute the moist air in the incubator body.
How to find out what humidity is in the incubator? The digital thermostat is connected to a humidity sensor; to find out the current humidity readings, just press the third button on the thermostat and the display will show the humidity value.
Norms and standards
The level of air humidity in the incubator is an important condition for the proper development of the embryo in the egg. Together with the correct temperature regime, the percentage of water in the air ensures the correct incubation regime
Experts have proven that for each individual stage of incubation the indicator will change.
What humidity should be in the incubator when breeding poultry at home?
Every owner must remember three basic rules:
- at the beginning of the incubation period, humidity should be higher;
- in the middle phase of the term it is reduced;
- In the last few days the temperature has been rising again.
In the first 6 days after the eggs are placed in the incubator, it is important to set the humidity level to an average level. The most optimal indicator is 50-65%
It promotes the development of the embryo in the egg and accelerates its growth process.
But, if you use such humidity in the second half of the incubation period, you can lose the entire brood. Chicks will die both before and after hatching, since their bodies are poorly formed. Constant high air humidity reduces the weight of the egg itself, which limits the supply of necessary substances to the embryo.
Scientists have proven that a constant high level of water in the air during incubation increases chick mortality by 15-20%. Therefore, after the first week, the moisture level is reduced to 50-55%. This regimen is used from 7 to 16 days.
The reduced temperature at the second stage promotes the accumulation of dry substances by the embryo. At elevated rates the process becomes impossible
Therefore, in order for the chick to grow correctly, it is important to give it the opportunity to receive the necessary vitamins and minerals.
From day 17, experts recommend raising the humidity to 70%. This mode promotes the hatching of the chick from the egg. If you leave the previous level, this threatens to compact the shell under the shell. Accordingly, it will be difficult for the bird to get out of the egg; there is a risk of losing about 10-15% of the eggs.
You can often find other opinions. For example, it is widely believed that high humidity is necessary for the entire incubation period. This solution leads to the fact that the moisture from the egg evaporates too quickly at the first stage, increasing the air bubble. As a result, the bird does not receive the necessary substances, as well as space for development.
Low moisture levels are no less dangerous. First of all, this affects the duration of incubation itself, which is significantly delayed. Also, chicks hatch too weak and about 15% of them die in the first days of life.
Therefore, it is important to follow the parameters. Also, minimum and maximum humidity levels have been established, violation of which threatens loss of output:
- lower limit at 43%;
- the upper limit is 82%.
Even an hour of the egg remaining outside these boundaries can cause the death of the embryo.
Setting the temperature in the laying hen incubator
The analog thermostat is adjusted using a knob, you just need to select the required temperature value, it’s extremely simple, but we’ll look at how to set the temperature on a digital thermostat.
When you turn on the incubator to the network, the temperature value inside the incubator is displayed on the digital display of the thermostat; to set the required temperature value, you need to press the first (left) button and hold it for 2 - 3 seconds, after which the display panel will begin to flash, now we have entered the setup mode .
The second and third buttons can increase and decrease the temperature value.
Now press the left or right button several times until the digital value of the desired temperature appears on the display, for example 37.8°C.
Then press the left button, now the value of the egg turning frequency interval will appear on the display (by default, the turning is carried out every hour), there is no need to change anything here, press the left button again and the temperature value in the incubator at the moment will appear on the display. When the incubator warms up, the temperature you set will appear on the display, which will be constantly maintained by the thermostat.
The detailed process of setting the temperature is shown in this video.
Raising chickens
After the chicks hatch, the device is switched to rearing mode. A small box is placed at the bottom, or covered with newspapers, and bowls of water and food are placed.
The incubator automatically maintains the temperature at 30-32° with the backlight always on.
Chicks and ducklings can stay in the incubation chamber for up to two weeks, larger chicks for a maximum of 10 days, and quail chicks for up to three weeks.
Laying eggs in the incubator
When the incubator is set (the temperature is set, the frequency of turning the eggs, the cells are filled with water) and warmed up, you can start laying the eggs.
First of all, you need to choose the right eggs for incubation, so I recommend reading the article on how to ovoscope eggs.
The eggs need to be marked with a pencil on one side with a cross and on the opposite side with a zero; this is necessary to make it easier to control the rotation of the eggs.
We place the eggs horizontally in the grid cells and close the housing lid. Now you can monitor the incubation process through the window in the housing lid.
Principle of operation
Before starting, remove the lid, remove the grill and the turning unit. Warm water is poured into a special container, the grate is returned to its place and the rotating mechanism is installed. Clean eggs are placed in cells and a thermometer is placed nearby. The lid closes.
The incubator is connected to the network. The desired temperature is set by turning the thermostat knob. To control the process of turning the eggs, it is recommended to mark them with a simple soft pencil.
For better heating and ventilation, eggs need to be transferred once a day from the central rows to the side rows, turning the mark in the opposite direction. Egg turning is turned off two days before the chicks hatch.
Peculiarities
The manufacturer offers several varieties of Layer incubators. They are easy to use and operate according to a single scheme. In appearance, all modifications are identical. The devices differ from each other in capacity: BI-1 is designed for 36 and 63 eggs, BI-2 – for 77 and 104 eggs. Laying incubators are used to hatch chicks of the following birds:
- geese;
- chickens;
- ducks;
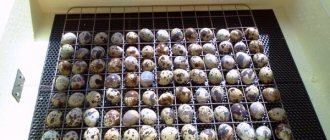
- quail;
- pigeons;
- parrots;
- turkeys;
- peacocks.
In addition to capacity, incubators have differences in egg turning systems. They can be of the following types:
- manual;
- mechanical;
- automatic.
The cyclicity of turning is no more than eight times a day, but it depends on the type of eggs and the incubation period. The body of the device is made of strong foam, which makes it possible to reduce the weight of the unit and increase thermal insulation. There is a specialized viewing window in the door, and at the bottom there is a reservoir with water cells, a heat exchanger and a temperature sensor. The following types of temperature controllers are produced for incubators:
- digital – for automatic modifications;
- analog – for manual ones.
Important! In addition, there may be an analogue temperature setting with the option of connecting it to a battery in the absence of electrical power.
The measurement inaccuracy of the required level of thermal energy depends on the modification, but in total it ranges from 0.1 to 0.9 ° C. The digital thermostat of the apparatus for artificial hatching of young animals automatically provides the set temperature parameters. Its existence greatly simplifies the course of incubation, since it does not require stable human control. It is equipped with an electronic board and buttons to regulate the temperature. The devices do not have an automatic ventilation system, and to get cool air in, it is advisable to open the lid for a few minutes every day.
In the absence of electrical energy, the incubator can operate on battery power for almost 24 hours. However, you should not rely only on the battery: if there is no electrical energy, you need to insulate the unit body and place it in the warmest place. The battery auxiliary power supply is not included as standard. You can make it yourself or buy it in a store. In the absence of electrical energy, turning the tray, including in automatic modifications, is done manually.
Incubation periods
There are 4 incubation periods in total:
- Days 1-7 – the first day is taken to be the moment of laying. The temperature 37.8-38.0 and humidity 60% do not need to be changed at this stage - the developing embryo needs comfortable, stable conditions. The only thing you have to do is turn the eggs.
- 8-14 days – reduce the humidity and continue to constantly turn the incubated material.
- 15-18 – start ventilating the incubator 2 times a day, gradually reducing the air temperature in it in order to speed up metabolism and improve gas exchange. The ovoscope at this stage shows a densely filled internal space. A squeak is already coming from the eggs, the chick is trying to stretch its neck towards the blunt end of the egg and, as it were, break through the air chamber.
- 19-21 – temperature drops to 37.5-37.7 degrees, humidity rises to 70%. During this period, it is advisable not to touch the eggs at all.
Development of a chicken embryo by day.
For the first three periods, the incubated material is turned constantly - ideally every hour, but keep in mind that the time intervals between turns should be the same. Excess eggs are removed based on the results of ovoscopy at the first stage.
Chicks normally hatch at 21 days. A healthy chicken breaks the shell with three strong blows, placing its head at the blunt end and its neck at the sharp end (this way it can rest its paws against the walls of the shell and break it). The chicks dry out on their own and are then placed in a dry, warm place.
Advantages and disadvantages
The advantages include low cost and small size. Thus, the BI-1 brand with automatic egg turning and a digital device for displaying information weighs 3.3 kilograms and has dimensions of 67x34x31 centimeters. The standard package includes two additional grids for goose and quail eggs. Another advantage is the presence of a viewing window, which eliminates the need to remove the cover every time.
The device has the following shortcomings reported by owners:
- fragility;
- unreliability of the egg turning mechanism;
- the need to insulate the incubator during a lack of electrical energy;
- Due to the lack of a fan, uniform heating and ventilation of the incubation material is not guaranteed.
Humidity and temperature during incubation
To get high hatchability, you need to know what temperature should be in the incubator for chicken eggs. The correct microclimate determines the quality of incubation. Even the smallest deviations in temperature and humidity can lead to death or disrupt the development of chicks.
The temperature in the incubator for chicken eggs has a maximum value of 27-43 degrees. Hypothermia or overheating of eggs is tolerated without harm only for a short time - for a few minutes. The optimal incubation temperature for chicken eggs is from 37 to 40 degrees.
The maximum temperature at which an embryo can develop is from 27 to 43. C. If it is low, development is slow, the hatching period is extended, and at a very low temperature the embryo develops incorrectly and soon dies.
It is also important to take into account the method of heating the incubator - if the heat source is from above, temperatures up to 40 degrees are allowed (near the top of the incubator). If the sources are located on all sides, the optimal temperature in the incubator is no more than 38.5 C
The temperature maintained in the incubator must be stable. Hypothermia and overheating of eggs provokes the development of diseases in chicks and also inhibits their development. The same applies to humidity. Its maximum indicators are 45-82%. But it's better not to approach them.
Temperature and humidity table for incubator:
| Days | Temperature | Wet bulb temperature | Humidity, % | Number of revolutions | Ventilation |
| 1-7 | 37,8-38 | 31-32 | 50-55 | every hour | No |
| 8-14 | 37,8-38 | 31-32 | 45-50 | 5-6 times a day | No |
| 15-18 | 37,8 | 28-29 | 50 | 4-5 times a day | 2 times a day, 15-20 minutes |
| 19-21 | 37,4-37,5 | 27-28 | 65-70 | No | No |
Kinds
As mentioned above, one of the main positive qualities of the Laying Incubator is the ability to purchase the appropriate volume for hatching chickens. For small farms, small-sized modifications with a small list of capabilities are suitable, and for reputable poultry farmers, devices with increased capacity and fully automated are produced.
Below is an analysis of all currently relevant modifications of the incubator.
BI-1 with a capacity of 36 eggs
This is the smallest incubator in terms of volume, which is ideal for individual farms. It is produced in the following versions:
- with manual temperature controller and fully automatic turning;
- identical equipment with a spare power supply;
- with digital temperature controller, automatic rotation and rechargeable battery.
Flexible configuration makes it possible for both beginners and experienced poultry farmers to use the device. It is possible to use the manual turning method, which makes it possible to lay up to 50 eggs.
BI-1 with a capacity of 63 eggs
This is an average modification, which allows for the possibility of laying 63 chicken eggs, which is acceptable for domestic use. When auto-rotate is turned off, the capacity increases to 90 pieces. This option is available in an extended configuration. The temperature controller can be digital or analog.
Some incubation samples have a battery backup function.
BI-2 M with a capacity of 77 eggs
This modification is designed for laying 77 medium-sized chicken eggs, which is very suitable for breeding meat chickens (broilers). The auto-rotate option is provided upon customer request. When it is turned off, the capacity increases to 100 eggs.
Depending on the model, a digital or manual mode of temperature control is implied, and the possibility of using a rechargeable battery.
BI-2 with a capacity of 104 eggs
This is the largest capacity for the Laying Layer apparatus for artificial hatching of young animals. It is manufactured in several versions, but all have an auto-rotate option, which makes it easier to monitor the bookmark. When it is turned off, the capacity increases to 140 pieces. Based on the configuration, digital or analogue control is implied. All automatic modifications are implemented only with a backup power supply.
The manufacturer provides such a wide selection of equipment that, if necessary, you can buy spare parts such as additional grilles, a second battery and a hygroscope (a device for determining air humidity).
New for 189 eggs
This modernized apparatus makes it possible to hatch 189 chicks in one incubation process. This modification is gaining great popularity due to the following new qualities and functions:
- the main advantage of this modification is a capacity for 189 eggs and 3 trays for chicken eggs; in addition, trays for goose and quail eggs are installed;
- a digitally controlled device with an integrated microcontroller that adjusts the temperature level;
- when the electrical power is turned off, the installation spontaneously switches to the auxiliary power source and vice versa;
- the interval for turning the eggs is set spontaneously;
- inside the device there is a built-in backlight and a large viewing window, which allow you to monitor the incubation process;
- the panel shows the temperature, humidity level, number of days passed;
- Constant water heating is installed.
Rotary device for automation: automatic functionality
Before starting work, you should carefully study the instructions for use, since the quality and speed of operation of the device directly depends on this. The most important part of the functionality is manual or automatic rotation of the eggs. The manual process is extremely inconvenient and is not suitable for large bookmarks. Below is the procedure for connecting the rotation.
How to install
First you need to place the incubator in a horizontal position, which is an important requirement from the manufacturer, and disconnect it from the network (remove the battery). Step-by-step algorithm for setting the lattice rotation:
- Connect the rotary device connector to the thermostat.
- Plug in the incubator.
- Within 7-15 seconds, the grid should move from one wall of the incubator to the other.
- If this does not happen, you need to turn on the thermostat connector with the AUP output to the network, wait for the grille to move, and then turn off the power.
- Normally, the next turning cycle should occur within an hour. Only after this can you start laying eggs.
Installation
First of all, it is necessary to install the device in a horizontal position, which is a fundamental condition of the manufacturer, and also disconnect it from the power supply (remove the battery). The step-by-step procedure for installing the grille rotation is as follows:
- connect the electrical connector of the rotary mechanism to the temperature regulator;
- connect the device to the electrical network;
- within 7–15 seconds the grid should move from one wall of the incubator to the second;
- if this does not happen, you need to connect the electrical connector of the temperature controller with the output to an automatic device for turning over to the power grid, wait until the grille moves, and then turn off the power supply;
- in a normal state, the subsequent revolution cycle should occur after an hour; Only after this can you start laying eggs.
Important! All movements of the lattice must be soft and unhurried; otherwise, there is a danger of damage to the embryos of the chicks.
Electric drive of the ideal hen incubator and its connection
For proper operation of the device, it is necessary to connect the electric drive to the side surface of the incubator.
The drive itself operates in 2 modes:
- turning the eggs 180° every 4 hours;
- Standby mode.
It is a small electric motor. Consumes a small amount of energy - about 30 W for one turning movement, and during standby - no more than 0.5 W.
The electrical installation of the incubator is shown in the diagram.
The picture shows a diagram of the electrical installation of the incubator.
The following elements are indicated by numbers in the figure:
- Electric drive installation.
- Indicator.
- Incubator body.
- Device for turning eggs.
- Rotator grid pin.
- Screw.
- Washer.
- Fastening screw.
- Electric drive traction.
Before installing the electric drive, it is necessary to extend the rod from the incubator body (3) by 5 cm. To do this, connect the cord (9) with a plug to the socket, and hold the rod with your hand. In almost a few seconds, the engine will start running, and the rod will rotate slowly. Accordingly, the plug must be turned off from the socket when the required length is reached.
Next, you need to mount the electric drive itself on the housing.
To do this you need to do the following:
- Open the lid.
- Insert the rod into the holes on the side surface of the incubator. The fastening screw also goes there.
- You need to put a washer on this screw and a nut on top, tightening it until it stops. It is necessary that the electric drive is securely attached to the wall of the incubator.
- The rod is connected to the rotating device using a pin, which goes into the outer hole located at the end of the rod.
- Then close the incubator lid and connect the device to the network. Control signal - the indicator light lights up, after which we can assume that the electric drive is completely ready for operation.
Before starting operation, the electric drive must be installed correctly. Note! If the electric drive is not mounted with a rotary device, the motor will turn off after 8 seconds in automatic mode. The rod will rotate, but will stop moving.
How to use?
Before starting work, remove the equipment from the packaging and check its integrity and completeness. If everything is fine, they begin assembly. It is necessary to install a rotating device in the device and correctly connect the control unit, which should not cause difficulties. Among other things, the device comes with instructions, which contain step-by-step diagrams and tips on how to assemble the device for artificial hatching of young animals.
Before you start laying eggs, you need to thoroughly test the electronics for proper functioning.
- Fill the baths with water. The liquid temperature should be approximately +38°C.
- Turn on the device and set the appropriate temperature level. It wouldn’t hurt to place another thermometer inside to be able to compare the readings and find out the accuracy of the operation of the electrothermal relay. After a certain time, the internal area of the incubator warms up to the required temperature, the temperature controller must turn off the heating elements. At the same time, a click should be heard, and the indicator lamp on the screen should go out.
- Let the device run idle for at least three hours. During this period of time, it is necessary to observe the activity of the electrothermal relay (heating elements must be occasionally connected and disconnected, the temperature on the screen must vary within the permitted standards). If the device is equipped with automatic tray rotation, you must pay attention to connecting and disconnecting the drive.
- If during the test run no malfunctions in the operation of the incubator are detected, you can start laying eggs for incubation. When there are not too many eggs, they need to be stacked sideways. If you use BI-1 without a rotating device, it is highly recommended to put a pencil mark on one side of each egg (for example, plus) - this way you can control which eggs have already been turned over and which ones have not. In BI-2 incubators with an electric drive, for maximum capacity, eggs should be installed in a vertical position, with the blunt side up. Once the eggs are placed on the tray, you need to close the lid well and start the incubator. If everything is done correctly and corrected, set and configured, in the near future the temperature in the apparatus chamber will return to normal, from this moment we can consider that the incubation procedure has begun. As a rule, it will take 19–21 days to hatch chicks.
It is necessary to take eggs from a healthy bird over 1.5 years old. The egg should be medium in size, regular in shape, without cracks or growths on the shell. It is worth noting that the storage time of eggs directly affects the percentage of hatchlings.
Eggs that will subsequently be placed in an incubator should be stored for no more than ten days at a temperature not lower than +10°C, otherwise all incubation properties will be reduced.
To learn how to use the Laying Incubator, see the following video.
Selection and preparation of incubation material
The success of incubation at home is determined by the quality of the starting material. The selection of viable embryos is carried out by assessing all possible characteristics of the eggs for study.
Table No. 1. Parameters for assessing the quality of chicken eggs for incubation.
| Characteristic | Description |
| Form | The egg must have the correct outline. Round, cone-shaped, ellipsoidal and overly elongated specimens are discarded. |
| Size and weight | Samples that are too large or small are removed; the average egg weight must correspond to the breed (usually in the range of 50–70 g). |
| External view of the shell | The surface must be smooth, leveled, without foreign inclusions or growths. Eggs with cracked shells are not allowed for incubation, as they will not be able to develop and will become a breeding ground for microorganisms. |
The collection of incubation material is carried out at intervals of 1.5-2 hours.
Examining the contents of eggs using an ovoscope
The ovoscope helps to notice all the defects of the shell, as well as evaluate the internal potential of each specimen. You can use industrially produced devices or those assembled at home.
The simplest ovoscope can be made from an LED lamp (flashlight) and a toilet paper roll. The main thing is that the lighting device does not heat the eggs too much during inspection.
You need to pay attention to the following signs of defective material:
- spots, marbling of the shell, small cracks invisible under normal lighting;
- incorrect location of the air chamber (normally it is at the blunt end), its mobility when the egg rotates around its axis;
- the adhesion of the yolk to the subshell membranes (it should be located strictly in the center), its inability to return to its original position after turning during inspection.
Minor damage to the shells of expensive broiler hatching eggs and rare breeds of chickens can be coated with starch-based glue. Marbling is also not a serious obstacle to attempting to get chicks, but in this case they will form more slowly and subsequently have reduced vitality.
Storage rules
The development of the embryo begins in the chicken's oviduct; after it exits into the external environment, it stops. For the entire time before the start of incubation, it is necessary to create favorable conditions to preserve its ability to resume growth.
To do this, eggs are placed in a cool room at above-zero temperatures (8-12 °C) and relative air humidity of 75-80%. Good results are obtained by laying them on their side, provided that they are rotated daily around their axis. For short-term storage, it is optimal to place the material with the blunt end facing up.
The optimal storage period for eggs does not exceed 6 days. If necessary, it can be extended up to a month, but the hatchability rate of chickens will decrease every day.
Disinfection of material
It is not advisable to use heavily contaminated eggs for hatching chicks, since it will not be possible to wash them without damaging the integrity of the cuticle covering the shell.
A freshly laid embryo should be touched as little as possible; dry debris and droppings can be shaken off with a knife. For chemical treatment of incubation material, special compounds are used, for example, Virocide.
Incubators "Laying Layer" BI-2 for 104 eggs, 77 eggs, 63 eggs
A true owner always wants to keep under control all the processes taking place in his personal yard. First of all, this concerns the hatching of chickens. Since hopes for the hen are rather illusory, the “Laying Layer” incubator can perform its functions.
These incubator models are intended for household use . The highest yield of chickens is provided by the Laying Incubator with 104 eggs. Along with chicken eggs, you can put duck, geese, and turkey eggs in them. If you purchase trellises for quails, you can try yourself as a quail farmer.
Description of the model incubator "Laying hen" for 104 eggs and 77 eggs
BI-2 incubators have rightfully earned the title of the most popular brand. Equipped with a grill for 104 eggs, they allow optimal use of the capacity provided by the manufacturer. The housing, made of polystyrene foam, has very low thermal conductivity and allows you to maintain the programmed temperature well.
We also recommend reading: Ideas for a warm chicken coop Do not feed the ducks - they are still flying... Chinese silky chickens are unique cutiesExotic breeds of chickens that lay colorful eggs
In the event of a short-term power outage, the temperature regime is almost not disturbed because the temperature inside drops very slowly. And if your model is equipped with the ability to connect a 12-volt backup power supply, then you can safely leave the incubator unattended.
True, there is one flaw on the part of the designers . When switching to a power supply of 12 volts, the rotating device for the Layer incubator will not work, because the drive is designed for a voltage of 220 volts.
It is possible to additionally program the interval for automatic egg turning, completely eliminating the influence of the human factor on this process.
To maintain the necessary humidity inside, the incubator has recesses for water in the lower part of the body.
The model for 77 eggs differs from the previous one only in size.
The incubator is supplied with the following configuration:
- incubator body;
- alcohol thermometer;
- revolution mechanism grid;
- mechanical device for turning eggs;
- instructions.
Description of the BI-2 model for 63 eggs
This model is also fully automatic , like the previous ones. It is equipped with a heating element that is controlled by a digital device. Temperature data comes from a digital sensor. By analyzing the temperature, the digital device increases or decreases the operating time of the element. The housing provides natural ventilation. Humidity is controlled by a digital psychrometer and displayed on a digital display.
To increase the number of incubated eggs, you can dismantle the rotating device grid. But you will have to turn the eggs manually at least twice a day.
Description of the model household incubator "Laying Layer" BI-1 for 36 eggs
Like all its older brothers, this incubator is not deprived of all modern automation systems. The only difference is that ordinary incandescent lamps .
Comparison with Kvochka incubators
The Layer Layer device (the incubator design of this brand is quite simple and therefore reliable) is very popular among summer residents and village residents.
However, of course, there are other brands of units on the market that are also in demand among homestead owners. For example, very often incubators “Cinderella”, “BLITZ” and “Kvochka” are ordered on suppliers’ websites. Next, we will give a comparative description of all these three models. Kvochka incubators are available in different price categories and can have different equipment. The most popular models are simple ones with a thermostat and automatic egg turning mode. They are marked as “Kvochka MI-31”. They cost about the same as the Layer. The incubator of this brand has the difference that the revolution in it is carried out not by moving the grid, but by tilting the body (manually). For this purpose, the models are equipped with specially shaped legs. Instead of bars, partitions are used inside. Most homestead owners consider this method more effective. In this case, the hatchability rate increases. Although the manual method of turning over is, of course, not very convenient.
Unlike the Layer, the Kvochka does not have a humidity regulator. Instead, special napkins are used in holders, moistened with water from the provided container. “Kvochka” has some advantage over “Laying One” in that it is equipped with a small fan. That is, this incubator does not have such a disadvantage as not very uniform heating of the air inside the device.
general characteristics
The Laying Incubator BI-1 is intended for hatching poultry chicks: chickens, quails, ducklings, goslings, pheasants and pigeons.
Device diagram (explanations in the text)
The body (item 1) is lined with expanded polystyrene, which gives the equipment lightness and excellent thermal insulation properties. In the upper part (on the lid - pos. 2) there is a glass viewing window (pos. 3), necessary for monitoring the temperature on the thermometer and the condition of the eggs. At the bottom there are containers with cells for water (items 8, 11), as well as devices that monitor the state of the environment inside the incubator: an evaporator, a thermometer and a sensor (items 4,5,6). BI-1 can be equipped with a thermostat (item 9) of analogue or digital type. Models are also sold in which the thermostat is combined with a moisture meter (item 10).
The equipment operates from a 220 V electrical network (item 7). BI-1 models are also available, which can operate on a 12V battery. This option is suitable in areas where power outages occur frequently. Operating temperature range – 33-45°C.
The package includes a grill for placing chicken eggs. To hatch chicks of other birds, the element must be purchased additionally.
Grid for goose and quail eggs