Any chicken feeder made from a sewer pipe is a financially profitable and convenient option. Its production will require a minimum of effort. You can find materials for assembly at a hardware store. And for commercial farmers - right in the yard. Eating from such a container, the bird will not be able to scatter food around the yard or litter. Or climb into it with your paws. The article presents various variations of such a feeder, their advantages and disadvantages.
Nipple drinker - how to make it
In addition to feeders, you can build a nipple drinking system for birds from eco-plastic pipes.
This design allows you to reduce water consumption and give the pestle exactly as much water as it needs, not a drop more. To do this you will need a nipple, a drip eliminator, square-section eco-plastic, a fixer. It is also important to have a plug and an adapter
For adult birds, nipple systems with a rotation of 180° are used, for chickens - 360°. With the closed method of keeping cage batteries, the nipple system can be attached both from the inside and from the outside. A drip eliminator is installed directly under the nipple. It is recommended not to install nipples without drip eliminators, because water will spill directly onto the flooring, which creates a lot of dirt and increases humidity in the coop. The number of such drinkers is set depending on the number of birds at the rate of 1 drinker for 3-4 birds.
Most often, the liquid distributor is a 20-liter bottle. It is connected with flexible tubes. A ball valve is installed at the entrances to the tubes, which regulates the water supply. Water will be supplied to the nipple directly through the tubes, so each valve should be well sealed to avoid leaks. Drip collectors can also be made with your own hands from plastic bottles.
The winter drinker will feature an insulated container into which you can insert the most ordinary medium-power boiler. The water in the drinker will not heat above 10°C in severe frosts, however, this method will protect the liquid from freezing. You can design a similar system, install devices for heating water and equip the structure with a thermostat to regulate the temperature and keep it at a constant level.
This is interesting
From PVC material you can build not only a container for feeding chickens. Another budget-friendly, simple and convenient option is to assemble a drinking bowl.
Continuing the topic, we recommend that you read the information from the article: “On the types of drinking bowls for chickens.”
If the container is planned to be used as a drinking bowl, it should be taken into account that it must be insulated in cold weather. When the external temperature drops below 0 degrees. Find out more in the article “Do-it-yourself winter waterers for chickens.”
In any case, at low temperatures the entire chicken coop requires insulation. The article “How to insulate a chicken coop for the winter with your own hands” will help here.
Using bottles
The easiest way to make a device such as an automatic feeder for chickens is from plastic containers for mineral water, juices, etc. A device for adult birds is made from three bottles: two 5 liters and one 3 liters
It is important to choose a container with sufficiently dense walls. The procedure for making a feeder in this case should be as follows:
- One of the five-liter bottles is cut in half.
- The top part of the container can be thrown away. Five square holes should be made in the lower half, approximately 5 cm in size (along the entire circumference). They should be cut with a sharp knife at the height of the first rib from the bottom.
- From a 3 liter bottle you need to cut off the top part with the neck. The result is a rather convenient funnel.
How to make your own feeders for goslings?
- Types of feeders for goslings
- We make feeders with our own hands
raising geese from a skillful farmer will require making a feeder for goslings with your own hands. Raising and feeding geese is not as easy as it seems at first glance. Young geese gain weight rapidly when properly maintained and fed.
Types of feeders for goslings
It is quite possible to make normal feeders for young geese with your own hands. Requirements for feeders:
- simplicity of design;
- ease of use;
- good serviceability;
- safety of feed from contamination and loss.
Food should not be trampled, carried by the wind, or eaten by rodents, crows, pigeons, or sparrows.
The starting materials for the product “feeder for goslings” can be wood. Cutting boards are quite suitable for making such “dishes” with your own hands.
On the first day of life, goslings feed from trays. Along the entire perimeter the tray has sides up to 20 mm high.
As the goslings grow up to 15 days of age, they are fed from feeders 90 cm long and 14 cm wide. This feeder is a knocked down tray with sides up to 6 cm high. To reliably move the feeder along its entire length, a rail is attached. Height is 14 cm.
Starting from the age of one month, goslings already switch to “dishes” for feeding adult geese.
There should be enough feeders for all the goslings to feed at the same time. For one head you need 15 cm of feeder length. If these conditions are not met, the goslings can create a “crush” and injure each other.
We make feeders with our own hands
To make such products with your own hands, you will need certain tools and materials. Tools you will need:
- saw (hacksaw, hand-held circular saw);
- plane;
- hammer;
- screwdriver;
- metal scissors;
- ruler or tape measure.
The materials will be boards, moisture-resistant plywood, environmentally friendly plastic, galvanized iron, oil paint, screws, nails, sandpaper. The thickness of the board should not exceed 2.5 cm.
First of all, decide on the design of what the feeder for goslings should look like. Draw a drawing. You will need equipment to feed different ages of goslings.
The number of units depends on the planned population. “Cutlery” in the form of trays is easy to make. Pieces of galvanized iron and wooden strips for the sides are used. Plan the planks and secure them around the perimeter with self-tapping screws.
For normal “dishes”, you first need to make blanks of all the parts. The material needs to be evenly cut, planed, and roughness removed with sandpaper. Then the structure is assembled.
The product should turn out without distortions or large gaps. If necessary, treat the joints with silicone sealant.
Feed comes in both dry form and in the form of mash. Liquid from the feed should not leak through the cracks.
Considering that the “dishes” must be clean, for ease of maintenance you can paint the products with oil paint. It is advisable to paint it green as it is the most attractive to young animals.
Grooved feeders for goslings are divided along the entire length by a partition so that the young animals do not penetrate into the container. The partition is not brought to the bottom of the feeder by 5 cm. This is done for the sake of ease of washing the feeder and increasing the volume of food poured in.
“Cutlery” must be made on legs (the height of the feed from the ground should ensure more rational use of feed) and give them stability. Overturning of the structure can lead to the death of goslings and unjustified losses.
Make the products reliable and heavy enough. From an economic point of view, it is even more profitable for a farmer to make it himself than to buy and pay extra money. With large volumes of keeping geese, this is very noticeable.
The feed receptacle is usually filled to one third. Otherwise, the food will be scattered from the “dining room” and trampled.
Mineral supplements as feed can be stored in a regular box hung from the wall at some distance from the ground. Feeding areas must be kept clean to minimize the likelihood of young animals contracting infectious diseases.
In addition to feed, goslings should always have sufficient fresh water for drinking in special drinking bowls.
High-quality do-it-yourself feed devices will allow the farmer to ensure maximum weight gain in poultry
It is also important that with sufficiently large livestock volumes in such devices it is possible to optimize the consumption of feed, especially purchased feed
Simple hanging pipe feeder
This design is incredibly simple. Even a novice poultry farmer who does not understand all the intricacies and features of this process can cope with the manufacture of such a container for food.
The work will require the following materials and tools:
- sewer pipe with a diameter of 10 cm;
- a pair of plugs;
- jigsaw;
- piece of cable.
Stages of work:
- A rectangular hole is made in the pipe using a jigsaw. At the ends, it must remain intact.
- The ends are covered with plugs.
- Using pieces of cable, the container is suspended at such a height that birds cannot climb into it with their paws.
PVC pipes are an excellent material for making feeders. It is from them that it is possible to assemble the most convenient designs, which are then easy to clean and disinfect. Although they do not look very attractive, they are very original. A bird's home with such feeders is immediately transformed beyond recognition.
Another bunker feeding system
This version of a pipe feeder for chickens is perfect for slightly older chickens. To make it, you need to take 2 polypropylene pipes: the first - 10 x 200, and the second - 30 x 32; a sheet of plywood 30 x 30, at least 1 cm wide, a 5-liter plastic bottle.
A two-hundred-millimeter pipe should be attached to the plywood. In a cylinder of smaller diameter, a vertical cut of 10 cm should be made. After this, stepping back from the edge also 10 cm, you need to make a horizontal cut. Now the narrow pipe needs to be inserted into the wide one. Then you need to cut off the bottom of the bottle and place its neck on a thin profile.
To prevent birds from turning over the feeder, it should be hung on the wall. The amount of grain in the feeder is enough to feed 30 broilers for more than 24 hours. This design is good not only because you don’t have to constantly run around to add food, but also because the birds can be taught discipline. Over time, having gotten used to the fact that there is always enough food, they will stop crowding the whole flock around the feeder.
Types of structures
Chicken feeders made from sewer pipes can come in a variety of designs. Types of devices:
- Vertical - the body is placed perpendicular to the floor covering.
- Horizontal - the main part of the device is placed along the wall of the chicken coop parallel to the ground.
- Hopper - allows you to regulate the supply of feed for poultry.
Sometimes, according to the principle of placement and manufacturing, a bunker feeder is combined with a vertical or horizontal type. The choice is made taking into account the number of birds, the design of the room or pasture and personal preferences.
Making a vertical automatic feeder
This bird feeder design can be made in 10 minutes if you have the necessary materials on hand. It is enough to purchase the base of the product. In this case, the diameter of the PVC pipes should be as large as possible. The cut height should not be more than one meter. Additionally, you need a flat part, for example, a lid from a plastic bucket.
On one side along the edge, cut several small holes, each of which will have the shape of a semicircle. Install such an element into the bucket lid with the exact side down where the holes were formed.
Pour grain into the pipe. It will pour out into the flat lid through the holes. As food is eaten, it will fall down the pipe.
Types of structures
Chicken feeders made from sewer pipes can come in a variety of designs. Types of devices:
Vertical - the body is placed perpendicular to the floor covering. Horizontal - the main part of the device is placed along the wall of the chicken coop parallel to the ground. Hopper - allows you to regulate the supply of feed for poultry.
Sometimes, according to the principle of placement and manufacturing, a bunker feeder is combined with a vertical or horizontal type. The choice is made taking into account the number of birds, the design of the room or pasture and personal preferences.
Principle and features of the device
An affordable material is suitable for making chicken feeders from sewer pipes. The assembly process of the device takes little time. Since plastic pipes have minimal weight, attaching such structures is quite simple.
Chicken feeders made from sewer pipes are distinguished by their versatility, functionality and long service life. You can make such a device using basic tools. At the same time, the design looks neat and is convenient to use. It can be cleaned, washed, filled with food, and moved without any problems.
Additionally, it is recommended to use additional devices that will help make the feeder more functional. These may be elements used to fasten sewer pipes.
Caring for the feeder and drinker
In general, plastic pipes can withstand high humidity well and therefore do not require special care.
But it is still important to monitor their condition
Important! The drinker can be modified by installing several nipples at the bottom - this will keep the water clean much longer. Feeders must be cleaned of feces if some chicken still manages to dirty them
With drinking bowls everything is more complicated. They need to be wiped clean with a sponge at least once a month. Various debris will inevitably fall into the water from a chicken's beak - from food debris to feces. Because of this, the water begins to rot, and plaque appears on the plastic walls of the pipes. The drinking bowl becomes a breeding ground for infection, and if appropriate measures are not taken, this can lead to an epidemic and death of birds
Feeders must be cleaned of feces if some chicken manages to dirty them. With drinking bowls everything is more complicated. They need to be wiped clean with a sponge at least once a month. Various debris will inevitably fall into the water from a chicken's beak - from food debris to feces. Because of this, the water begins to rot, and plaque appears on the plastic walls of the pipes. The drinking bowl becomes a breeding ground for infection, and if appropriate measures are not taken, this can lead to an epidemic and death of birds.
Regular cleaning of the feeder and drinker significantly reduces the risk of disease, ensuring the birds feel great.
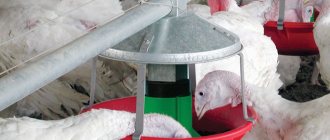
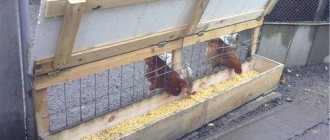
Chickens eat from a feeder
Knowing how to properly make a reliable and durable chicken feeder from PVC pipes can make caring for birds much easier. If desired, the design can be easily improved to suit the needs of the farm owner.
New Year's gift box
After the New Year, there are often gift boxes left over that are a pity to throw away. They are colorful and bright and can be useful for something.
When cutting out windows in a box, leave enough space from the corners of the package, at least three centimeters. This will help maintain the reliability of the structure. You can tape it on the front side so that it doesn’t get wet so quickly and become unusable. Find a suitable location and place the feeder within sight.
Small birds do not have very good eyesight, so at first you can scatter food under a homemade feeder to attract their attention. Give the birds time to get used to you, and they will come every day for a meal.
>
Classification of feeders made of PVC pipes
Feeders made from polyvinyl chloride pipes have a number of advantages and are valued, first of all, for the availability of materials, low cost to create, high practicality, and the ability to create an individual model. Based on the type of installation, three types of feeders can be distinguished.
Suspended
The hanging model is very convenient to use, since it eliminates the possibility of chickens getting into the middle, littering there, or, even worse, leaving excrement. Such devices are suspended in the chicken coop at a certain height from the floor and attached to any wall using screws, brackets or other fasteners.
Learn how to build an automatic chicken feeder.
The simplest version of a suspended “feeding utensil” can be considered a product made from a wide plastic pipe, at least one meter long, and several plugs. To create it you need:
- Cut the pipe into three parts 70 cm, 20 cm and 10 cm long.
- Install one of the plugs on one side of the longest pipe (70 cm).
- Place a tee on top and install a 20 cm long section into it.
- The inserted pipe on the opposite side should also be plugged.
- Insert the remaining part (10 cm) into the tee.
The advantages of this device are:
- ease of use, ability to close the structure at night;
- does not injure birds;
- can be used for a large number of chickens;
- The food is protected from debris and chicken droppings.
Did you know? The first feeders appeared in the 6th century. Bishop Cerf of Culross made special devices in the form of a box into which he put food for wild pigeons.
Attached to the wall
Feeders that are mounted on the wall are quite convenient, but you will have to tinker a little to fix them. To install such a system, you should use special brackets that are attached directly to the wall or grill bars.
To create a wall model, you will need a PVC pipe with a diameter of at least 15 cm. You should also prepare 2 plugs, a tee and two small pieces of pipe, 10 cm and 20 cm each. The manufacturing technology of the structure is simple:
- The pipe is connected to a section of 20 m using a tee and plugs are installed at the ends.
- The smallest 10 cm piece of PVC is mounted to the tee branch, which will serve as a feed tray.
- The resulting structure is fixed in the right place on the wall with the long end up and the food is filled in.
In winter, it is worth taking care of not only the inhabitants of your poultry house. Make and decorate a simple bird feeder for wild birds too.
Placed on the floor
Experienced poultry keepers and farmers in most cases prefer hanging or floor-mounted feeders. Floor structures are characterized by:
- mobility, the ability to be installed anywhere;
- functionality, since up to 10 birds can feed from the feeder at the same time;
- ease of manufacture.
The disadvantage of a self-made “dining room for chickens” is its openness. Since the food on top is not protected by anything, particles of debris, dirt, feathers, etc. can get into it. To organize the simplest floor product, you should:
- Take two pipes, 40 cm and 60 cm long, two plugs, elbows.
- On the long part of the PVC, make holes for food, 7 cm in diameter.
- Place the PVC horizontally on the floor, plug one side, and install an upward elbow on the other.
- Insert the second part of the pipe into the elbow, through which the feed will be poured.
The finished structure is securely fixed in several places in the desired location of the chicken coop.
Find out what options there are for making drinking bowls for chickens, how to make a drinking bowl from a plastic bottle, and also build a drinking bowl for chickens and broilers.
Kinds
Tubular chicken feeders can be of several types:
- horizontal;
- vertical;
- open;
- closed.
Horizontal feeder - a pipe mounted horizontally on stands. In its upper part, holes are cut through which feeding occurs. One end of the pipe must be plugged. At the other edge, which is equipped with a special socket, a 45-degree angle made of a pipe of the same diameter as the horizontal pipe is installed. In some cases, both ends of the pipe are plugged. The feeder is filled through the holes intended directly for feeding.
A vertical feeder is a modification of a horizontal one, installed in a vertical position. The edge that the 45 degree angle was inserted into should be on the bottom, and the edge that was capped should be on the top. Feed is supplied through the top edge. The length of the tubular trunk of a vertical feeder determines the amount of feed that will be supplied to the birds during the day.
Horizontal and vertical feeders can be open or closed. The first type involves chickens consuming feed from one enlarged hole. The second type involves the consumption of feed by each chicken from an individual hole.
What are the advantages of self-made feed containers?
In private households there is often a lot of work to do, and chickens, especially large meat breeds, need a sufficient amount of feed, which needs to be added every now and then. The ideal option is bunker feeders made of pipes, which can be found in the photo. By making such a feeder with your own hands, you can save money on buying food, as well as manage your time as rationally as possible.
A feature of almost all poultry is the habit of rummaging through the feeder and scattering the food, which as a result becomes completely unsuitable for food. Feeders made of plastic pipes meet all the necessary parameters. In addition, the owner will not have to constantly adapt to his pets in order to feed them, but put food in the bunker feeders when it is convenient for him.
Experienced poultry farmers have been using feeding bunkers made from plastic pipes for a long time. There are several interesting variations of chicken feeders that you can construct yourself. Some of them can also be used to feed dry food to rabbits. To have a visual idea of the design of such feeding systems, we suggest watching a video on the relevant topic.
List of required tools
To make high-quality chicken feeders from plastic sewer pipes, you need to select the appropriate tools and materials. The list will consist of only a few items. This is due to the fact that working with plastic pipes is not complicated by the hardness of the material.
For each type of feeder, pipes with a certain diameter are used. Usually several options are used. Additionally, you may need tees, adapters, and rubber bands to connect elements.
To make holes along the entire length of the pipe, you should use a metal saw or jigsaw. Marking is done using a marker or felt-tip pen. To make the fastening, a drill or screwdriver is useful.
Tightness in some parts of the device can be ensured by applying glue to the seams and cuts with a special gun. But it is better not to resort to using this option, since chickens can peck at the glue.
Original feeders
The following types of feeders, some of which are made from scrap materials, will certainly appeal to the reader:
Feeder based on cutting board
To make this device you will need:
- cutting board;
- plastic cup;
- funnel (it’s better if it’s also plastic);
- hose with transparent walls;
- silicone sealant.
You need to act in the following sequence:
- The wide part of the watering can is placed on the cutting board and outlined with a pencil.
- Within the drawn circle, many holes are drilled in random order using a drill.
- Next, using sealant, the watering can is glued to the board in exactly the position in which it was held when circling the wide part. Both items need to be held together for a while until the sealant sets.
- A hole is drilled in the cup near the bottom with such a diameter that a hose can be threaded into it, but at the same time the latter fits tightly enough.
- Now you can start assembling the feeder. One end of the hose is put on the spout of the watering can and fixed to it with a clamp; the second one is inserted into the cup through a hole made in it. If the hose in the cup does not hold very tightly, you need to use sealant as a seal.
The feeder is ready. The grain poured into the watering can will flow through the tube into the cup.
Feeders for supplying dry feed for poultry can be conventional or automatic. An automatic chicken feeder is good because it saves feed and preserves it.
For instructions on how to make a bird feeder with your own hands, see here.
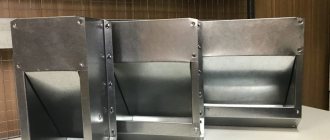
Hopper bucket feeder
Any container can act as a feeder hopper. You can make such a feeder very cheaply from a plastic bucket in which some kind of construction mixture was packed. In addition to it, you should prepare the bottom of the same, but larger bucket, or a sectional bowl for pets, or a plastic container for seedlings. This part of the feeder should have a diameter 10–15 cm larger than that of the bucket.
Plastic bucket feeder
The manufacturing technology is extremely simple:
- Holes are cut in the side wall of the bucket near the bottom.
- Next, the bucket is installed in the center of the bowl or menagerie and screwed to it with a bolt and nut.
All that remains is to pour the food into the bucket and close it with a lid. Some of the food will spill through the holes into the bowl and while the birds eat it, it will spill out again and again.
PVC pipe feeder
A very affordable material are plastic parts for sewer assembly. Here's what you need to prepare:
- pipe with a diameter of 150 mm;
- a pair of plugs for it;
- tee.
DIY chicken feeders made from plastic pipes
Make a feeder like this:
- A) Three fragments are cut from the pipe: two are 10 and 20 cm long, the third is of arbitrary length (this will be a bunker).
- A long piece of pipe, acting as a hopper, is inserted into the tee on one side, and on the other - a piece 20 cm long. The free ends of these pieces are closed with plugs.
- A 10 cm long piece is connected to the outlet of the tee.
The structure is filled with grain or other dry food, after which it is installed with the long part up. And they fix it. A short piece attached to the tee outlet will act as a tray. You can also close it with a plug at night.
Are there a lot of squirrels in your area? Build a squirrel feeder and these little animals will delight you in cold weather.
Read about the features of making silicone molds for paving slabs in this article.
Hopper feeder made from 5-liter plastic bottles
This container, used for packaging purified water, is quite popular today. To make a feeder you will need two copies. Here's what to do with them:
- From one bottle you need to cut off the upper tapering part so that what remains is something like a glass with smooth walls.
- A window is cut into one of the side walls of this “glass”, wide enough for the chicken to stick its head through.
- The edges of the window should be covered with fabric electrical tape or adhesive tape so that they, being sharp and rigid enough, cannot injure the bird.
- You need to cut off the bottom of the second bottle.
- Near the lid itself, you need to make several holes in the wall of the 2nd bottle.
- Let's start assembling. We turn the 2nd bottle, that is, the one that we have deprived of the bottom, upside down and insert the 1st bottle into a glass-like bottle. In this case, the cap of the 2nd bottle should touch the bottom of the 1st.
The feeder is ready. Now you need to pour the grain into the inverted 2nd bottle and cover it with some kind of lid. This feeder works in the same way as all other bunker-type feeders.
Main varieties
For chickens
Feeders made from sewer pipes for chickens differ from containers for adult chickens only in size.
Already in week-old chickens, the composition of the diet resembles the menu of older chickens. But for up to 2 months, it is recommended to keep young birds separate from adult birds.
There are several reasons for this. One of them: the inability to eat its portion of food, since a stronger chicken will appropriate it for itself.
Feeders are built on the principle that all birds have enough food. According to standards, one chicken has 10 to 15 centimeters of area with food. Depending on body weight. Chickens have different numbers - 5-7 centimeters per head.
Other types of feed containers for babies are described in the article: “Assembling feeders for chickens with your own hands.”
Hanging option
A hanging feeder for chickens made from a pipe has several manufacturing options. But the result is the same: it is suspended at a distance convenient for the birds. And it holds enough food to feed a large herd.
The advantage of a hanging feed container is that chickens are not able to climb inside the structure. This means they cannot leave waste products in the food. Or scatter food throughout the chicken coop.
When manufacturing and installing a suspended structure, you should remember that it is closed with plugs on several sides.
Wall
The wall version is also convenient to use. But, unlike the previous version, it is difficult to install.
The structure is called a wall structure because it is attached directly to the wall. Brackets are used for fastening.
The wall container has a significant drawback. It can only be used by 2 chickens at a time. Accordingly, if a farmer has a lot of heads, either other options for feeders or wall feeders will be suitable, but in larger quantities.
Floor
One of the easiest feeders to manufacture and install is floor or standing. It is also good because more than 5 birds can use it at the same time. It can also be moved to any convenient place.
But the floor-mounted feed container also has its disadvantages. The main disadvantage is its openness. Chickens, by their nature, have the instinct not just to take grains from the surface, but to mine them. Therefore, they love to scatter all the food, trample it, and soak it.
An outdoor dining room cannot protect the food in it from bird waste, fluff and feathers, dirt, dust, water, and precipitation.
Bunker
The bunker type is good because the feed remains uncontaminated. The container has a protected opening, which is necessary so that the chickens can eat freely. At the same time, food has minimal contact with the external environment.
The bunker version is quite simple to manufacture. Moreover, it can be assembled not only from plastic material, but also from others.
Even a beginner in this matter can handle the assembly and installation of this container. Especially if he pays attention to the information provided in the article: “We build a bunker feeder for chickens with our own hands.”
Nipple drinker - how to make it
In addition to feeders, you can build a nipple drinking system for birds from eco-plastic pipes. This design allows you to reduce water consumption and give the pestle exactly as much water as it needs, not a drop more. To do this you will need a nipple, a drip eliminator, square eco-plastic, and a fixative
It is also important to have a plug and adapter
For adult birds, nipple systems with a rotation of 180° are used, for chickens - 360°. With the closed method of keeping cage batteries, the nipple system can be attached both from the inside and from the outside. A drip eliminator is installed directly under the nipple. It is recommended not to install nipples without drip eliminators, because water will spill directly onto the flooring, which creates a lot of dirt and increases humidity in the coop. The number of such drinkers is set depending on the number of birds at the rate of 1 drinker for 3-4 birds.
Most often, the liquid distributor is a 20-liter bottle. It is connected with flexible tubes. A ball valve is installed at the entrances to the tubes, which regulates the water supply. Water will be supplied to the nipple directly through the tubes, so each valve should be well sealed to avoid leaks. Drip collectors can also be made with your own hands from plastic bottles.
The winter drinker will feature an insulated container into which you can insert the most ordinary medium-power boiler. The water in the drinker will not heat above 10°C in severe frosts, however, this method will protect the liquid from freezing. You can design a similar system, install devices for heating water and equip the structure with a thermostat to regulate the temperature and keep it at a constant level.
What should be the requirements for the parameters of the feeder?
There are several basic requirements for any poultry feeder:
Protecting the container from dirt and excrement - special sides, turntables and covers are used for this. Easy to maintain - food containers should be washed and cleaned regularly, regardless of whether animals have brought dirt into them. In addition, food must be poured there at least once a day.
To spend less time on this, farmers are advised to build or buy mobile, lightweight feeders from universal and quick-to-clean materials (plywood and plastic). Size - it is important to provide the birds with feeders such that all individuals in the flock can have access to them at the same time, otherwise the weaker ones will be oppressed. The tray should have at least 10 cm per head, and in circular trays there should be up to 3 cm per individual
These figures should be halved for chickens. You don't have to make one huge power station, just make several smaller ones.
What is a shed and the necessary conditions for keeping rabbits in a shed
This is interesting: Santolina
Non-standard design options
Homemade devices for feeding chickens are more modern, cheaper and functional. Having in your arsenal plastic pipes of different diameters and a saw for cutting, you can make a rather non-standard, but at the same time functional design. Original ideas for chicken feeders:
- In a large diameter pipe, make 5 round holes at the same level. Insert pipe sections of smaller diameter there.
- Use clamps to tighten several pipes together, with an elbow attached at one end. The structure is installed vertically.
- Lay the pipe horizontally, the ends of which are closed with plugs. Cut several round holes along the structure.
There are many options for making simple but effective feeders. It’s worth showing your imagination and thinking through the details. Some types of feeders will take no more than 30 minutes to make. You can diversify design options by using several types of materials within one product.
Necessary materials
A variety of materials can be used to make a feeder.
But when choosing, you need to pay attention to the combination of material and the type of feed for which the feeder is used. Chicken diet can be divided into three groups:
- Dry food: this group includes compound feed and grain. Mineral supplements - shells, chalk, pebbles - are also served in dry form. For all this, the feeder can be made of wood.
- Mash: This type of food is wet and will be problematic to clean from a wooden feeder. Metal and plastic products with a smooth and waterproof surface are much more suitable.
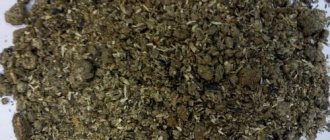
- Grass: for such food, the feeder does not need to have solid walls, so it is most often made of mesh. You can make the mesh yourself from thin wire.
Let's look at the design and manufacturing process of a wooden feeder. It will require the following materials:
- thick plywood;
- hinges with an opening angle of 90 degrees;
- self-tapping screws
Features of pipe feeders
In every household or farm where poultry is raised, the issue of feeding is relevant. The thing is that chickens, quails and some types of waterfowl not only require frequent replenishment of food supplies, but also almost always scatter food around the enclosure, making it unsuitable for consumption. Therefore, the feeding process without the use of special equipment is labor-intensive and costly.
And the presence of a feeder greatly facilitates the farmer’s work. In addition, in this case, feed is used more rationally, which means that in order to feed the chickens, less grain will be needed. The easiest way to make a feeder with your own hands is from a plastic pipe. It is easy to make the necessary holes in it, and besides, a piece of pipe will cost very little.
Where are bird feeders placed?
There are few rules for placement: the product should be out of reach of predators and hang on strong branches. If possible, the branches should not only hold the feeder, but also protect it from swaying in the wind. It should also be convenient to add food in the future.
In the yard near the house they find a branch that is stronger and higher: this way the birds will not be disturbed by stray dogs.
Cats will try to take advantage of the chance to hunt, so the product is hung further from tree trunks on which felines have been spotted.
When hanging a product on a balcony or outside a window, take into account that the food may be scattered on the windowsill by nimble birds, and the neighbors will not thank you for it.
Several simple options for constructing a feeder from PVC pipes
Traditional chicken feeders turn out to be very ineffective and impractical in practice, since birds often climb into them, scatter food, litter and end up turning dishes upside down. Poultry farmers have to constantly monitor the condition of their feeders and spend a lot of time cleaning them. Special devices will help get rid of such problems - feeders made from PVC sewer pipes, which you can make yourself. How? Let's consider.
DIY chicken feeder made of PVC pipes
People who raise chickens in rural areas know very well how carelessly they treat the feed poured into open feeders; a quarter can simply be scattered around the yard and trampled into the dirt with their paws. Also, if the feeder is in the open air (on the street in the courtyard of the house), then migratory birds often fly up to eat)) Rodents do not disdain chicken feed, they mostly feed on the feeder in the quiet night time, while the chickens are sleeping on the roost) In general, food loss They are quite large, sometimes even half of them will go to nowhere. For this reason, the author decided to create an economical and very easy-to-make feeder from a plastic bucket and PVC pipes (corners).
The principle is as follows: we take a plastic bucket and drill holes in the side of it, where polypropylene corners are then inserted; they should be located at a distance of 2-3 cm from the bottom. That is, when the bucket is completely filled with food, it will slowly settle as it is consumed by his chickens, “Everything is as simple as daylight.” You can also optionally make a viewing window, so you can see the level of filling of the bucket with food when the lid is closed.
So, let's look at what exactly the author will need to create a chicken feeder from PVC pipes?
1. plastic bucket 10-15 l
2. polypropylene corners 70 mm
1. drill with 70 mm core drill
2. hot glue gun
4. sealant gun
5. stationery knife
Step-by-step instructions for making a chicken feeder from PVC pipes and a plastic bucket with your own hands.
As already mentioned above, the loading hopper is a regular plastic bucket, in this case 10 liters and three corners on the sides to get the chicken head inside the feeder) You can also use a larger container, for example a 20 liter bucket or a barrel. If you need a long-lasting feeder so that you can fill it with food once and forget it for a week, then it is rational to use a plastic barrel with a capacity of 40-50 liters.
In general, the idea can be developed further and improvements made.
And so, the first thing the author prepared was the following components: a 10 liter plastic bucket, 70 mm polypropylene corners and a sealant with a gun.
Next, you should try on the corner to the wall of the bucket and draw a circle around it with a marker. Attention Important! The corner should be located 2-3 cm from the bottom of the bucket, so that as the feed decreases, it is supplied to the feeding area. Then a hole is drilled using a drill and a 70 mm crown, a PVC corner is inserted into the hole made and fixed with hot glue, and for greater reliability, you can also apply sealant
Then a hole is drilled using a drill and a 70 mm crown, a PVC corner is inserted into the hole made and fixed with hot glue, and for greater reliability, you can also apply sealant.
In order to visually control the level of feed in the feeder without opening the lid, you should make an inspection window in the wall of the bucket. Everything is done extremely simply, namely, using a ruler and a marker, markings are made in the form of a strip 2-3 cm wide, and then cut along the contour with a stationery knife. After which you will need transparent plastic, which can be taken from a regular plastic bottle, we also cut out a strip but in size it should be 1-1.5 cm larger in length and width. We apply it, drill holes and rivet it, go through the edges with hot glue, and then also with sealant.
Now the chicken feeder itself is ready, pour in the feed.
The author used a couple of bricks as a stand so that the feeder corresponded to the height of the chicken and she could freely come up and peck the grains.
As you can see, the feeder made from a plastic bucket and polypropylene corners turned out to be as closed as possible and the chickens will no longer scatter their food, grain losses will be sharply reduced. Birds will also stop feeding and feeding.
The materials for production are budget-friendly and publicly available, step-by-step instructions are provided to you, so let’s take it and do it. Be brave, friends!
Advantages: minimal feed loss, lightness and mobility, large bunker volume.
Disadvantages: when the feed is used up, the weight of the feeder will decrease and the chicken may turn it over; it is necessary to modify it and make a stable stand.
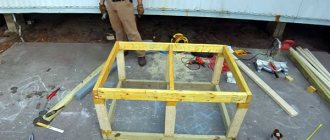
Manufacturing procedure
Using a jigsaw, you need to cut out rectangular parts of the following sizes from a plywood sheet:
- 29x17 cm (bottom);
- 29x40 cm, 2 pcs. (blanks for sidewalls);
- 28x29 cm (front wall);
- 70x29 cm (ibid.);
- 29x26 cm (lid);
- 40x29 cm (back wall);
The proposed feeder is made according to the following scheme:
- In rectangles measuring 40x29 cm, which serve as blanks for the side walls, you need to make cuts at an angle of 15 degrees. The end result should be pieces that look like slightly beveled letters “L”, with the top edge measuring 24 cm and the bottom edge measuring 29 cm.
- Holes for screws should be drilled in all parts, not forgetting to use a drill of a larger diameter to make recesses for countersunk heads.
- Now you need to assemble the feeder. It will look like a box with a drawer pulled out from below. The front wall is formed in two parts: the narrow one is fixed on the “pull-out drawer”, the larger one covers the rest. The hinged lid is attached to the top.
- All edges, protrusions and burrs must be sanded so that birds cannot be injured by them.
- The assembled feeder must be treated with a biocide. It cannot be varnished or painted.
To ensure that the parts fit together as tightly as possible, before screwing in the screw, press them with a clamp or other clamp.
Wooden feeder diagram
The feeder is ready and you can pour dry food into it. The main supply will be inaccessible to the bird, but a small part will be visible in the “pull-out box”, which acts as a feeding tray. As food is consumed from the tray, it will gradually spill out from the main part of the feeder. This part is called a bunker, and feeders operating on this principle are called bunkers.
Another version of a wooden feeder turned out to be quite popular, for which the following parts need to be cut out of plywood or boards:
- a rectangle with dimensions 100x15 cm (this will be the bottom);
- two rectangles measuring 100x8 cm (front and back walls);
- two parts in the form of a “house”: a rectangle measuring 15x8 cm, to which a triangle is attached;
- rail with a cross section of 2x3 cm and a length of 100 cm.
Drawing of a bunker feeder
The “house” parts are the side walls. A rail is attached between the tops of their “roofs”, so that the feeder looks like a toolbox. Only the rail in its upper part is not so much a handle as a barrier for the chickens: thanks to it, they will not be able to climb into the feeder.
Please note that such a feeder is easy to tip over, so it is advisable to cut the bottom from a thick board.
Metal mesh is also an effective barrier. The size of the cell is selected so that the bird can freely stick its head into it and get to the food.
In conditions of limited space, a two-story feeder would be very appropriate. First, a frame is assembled from the bars, then it is sheathed with sheet material, for example, the same plywood. The lower floor is made 25 cm high and 26 cm wide. The length is chosen in accordance with the number of chickens. The second floor is made in the form of a trough with sides 10 cm high.