When breeding chickens, it is necessary to think in advance where they will be kept from the first days of life. For these purposes, breeders often use brooders - special devices that create all the conditions necessary for the growth and development of chicks. They can be easily made in a home workshop using ready-made instructions.
What it is?
A chick brooder is a box, box, or part of a room that is designed to house chicks during the first weeks of their lives. This design should completely replace the mother hen for babies and perform her heating functions.
It is not difficult to make such a structure with your own hands. The main thing is to understand the general principle of operation and take into account all the basic requirements. If everything is taken into account, then you can make a brooder from any available materials, even from cardboard boxes.
Device Description
A brooder is a box for quickly growing broilers in a chicken coop. This design has significant advantages:
- cages placed in several rows save space;
- It’s easier to maintain the desired temperature and humidity.
These can be not only cages or boxes, but also a specially separated part of the room. You can buy a device for growing ready-made or make it yourself. Read about how to properly make a cage for chickens with your own hands in this material.
It is important to periodically clean the brooder and disinfect it after each flock.
How to choose a brooder?
Basic principles of selection:
First . For a poultry farmer, one of the most important criteria that influences the choice is economic feasibility. Here we are talking not only about the presence or number of banknotes in the wallet, but to a greater extent it is worth taking into account profitability.
When will the chosen equipment pay for itself? How will its price affect the cost of a kilogram of chicken meat? What kind of barn would you have to build to install a brooder, and would there be enough space? Will it fit into an existing space? How long will the equipment last?
And perhaps the most important aspect: what to do with a chicken house if you decide that raising chickens is not your thing?
Second . The chicken house must be durable. Here we are not talking about a flimsy house that can be blown away by the wind! The roof of the house should not fall.
It is important that the floor is strong and can withstand the weight of bedding, equipment, the chickens’ own weight, which increases with age, and the weight of feed and water. And also the weight of the poultry farmer himself (sometimes you have to go into the house to clean and catch birds).
This last condition is not mandatory if we are talking about twenty chickens, and the rearing is supposed to be cage-based. For summer residents, teenage chickens usually roam their pens on their own.
Third . In the house you should :
- maintaining the desired microclimate;
- be fresh air, because birds are very fragrant creatures.
Shouldn't:
- blow from cracks;
- being too hot or cold;
- be temperature changes;
- be loud and scary.
Why are these principles important? Because with properly organized housing there will be rational feed conversion.
This means that all the food eaten will turn into meat and will be used for the growth and development of the chicken, and will not be lost for warming up or overcoming stress.
Fourth . The new term is planting density. That is, how many chickens and how long can they live on 1 m² without interfering with each other. It is important.
Indeed, if the quantity is incorrectly calculated, the following situations are possible: chickens peck at each other, die (poultry mortality), and their legs become sore. As a result, less meat will be obtained.
Fifth . The need to place various equipment in the house. There should be a place for it so that it helps the chickens grow and does not interfere.
We conclude: a house for chickens is not the same as a shed!
When the chicks turn into two-month-old (almost adult) birds, they will no longer need much of what is described. Because they will already be able to control their own body temperature, the temperature of drinking water will not be so important, and the temperature of the floor will not be so important.
Because the poultry house is the whole shed. In the area of the barn, the brooder is installed as a separate equipment, as a separate chicken coop, as a separate house.
It's profitable. After all, maintaining the desired temperature of air and water is easier and cheaper in a small enclosed space than in the entire volume of the barn.
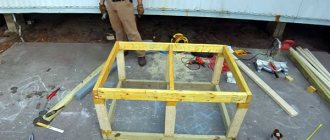
Chicken coop frame
So, let's start building a simple chicken coop with our own hands. First you need to make a frame. Collect it directly from the area chosen for the chicken coop.
We recommend reading:
- How to make a utility block for a dacha - a step-by-step description of how to build it yourself and instructions for arranging a utility block (115 photos)
- How to build a bathhouse from timber - 125 photos of the best projects and ideas on how to build a bathhouse correctly
- Do-it-yourself canopy: step-by-step description of how to build a canopy correctly. The best ideas and beautiful design options (95 photos)
For a structure designed for up to 20 chickens, a beam measuring 50x50 centimeters is suitable. We use it on vertical racks, as well as to form racks for the lid. For the rest of the structure, an edged board measuring 100x40 centimeters is suitable.
Read here How to build a country cabin - popular designs and options for building a cabin with your own hands (105 photos and videos)
Next, you need to divide the frame into two parts - one will be intended for walking, the other, accordingly, is the small shed itself.
In our case, the following sizes are suitable: one and a half meters is for walking, and 4.5 meters is the chicken coop itself.
How to properly build a chicken coop so that the chickens lay eggs and gain weight. To zone the chicken coop and the walking area, make a small partition between the rack.
We recommend reading:
- Beautiful canopy over the porch - installation options, design options and installation tips (95 photos)
- How to attach a terrace to a house - step-by-step description of the construction, design options, projects and installation instructions (115 photos)
- Building a gazebo with your own hands - the best design ideas and main stages of construction (115 photos + video)
Next, the joists and floor are laid. In order to make the floor, you can take an edged board or plywood sheets.
The floor is necessary so that no one can break into your bird (this applies to forest dwellers who often steal chickens), and also to make it convenient to clean the chicken coop. For chickens to dig, you can sprinkle them with shavings.
We recommend dividing the internal shed into two parts - one for laying hens, the other for broilers (in case you decide to have different breeds of chickens).
What are they?
The simplest one is a box of impressive size kitchen appliances. Here, too, everything depends on the number of chickens. There are few chickens, only a dozen or two - a box from a small refrigerator will do.
Heating equipment is also simple. This is a three-liter jar (or two) with an ordinary incandescent light bulb. The one with the size of the flask will allow you to lower it into the jar, that is, which will fit through the neck.
You can use lamps with a metal reflective lampshade. Usually the box is closed from above not completely, but partially, so that air can escape freely.
It is clear that such a brooder will only help the poultry farmer in a heated room, for example in a room. You can’t put such a cardboard device in a barn. After all, its functions are minimal: to limit space and heat.
A more complex device is a box in which a microclimate is maintained. Such brooders can have different “fillings”. The price depends on its complexity and modernity. You can purchase a factory brooder in an online store.
Chick brooder with thermostat
In the spring of 2016, this model for residents of the Altai Territory (when purchased in a Barnaul online store) cost 8,990 rubles. A lot, however...
In the photo below, the brooder is two-story. This is not bad for raising quail. After all, even adult birds will still sit in cages.
But for chickens, from which one flock will later be created, this is bad. Because the chickens will know their own and theirs. They will hardly be able to become a single team.
Criteria by which a finished structure is selected
Livestock stores today sell chick boxes of various types. In order not to make a mistake with your choice, it is recommended to focus on the following criteria when purchasing:
- Size. It is advisable to focus on a large-sized structure, especially if the farmer raises fast-growing poultry species.
- Floor. It is worth carefully examining the floor and examining it for slipperiness. It is advisable that it be covered with a plastic mesh with special compartments to prevent damage to the chicks' legs.
- Waste compartment. It must be present in the finished design. You can find the compartment under the bottom of the brooder.
A purchased box for chickens should have a spacious drinking bowl and a feeding bowl. It is advisable to purchase new brooder models that are equipped with air conditioners and heaters.
Important! There should be an adjustable heater inside the structure. It is desirable if it is made of ceramics.
Requirements
A brooder actually helps replace a hen for chickens, being a small box in which they are kept in the first weeks of their life if they are bred in artificially created conditions.
When making it yourself, attention should be paid to the following parameters:
Dimensions
Depends on the number of chickens, since per 1 sq. m should not come more than 25 individuals. Taking into account the fact that they will be kept in a brooder until they are 2 or 3 months of age, at least 0.1 square meters should be allocated for one individual. m area.
A standard “house” can often contain 50 one-day-old chicks.
Its acceptable dimensions are:
- length – 100 cm;
- height – 50 cm;
- width – 50 cm.
Thus, the dimensions of a standard box for housing 50 chicks are 100x50x50 cm. If you plan to keep broilers or more than 60 chickens, you can increase the width and length to 60 cm and 1 m, respectively, with a height of 50 cm.
Ventilation
The brooder should be provided with good ventilation, but drafts should not be allowed, since chickens are extremely sensitive to cold.
Humidity
An excessive increase in humidity in the box should not be allowed, as this can weaken the protective properties of the young animal’s body. Only in the first day can it be maintained at a level of 60-70%.
Taking into account these parameters, a home master can assemble a brooder using the following scheme:
Floor
It must be dry and non-slip, otherwise the chicks may get sick or injured.
Availability of a tray for collecting litter
If possible, it is worth organizing a special tray under the floor designed to collect excrement. It will make it much easier to keep the brooder clean.
The fact is that droppings must be removed regularly, but chickens should not be constantly disturbed, especially those that are not yet 50 days old. A special pallet will help solve this problem.
Heating
A moderate heating source must be installed inside the brooder to maintain the required temperature.
In the first days of the chicks' life, it should be approximately 35°C, but after that it can be lowered to 30°C. In this case, the heating source must be installed in such a way that the residents of the “house” cannot reach it.
Product types
The simplest device is made from cardboard sheets or boxes. This is a light and comfortable material, but fragile and short-lived.
The cardboard gets wet from the water that gets on it, the ducks will spill it, as they love to swim. However, a brooder is needed only in the first month of a young bird’s life, then it is transferred to a room with the rest of the birds. The cardboard will withstand a month of use, but it cannot be used in the future. Another disadvantage of the cardboard device is that it cannot be washed and disinfected.
If you need a more durable brooder, for several seasons, it should be made of thick plywood or thin boards. In such a device, you can also use other materials - glass, metal mesh, which can be washed and disinfected.
How to do it yourself?
Tools and materials
In order for a product to have increased performance characteristics and last for more than one season, it is extremely important to choose the right materials for its assembly.
Here are acceptable options:
- Oriented strand board (OSB sheet, OSB) . Used as a basis for construction. The optimal plate thickness is 9 mm. It should be noted that it should not be used as the main material, since it has an uneven surface and is difficult to wash.
- Plywood . It is considered a good option for making frames and doors because it is a smooth material that is easy to clean and disinfect. However, plywood is quite fragile, so it can break under the weight. So, if you plan to make a battery, you should use sheets with great strength, although their cost will be much higher.
- Wooden slats, beams . Suitable as raw materials for assembling frames and doors. In addition, with their help you can create a lattice floor.
- Expanded mesh . Will be needed to cover the inspection windows in the doors. At the same time, the mesh allows sunlight to pass through, which is also beneficial for the chickens.
- Galvanized metal mesh . A tray is made from it to collect litter. To do this, you need to use a piece measuring 1.0x0.5 cm. Such a mesh should have small cells (about 1 cm).
- Incandescent lamp . Installed inside the brooder as a source of light and heating.
- Self-tapping screws . They should be used when assembling a product that can be completely disassembled in the future if necessary.
In order for the structure to be reliable, the frame frame should be made of wooden boards and bars, and OSB boards or plywood sheets should be fixed to it. These materials heat up well, so they help keep the box dry and warm.
Some craftsmen mistakenly use polymer materials like polycarbonate.
They are easy to clean and disinfect, but they practically do not breathe, and therefore do not allow maintaining optimal temperature and humidity conditions inside the structure.
The complete set of necessary tools looks like this:
- hacksaw or electric tool for sawing wood;
- electric jigsaw or wood saw;
- drill and screwdriver for quick assembly of the structure;
- metal scissors for cutting expanded mesh or metal sheets;
- hammer, wire cutters, pliers;
- tape measure, pencil.
After calculating the dimensions and preparing the drawings, you can begin assembling the structure, which is a box with doors, a mesh bottom and a tray for collecting litter. We will consider effective assembly methods below.
Method No. 1
To make a “house” for young animals, you need to have the following materials on hand:
- 2 sheets of plywood measuring 1.5x1.5 m;
- metal corners;
- steel mesh with cells 10x10 mm;
- wooden slats 50x15 mm;
- fasteners (the best option is galvanized self-tapping screws);
- wooden hinges - 4 pieces.
Assembly work is carried out in the following sequence:
- To create the frame, cut the sheet plywood into two parts, saw one of them in half again to get a pair of plywood squares measuring 75x75 cm (future side walls). The remaining plywood pieces measuring 150x75 cm will be used as the back wall, ceiling and floor.
- Cut 4 strips of equal length for the side panels and 2 for the end, the length of which should be 2 cm less than the length of the walls. These are guides for the removable lattice bottom.
- Fasten the lower planks along the edges of the walls, moving 1 cm away from the side cuts. Keeping 3 cm from them, fasten another plank in parallel. In this case, it is extremely important to maintain the distance between the elements of the improvised slide, so that in the future the removable bottom and pallet can move without difficulty.
- Attach paving strips to the sidewalls as stiffening ribs. Their size must be calculated so that on top they are level with the edge of the walls, and on the bottom they are 3 cm higher than the top bar. Next, you can connect the sidewalls and the back wall using galvanized screws and metal corners. It is advisable to insert fasteners into pre-prepared holes. The grooves in the lower part of the structure must completely coincide.
- Assemble the frame of the front panel, and attach hinges to the inside of the sides of the resulting frame, on which the door can later be hung.
- Screw the previously prepared parts for two doors to the hinges:
- Attach the bottom and ceiling, cut from the same sheet of plywood:
- Prepare a removable mesh bottom. The mesh must be secured between the plywood planks like a frame to ensure the structure is strong and practical.
- Make a tray for collecting litter in the same way as a mesh bottom, but you should use a light and hygienic plastic panel as the base. It is worth considering that the tray should be slightly smaller than the plywood bottom. Thanks to this, he will walk freely but securely. Its bottom should be covered with wood shavings or covered with paper.
- Cover the space between the mesh and the bottom with a wide strip, which is nailed to the frame using self-tapping screws. It will prevent droppings from spilling out and limit the spread of its unpleasant odor.
- Make mesh windows on the doors. To do this, use a jigsaw to cut out the central part of the plywood part, and attach a strong plastic mesh to the resulting frame.
Instead of doors, you can attach a plastic film to the top crossbar, which should also be secured from below with nails. When the chickens grow up, the film should be replaced with a plastic or metal mesh.
Method No. 2
Initially, you need to prepare the following materials:
- a sheet of moisture-resistant plywood measuring 1.5x1.5 cm and 1-2 cm thick;
- wooden blocks or slats;
- metal corners;
- self-tapping screws
The instructions for assembling the structure are as follows:
- Using a saw or jigsaw, cut off a section of 0.5x1.5 m from a sheet of plywood. Next, it needs to be cut into three equal parts of 0.5x0.5 m each, two of which will be used as sidewalls. Cut the remaining part of the sheet into three parts measuring 1.0 x 0.5 m to get the ceiling, floor and bottom of a retractable tray for collecting litter.
- Fasten the top and back walls of the future box with the sides. To facilitate the assembly process, you can initially prepare a frame of a suitable shape from wooden slats or pieces of metal profile.
- Assemble a frame from wooden slats for the pallet. Its dimensions should be such that it easily fits under the bottom of the brooder (approximately 97x48 cm). Next, you need to adjust the piece of plywood to the dimensions of the frame and attach it to it with nails. The tray should also be covered with oilcloth to make it easier to throw away the droppings collected on it.
- Attach guide strips to the sides that will hold the tray and bottom. After this, you can install the pallet.
- Make a frame for the floor from slats , and then attach a metal mesh to it so that the droppings can flow into the installed tray. If the brooder contains newborn chicks, newspaper or cloth should be placed on the bottom for the first few days.
- Using slats, assemble the door frame , to which attach the plaster mesh. Next, fasten the hinges on the sides on which to hang the door. In addition, it is advisable to install door latches or a stop made of a wooden block in the middle of the front part of the frame.
To prevent cracking of the plywood when fixing it with self-tapping screws, you should first prepare small holes in it.
If desired, the assembled structure can be painted on top, and then placed in a suitable place and chickens released into it.
Step-by-step instructions for assembling a brooder for your home are presented in the video below:
Method No. 3
The fundamental difference between this model of a homemade brooder is that it is made from ready-made materials at hand, namely:
- wooden box;
- canisters;
- piece of fabric.
Using a ready-made box or assembling a frame 120 cm long according to the instructions above, you must perform the following steps:
- Divide the brooder into two segments of 70 and 50 cm, respectively. The larger part will have a window made of plexiglass or glass, and the smaller part will remain closed and will be intended for the young animals to spend the night.
- Make double walls, the distance between which should be 15 cm. They should be placed above the floor in a closed segment. Attach holders for the canister to them.
- Make a frame for the window and insert glass (plexiglass).
- Attach the frame holders to the open part of the brooder and install the frame using the hinges. Thanks to this, the window will open.
- Make a side door. It can be presented as a small hole or an opening front panel.
- Hang a fabric screen between the segments.
- Fill the gap between the walls in the closed part with peat, and above the canister make a double lid like walls, the space in which is filled with heat-insulating material.
- Place a canister of hot water and close it with a lid. From time to time it is necessary to change the water in the canister.
In addition to the canister, you can install an incandescent lamp in the brooder, but do not allow it to come into contact with the fabric, otherwise it may ignite.
Let's start tinkering
When you have read all the recommendations and, taking them into account, have drawn up a drawing, you can begin making a broiler cage with your own hands. Let's get started? For this:
- make 6 racks, the dimensions of which should be as follows: height 7x2 cm, width 7x2 cm, length 165 cm;
- connect with slats (two pieces 5x2 cm, six pieces 3x2 cm, three pieces 10x2 cm) to form a frame;
- Make 9 side walls from plywood. Dimensions – 30.5x57.5 cm;
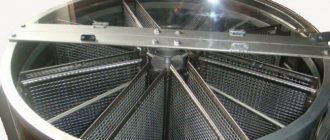
- To be able to collect waste, it is necessary to make metal pallets from sheets. The pallet must meet the following parameters: 20 cm height, 66 cm width, 30 cm length;
- make a roof (70x140 cm), either from plywood or from the same sheet of metal;
- complete the open part of the broiler cage. For this you just need a mesh. The chickens will have the opportunity to eat the feed.
Broiler cage drawing
Important advice! If you want to achieve maximum convenience for yourself, make cages with wheels by attaching them to the base. You can easily move them around for easier cleaning and more.
Organization of lighting and temperature
In order for the chickens to feel comfortable, it is necessary to equip the correct lighting and heating system by installing a lamp with infrared radiation or a regular 60 W power and infrared heating film.
It is believed that for each square meter there should be about 0.28 kW. At the same time, the quality of the heating system can be assessed by the activity of the chicks.
If the temperature is set correctly, they actively eat and drink; if it is insufficient, they gather in groups and try to keep warm, and if it is too high, they cannot breathe and die.
In this case, the temperature regime must be adjusted depending on the age of the young animals:
To maintain the specified parameters, experienced craftsmen advise organizing a lighting-heating system using an electric lamp, socket, plug and cable.
Installation work is carried out in the following order:
- In the ceiling part of the box, drill a hole for the cable, and then thread it inside and attach the cartridge to it. Connect the outer end of the cable to the plug.
- Install a light regulator (dimmer) and a plug on the outside of the box.
- On the back wall, provide a place for attaching a thermometer, which will allow you to monitor the temperature conditions inside the box.
- Install the lamp into the socket. In order to organize areas with different degrees of heating in the design, you should use a lamp with a reflector. This way, the chicks can gather under the reflector if they get cold and move away from it in extreme heat.
In the first three days, chicks need to be provided with 23 hours of light per day.
Light mode
If you have day old chicks, care and proper lighting will have a big impact on their performance.
Experienced poultry farmers raise chickens in windowless enclosures with ever-decreasing daylight hours. By reducing daylight hours by 30 minutes each week, you can delay the puberty of chickens, but this will also promote good growth, the end of molting before laying, which will help produce larger eggs with a strong shell.
On the farm, this regime is only appropriate for chickens taken for rearing in June, when daylight hours last 15-16 hours. If chickens from the April-May brood are raised, they should be kept in an aviary with curtained windows and walked after sunrise. Long daylight hours provoke premature laying of eggs, and this leads to a decrease in productivity.
Thus, it is worth paying attention to every little detail to achieve success in raising chickens. It is worth remembering that the heating lamp for chickens is of particular importance in poultry farming. In addition, infrared radiation is used in raising livestock.
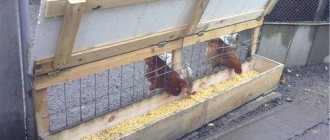
Arranging a feeder and drinking bowl
Ordinary galvanized scraps that just need to be wrapped work well as feeders.
In this case, the dishes can be filled with food from the outside without disturbing the young animals. In addition, it is filled with enough food at a time, so not a single chicken will remain hungry.
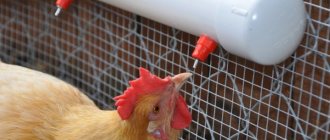
As for drinkers, it is worth choosing nipple systems with drip eliminators, since they are safe for chicks and, thanks to the dosed supply, they help prevent the development of dampness in the pan, which is very dangerous for young animals.
For the same reason, you should not use vacuum drinkers or plates. In addition, during watering, chickens can drown or choke in them.
What is better - to make it yourself or buy it?
Modern brooder for chickens
This question occupies the majority of beginners in poultry farming. Of course, if you are not afraid of additional costs or want to get a beautiful brooder, then you can buy it.
The price of such a device is approximately 6,000 rubles. You can also immediately purchase feeders, drinkers and other devices that will make caring for chickens a pleasant experience. In general, the price can even increase to 10,000 rubles.
But is it worth going to such expenses? Experienced poultry farmers will immediately say no. After all, making a brooder with your own hands from available materials will not be difficult. And at the same time, financial costs are minimal or non-existent. So why overpay then?
Chicken behavior
By observing the birds, you can find out whether they live comfortably in the brooder. If the chickens are running all over the room, then there is nothing to worry about - they are warm and cozy. If they huddle together and concentrate near the lamp, then they are cold. Then you need to set the IR lamp lower or increase the heating.
When the room is too hot, the chickens will be quiet, pant and scatter around. It is worth reducing the heating or installing the lamp higher.
You can breed broilers and egg-laying chickens. The latter are much more mobile, so that they do not waste their energy, you can build fences. It is also necessary to install a drinking bowl and feeder.
How to temporarily replace the brooder?
If the chickens are already on hand, and it takes some time to make a “house” for them, the breeder has to decide the issue of their temporary placement.
To do this, you can use a box from household appliances, which will only need to be slightly modified:
- Insulate the bottom so that it is non-slip. To do this, it can be covered with 2-3 layers of gauze or a sheet of corrugated cardboard.
- Cut a viewing window in the wall of the box at a convenient height, and then tighten it with transparent plastic film. This will allow you to look at the chicks at any time without opening the box or disturbing them.
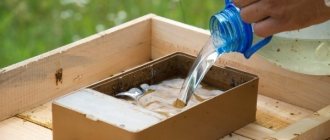
- Create a heating and lighting system in the box. To do this, you can use a liter jar with a screw-on metal lid.
- On its inner surface, you need to fix a small metal socket with bolts and screw in the light bulb. It is advisable to install a non-flammable gasket, for example, textolite, between the cover and the cartridge.
- To ensure air exchange inside the jar , the lid should be pierced several times. Next, fill the container 1/3 with fine sand, and wrap the bottom with a cloth or put a thick sock on it, otherwise the chickens may get burned.
If the box is large, you need to place several similar jars of sand in it.