I am a beekeeper with many years of experience. I live in Siberia. Therefore, climatic conditions make their own adjustments to the preparation of bee colonies for wintering. In this article I will share my experience in preparing for wintering bees in omshanik.
I keep the bees in 16 wooden frame hives and 14 polystyrene frame hives. I begin preparing bees for wintering in the last ten days of July, when the main honey harvest has not yet ended. Preparation during this period consists of providing the bee colony with empty honeycombs in order to create normal conditions for the queen to work. The brood grown in August will make up the bulk of the bees heading into the winter. For this purpose, I substitute wax or dried soil into the brood part of the nest, and after August 1 I substitute only dry material, because The bribe ends, and the bees stop drawing back the foundation.
Why doesn't a bee hibernate?
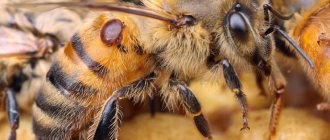
The family prepares for winter throughout the active spring-summer season, with the exception of the breeding season. Bees stock up on honey and raise a large generation of workers. They do not hibernate like other insects because they are not adapted to storing nutrients in their bodies. Individually, individuals cannot withstand the cold. Before wintering, bees gather in a group in the form of an ellipsoid. Inside it they sit more freely and can move around. Due to the movement in the center of the club, heat is generated up to 25-30 degrees. In the outer layer, the bees, pressing against each other, form a dense shell 3 to 7 cm thick with a temperature of about +15 degrees. Gradually they change places - from the center they fall into the shell and vice versa. By being in relatively active motion and feeding on honey from sealed frames, gathering in a club for warmth, they preserve their lives. Wintering bees in omshanik makes this difficult period easier for them.
pros
The main advantages of using the design are:
- Bee health. Insects stay warm and get sick less. Reducing the need for honey consumption protects bees from digestive problems. Defecation usually occurs only outside the nest, so with increased nutrition, the rectum becomes clogged and the condition of the insects worsens.
- No problems with nutrition. When there is insufficient heating and low moisture levels, the honey becomes sugary, making it more difficult for the bees to consume it.
- Safety. The risk of the hive being knocked over due to an accidental shock or strong gust of wind is reduced.
- Convenience. Beekeepers do not have to worry that the hive will be stolen by wild animals. The wooden structure of the nest is better preserved. It is easier to examine and treat sick bees. Much fewer insects die during wintering in omshanik.
Features of winter behavior
Bees place food supplies at the top of the hive, closer to the back wall of the nesting box.
Below, opposite the entrance, they raise brood. Here they form into a club, which they form even at above-zero temperatures: in weak families - at +13 degrees, in strong families - at +8. The top half of the club is always placed on a significant area of the sealed frames. The bees warm the honeycombs with their warmth, the wax on their lids melts, and some of the cells are unsealed. Water vapor from the air penetrates them and dilutes the honey on which the bees feed. The club gradually moves upward along the honeycombs, heading towards the back wall of the hive. If there is enough honey within the frames, the bees calmly move along the spaces between the frames.
At the beginning of wintering, the required temperature in the club is maintained by heat from the bees during their life activities. When it gets colder, the club shrinks. Bees occupy interframe spaces and free honeycomb cells. To keep the club warm, they begin to eat more food.
When it is completely eaten, the bees are forced to move to neighboring frames. But they can make such a transition only at a sufficiently high temperature in the hive. If the outside temperature is less than zero, then the club is not able to move. The bees are showing concern. The club may split into two, resulting in the death of one or both halves.
Nutrition of bee colonies in winter
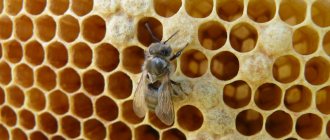
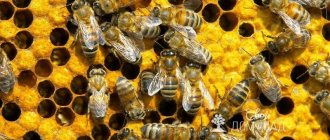
You should start preparing honey in mid-summer, when the honey harvest is in full swing. To prepare bee colonies, be sure to use only dark-colored honeycombs. Because they are the warmest. A complete seal of the combs is desirable, i.e. All honeycombs must be covered with wax caps. This is the best protection for honey from moisture or too dry air.
There are times when the honey harvest is interrupted due to weather conditions and timely procurement of honey by bees is impossible. Then feeding comes to the rescue. It serves as thick sugar syrup. It is made in large portions, pouring 5-10 liters at a time into large feeders. This is what distinguishes spring feeding from autumn feeding; in the spring, bees are given 0.5-1 liters of feeding.
How to place and bring in hives?
There is no need to rush into placing bees in the winter hut. If the weather is relatively good in October-November, then give them the opportunity to make one last flyby. The hives are moved indoors before the onset of cold weather, that is, until approximately mid-to-late November.
When moving the hives, the bees must remain as calm as possible. To do this, the entrances are closed, and the hives themselves are taken very carefully. Do not make unnecessary movements, otherwise the bees may become alarmed.
When the bees are completely brought into the winter hut, the door to it is left open for 2-3 days. The same goes for ventilation. This is necessary so that the omshanik cools down and the bees finally calm down. From this moment you can open the upper entrances. You need to remove the insulating pillows from the top, replacing them with light mats made of sedge or cattail.
All that is now required from the beekeeper is periodic checks of the hives and compliance with the temperature regime.
Feed supply
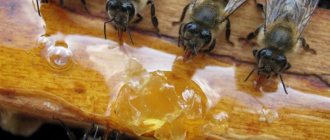
Wintering bees in omshanik reduces honey consumption. Individuals united in a club slow down the rhythm of life. Metabolic processes in their bodies are less intense. Bees in a club need 20 times less food than bees separated for the same time. In the first month or two of wintering, they eat up to 700 g of honey in 30 days. By the end of the period, the monthly consumption is at least 1.2 kg. If the overwintering of bees in the moshannik was problem-free, and by spring brood appears in the hive, then the volume of food doubles.
Leave a frame containing at least 2 kg of honey and there are free cells in which the bees of the wintering club will be placed. Then it will remain dense, and it will be easier for the bees to maintain the temperature while eating less food. In addition to honey (carbohydrates, microelements), at least 2 frames of beebread (protein food) are stored for each family. It is necessary for feeding the brood in the spring. The cells with beebread must be preserved - filled with honey, sealed with a wax lid, otherwise the bread will mold and spoil.
Primary requirements
Russia is famous for its harsh winters, especially in the northern part. For this reason, many beekeepers prefer to move the swarm indoors under cover during frosts.
In some regions, owners deliberately take bees outside for the winter in order to speed up the intensity of the spring migration and the productivity of the flock, which increases in the fresh air.
Preparatory work is carried out in the following directions:
- thermal insulation;
- maintaining humidity levels;
- creation of comfortable conditions, comfortable entrances.
One option to wait out the winter in an apiary is to use covers made of covering material, which is troublesome and expensive. The hives are combined into one structure and left in this form for 3-4 months. If the winter is snowy enough, snowdrifts can serve as shelter. In any case, the beekeeper must ensure that the hives are ventilated and dry.
Preparing honeycombs
For a safe wintering, be careful when preparing forage combs.
Beekeeping for beginners can sometimes be quite a challenging endeavor, so take it as seriously as possible. The honeycombs are harvested in the first half of the season, and the order of installation of frames for food depends on the system (design) of the hive. Let’s immediately make a reservation that the honeycombs are neither new nor old, but “used” - light brown. In double-body honeycombs, before honey collection, combs with printed brood are placed in the center of the 2nd body. Of the multi-body honeycombs, such honeycombs are placed in the center of the top one. The removed frames are not pumped out - they contain food for the winter. In the beds in front of the main honey collection, combs with printed and open brood are placed side by side in the center, moving the light and black ones to the edge of the nest. In extension hives, 4-6 nesting frames are placed in the center of two extensions, and half-frames are placed along the edges. The bees work first on the honeycombs in the center. As soon as the nests are half sealed, they are taken from the hive, but the honey is not pumped out - this is winter food.
For reference: a honeycomb frame 43.5 x 30 cm holds 4 kg of honey, 43.5 x 23 cm - 3 kg, provided the cells are filled on both sides.
How to build?
When building an omshanik, you need to decide on the type of structure and only then proceed with preparation.
Preparatory work
Particular attention should be paid to the area on which the winter hut will be built.
It must meet the requirements:
- Protection from water. To check at what depth the groundwater is located, you should dig several holes in the spring. If water begins to accumulate in them, such an area is not suitable for construction. You also need to make sure there is no threat of floods.
- Location. You need to place the omshanik not far from the apiary, so it will be easier to bring in the hives. Ideally, the structure should be placed in a ravine or on the slope of a small hill. This way it will be protected from the winds.
- Entrance placement. It is better to do it on the south side so that when the door is opened, less cold wind enters the room. In the winter huts, where more than 100 families of insects will live, there are 2 entrances - on the north and south sides.
- Area calculation. When drawing up a construction scheme, you need to take into account that the width of the passage between the racks should be about 1 m. A rack for placing hives in 1 row is at least 70 cm, in 2 rows - 160 cm. A distance of about 20 cm should be left between the hives. It is also not necessary place the hive close to the wall. Taking this into account, the total area of the building is calculated. It is better to make omshanik a little more than required, because the number of bee colonies may increase in the future.
- Calculating expenses. You need to decide in advance what materials will be needed for construction and calculate their required quantity. Mark the future territory of the winter hut.
Selection of materials
It should be remembered that when building an omshanik, materials will be required not only for the construction of the room, but also for the manufacture of shelving, doors and ventilation pipes.
Therefore, you need to prepare the following:
- Tree. You need bars or logs. Prepare polished boards, frame, slab. It is better to choose strong wood that retains heat well.
- Stone. You will need bricks and ordinary stones. To strengthen the walls, prepare sand, crushed stone, and lime.
- Metal. Metal corners, channel and pipes.
- Insulation. Due to the roofing material, waterproofing is created. You will need film, reed slabs and adobe.
Pay special attention to the materials for creating individual elements of the omshanik:
- Floor. It can be created from concrete, clay, wood.
- Walls. In underground structures they are made of brick, in others they are made of wood.
- Overlap. Reinforced concrete is used. Be sure to take care of waterproofing.
- Roof. It can be made from boards. For insulation, the ceiling is laid with moss, straw or sawdust, or polystyrene foam.
Construction
Below are step-by-step instructions for building different types of omshaniks.
Details about the construction of an underground type of omshanik:
- Dig a pit. To do this, it is easier to hire an excavator. You can use a shovel, but it takes much more time. The depth of the pit is 3-5.5 m. After digging, level the area well. To do this, use a special ruler-level. Using a shovel, create a groove through which the condensate will drain, and also dig a place at an angle to install the ladder. Its width is at least 1 m.
- Making the floor. Fill the bottom of the pit with concrete or line it with boards as spacers. Place formwork boards along the edges. They must be placed at the same level. Pour a layer of concrete about 20 cm thick. Level it. Wait for it to dry. The formwork can be removed 2 weeks after pouring the concrete.
- Walling. It is better to use a double layer of brick. Before laying, moisten each brick in water. Dry brick may crack. Fill the gap that forms between the lower bricks and the floor with clay. Use metal tubes to strengthen the structure. Make a metal frame from below and lay a channel on top. For strength, weld the metal frame elements together. You also need to make a frame on top.
- Creating a roof. Lay boards on top of the frame. They need to be well strengthened with concrete mortar and wrapped in film. Lay with a double layer of reinforcing mesh. Fill the top with concrete. Wait 1 week for it to harden.
After this, you can cover it with a layer of roofing material and cover it with earth. Above the ceiling, you can equip an attic space for the removal of ventilation pipes and storage of tools. The roof itself can be made of boards or slate. Insulate with reeds.
- Arrangement. Lay the steps with concrete slabs or fill them with mortar. Before entering the omshanik, you can equip a vestibule, thanks to which it will be possible to retain heat.
Whitewash the walls indoors. Provide ventilation using plastic or metal pipes. Be sure to take care of lighting in the winter hut. It's better if it's double. A diffused red color is ideal for caring for bees.
Make sure there are no cracks in the omshanik. If they are found, cover them with a layer of foam.
You can clearly see what the design of a finished underground winter hut looks like while watching the presented video:
The method of constructing a semi-underground is similar to the construction of an underground omshanik.
The steps are as follows:
- Site preparation. To do this, clear the place where you plan to put the winter hut, remove weeds and small debris. It is advisable that the site be level.
- Creating a foundation. Dig a pit 1 meter deep.
- Making the frame. It is made from beams or bricks. When creating walls, you need to provide space for windows and doors in advance. Wooden boards are nailed on top of the frame.
Be sure to line the walls with insulating material. If polystyrene foam is used, it is secured with polyurethane foam. You can make the cladding with plywood, but then the materials will cost more.
- Construction of the roof. It is made predominantly single-pitched. For this, wood, roofing felt and insulating material are used. If you make a gable roof, then you can store beekeeping equipment in the resulting attic.
- Interior decoration. Wooden racks are installed inside; they can be made of 1 or 2 tiers. Ventilation pipes are attached. They should be placed under the ceiling or inside the attic.
Sequence of work during construction of an above-ground type:
- Place wooden posts around the perimeter. They need to be immersed in the ground to a depth of about 80 cm. The total height of the posts is 1 m.
- On top you need to make a frame from timber and nail logs about 60 cm long.
- Line the floor with wooden boards.
- Above ground level, you can use not only brick, but also wood to build a winter hut.
- It is better to make windows under the ceiling so as not to provide artificial lighting.
- The roof can be made gable or single-pitch.
The right honey
The manual “Beekeeping for Beginners” draws special attention to the fact that not all honey is suitable for winter food.
To avoid honeydew toxicosis, for wintering bee colonies it is necessary to leave frames with honey without honeydew, collected in the first half of the honey collection. If a family overwinters on honeydew honey, then some of its members do not survive until spring - they begin to have diarrhea. Those who survive soil the nest with feces, which threatens with a dangerous parasitic disease - nosematosis. Rapidly crystallizing honey collected from willow, sunflower, sainfoin, sow thistle, and cruciferous plants (rapeseed) is not suitable for wintering. It cannot be liquefied. Bees overwintering with such honey become restless from thirst. The family weakens or dies from starvation with a supply of crystallized honey.
When preparing food, light brown honeycombs are used, in which several generations have been bred. They are less thermally conductive than light ones, retain heat in the nest better, and the queen lays eggs in them more readily in the spring. In old black honeycombs with nuclei of honey crystals remaining in them, fresh honey quickly hardens. Wintering will be unfavorable, because bees need liquid honey. Light honeycombs, in which there have not yet been broods of bees, are cold, the queen begins to lay eggs in them late, and the development of brood in them is delayed in the spring.
Preparatory activities
In the spring there is an exhibition of insects from the house. At this time, you need to inspect the families and restore order in the hives. It is necessary to open the ventilation holes and doors to dry the winter hut. Make sure that birds and mice do not get into them. Considering that during the winter the sand manages to become damp, it must be dried in the sun.
Before bringing the hives into the house, all things, equipment and tools are taken out. In the summer, the boards are checked to ensure they are free of mold and rot. Ventilation pipes are covered with new mesh. It is important to disinfect the room, whitewash and fumigate with smoke. Check the roof for leaks, as well as the corners to ensure there are no mouse nests.
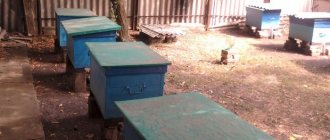
Omshanik for bees
The site for construction is chosen on a dry area (groundwater depth no closer than 1 m from the floor), on a slight slope (for drainage of melt and rainwater), with protection from winds. Omshanik is made inaccessible to mice that destroy hives, impervious to light and noise that disturbs bees.
Depending on the local conditions, buildings can be above-ground, underground or semi-underground. The most common are underground, buried to the height of the walls in the ground. In winter they will have an even temperature; in spring it will remain lower, which is important for the successful completion of wintering. The walls of the omshanik are made of brick or rubble; the wood is quickly affected by fungus.
Disadvantage of terrestrial winter huts: the walls are excessively cooled in winter, and under the spring sun they overheat, when it is too early for the bee to stop hibernating. In an above-ground room, a thermostat is needed for the omshanik - it will maintain the set temperature.
In semi-underground walls, they are buried half their height into the ground. Such omshaniks are usually built on the slope of a mountain.
Omshanik for bees consists of walls, floor, ceiling, roof, supply and exhaust ventilation. Inside they make racks for hives. The door opens inward, it is insulated with felt, and covered with roofing iron from the street.
The size of the winter hive determines the type and number of hives. The height from floor to ceiling is 2.5-3 m. The hives are placed on racks or one on top of another. Single-walled occupies 0.6 square meters. m area. Double-walled and bed hive - 0.7-0.9 sq. m. The distance from the walls to the hives is 10 cm, between rows is 90 cm.
Kinds
In total, 3 types of structures are used.
Ground
The least convenient type of omshanik. It is easy to build as it does not require a lot of time and costs for materials. But such a room has to be additionally insulated, since the walls hardly retain heat.
Externally, a ground-type winter hut resembles an ordinary building that can be used as a barn. You can easily place bee nests in it and take them out after the cold weather ends. In addition, if you cut through windows, artificial lighting is not required.
Underground
This design is considered the most convenient. The structure is located almost entirely underground, with only the roof remaining on the surface. Such winter huts perfectly retain heat and optimal humidity levels.
But it is necessary to build a room only in places where groundwater lies deeper than 4 m. In addition, construction requires more materials and effort.
Another drawback is the inconvenience of moving hives to the omshanik and removing them during warming periods.
Semi-underground
It is built if groundwater is located shallow underground. This type of winter shelter combines the advantages of two others. It is bright and moving the hives requires less effort. But you need to constantly monitor the temperature and humidity level, otherwise the nests may become damp.
Ventilation and temperature in omshanik
Humidity and wintering temperature of bees must be maintained at a constant level.
Allowable fluctuations of the latter are from -2 to +4 degrees, but the optimal one is from 0 to +2. When it's cold, bees eat more food, and their intestines become full of feces and diarrhea begins. Excess heat makes them extremely anxious. A relative humidity of 75-85% will be favorable. A higher one will cause dampness in the omshanik and the hives, while an excessive one will dilute the honey, causing it to sour. When bees eat sour honey, they develop diarrhea, become weak and die. Low humidity is not enough to liquefy the honey, it crystallizes, and the bees die from thirst and hunger.
Supply and exhaust ventilation is needed to regulate humidity and temperature in the garden. Fresh air enters through pipes under the floor, warm air with water vapor is drawn out by a pipe on the ceiling and discharged outside under the roof. The supply and exhaust are adjusted using valves. A family needs a hole with a cross-section of 8 square meters. cm. From this data the cross-sectional area of the pipes is calculated. If necessary, several of them are arranged.
What is it used for?
Omshanik is a small room where beehives are brought during the winter cold. Another name for the building is a winter shelter. It is built mainly in cold regions, where winters are especially harsh.
Thanks to omshaniks, bees endure winter more easily and consume less honey reserves. In addition, the design allows the beekeeper to monitor the condition of the insects without disturbing them too much. During the winter, you need to visit the farm several times to check the temperature in the room, food supplies and the health of insects.
In summer, the need for a winter shelter decreases. But it can be used as a storage room for tools.
Moving to a “winter apartment”
In the summer, the omshanik is thoroughly dried, the floor is covered with dry sand, the walls and ceiling are whitewashed. Don't rush into moving the hives. In autumn there are warm days for bees to fly around. When to bring bees in for the winter? Usually in mid-November in the northern and central regions, in early December in the southern.
It is acceptable for bees to winter in a barn if its walls are insulated, the walls of the hives are covered with reed mats, and silence and darkness are ensured. Construction of a real omshanik is an expensive and labor-intensive undertaking. Wintering bees in a barn is more reliable than in an open space exposed to winds and snowfall. The bee is not afraid of the cold, but of hunger, dampness and drafts, and the beekeeper is afraid of thieves if the beekeeper is far from home. The features of successfully wintering an apiary in a barn are different than wintering bees in an omshanik.
Materials for winter shelter
When you decide on a site for a house, you need to select the appropriate materials for construction.
The winterer can be:
- brick;
- wooden;
- stone.
It can be sheathed with boards or clapboard, and also plastered. It is important to determine the presence of a foundation, which is made of slabs, cement blocks, and concrete. Keep in mind that the humidity and temperature conditions in the room depend on the material.
First you need to decide on the dimensions of the house, the number of tiers, and then start calculating the boards, bricks or wood. You will also need clay to cover existing cracks, sand to cover the wall near the ground, and insulation.
Number of frames
Traditionally, up to 10 frames are installed on a strong bee colony, which they plant horizontally, on a medium one - 6. Dadan’s ones are more suitable here (145 mm in diameter is the optimal size). Take 20 frames with the prospect of varying the components. For a weak flock, 2 frames are needed so that the bees spend as little energy as possible on securing the hive and last until spring. It would be preferable to place such a family next to a strong one - through a partition - or to equip the hive with a separate entrance for each of the flocks.