The main task of the beekeeper in the cold season is to ensure that the bees overwinter with the least loss of bees and honey and meet spring healthy and vigorous. In winter, insects are inactive; any disturbance during this period is undesirable for them. Therefore, you need to prepare for the cold so that during cold weather you do not have to open the hives for inspection and feeding.
Key points in preparing bee colonies for wintering
They begin preparing bees for wintering after the autumn inspection, which is carried out immediately after the end of the last honey collection. During the inspection, the amount of honey and bee bread in stock, the strength of bee colonies, the amount of brood and the quality of the combs are determined (light brown color is considered ideal). If there is a shortage of food, its reserves are replenished by feeding the insects with sugar. When preparing families for winter, it is important to remember: it is better to have an excess of food reserves than a shortage.
Also in the fall, when the young animals have already hatched and the bees have not yet gathered in the club for the winter, it is necessary to carry out anti-mite treatment. The beekeeper should take into account that during the winter the bees do not feed on honey individually, but cling to the honey in a club, heat it and use it. As supplies are used up, the club moves up rather than along the streets to the back wall. If the club comes across an empty honeycomb on its way, the insects will not be able to cross it and will die of hunger. Therefore, it is so important to help working women form nests correctly in the fall.
Video assembling a nest for the winter
This video clearly shows all the stages of forming a nest for the winter.
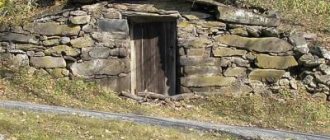
Winter hut for bees
What is a winter shelter? Already from the name it becomes clear that this is a wintering room. Typically insulated. This can be a specially equipped omshanik, or an ordinary cellar, basement, attic, veranda, etc.
Note: hives are brought into the winter hut after the last flight, when the bees have emptied their intestines for the winter. It is important that young bees from the new brood also participate in this - they have the most feces inside, and without flying around they may not survive the winter.
What temperature should be in the winter hut
The optimal temperature in the winter hut is within 0-2 degrees, up to +4 or -2-3. Bees tolerate cold more easily than heat, but a decrease in temperature in the winter hut by 4-5 degrees is bad. Water vapor settles on the walls and ceiling of the winter hut and turns into frost. When it warms up, it melts - it turns out damp, and this is mold, plus the honey liquefies and flows out of the honeycombs, floods the bees and turns sour. Trays with a 2-3 cm layer of lime help prevent excess moisture - it absorbs moisture well.
Excessive dryness is also bad. Printed honey absorbs moisture from the air - for bees in the winter hut this is the only source of water. If the air is dry, the bees will suffer from thirst. Due to dryness, honey becomes candied and becomes inedible. The best wintering is at 80-90% humidity. To combat dryness, you can hang wet rags around the winter hut or simply wet the floor.
When to form a nest
The formation of a bee nest begins after most of the bees have already hatched. For example, if the build-up begins in the first half of August, assembly begins 21 days later - around the beginning of September. You should not put off collecting bees’ nests for the winter until late autumn; you need to have time to do it before the club is formed. It is better to do this in warm, sunny weather.
Preparation
When should you start preparing for assembly and how to do it correctly? The best time is the second half of August. During this period, the bees stop feeding the drones, and the cracks in the walls of the hive are covered with sticky propolis. As soon as the drones are completely weak, they throw them away.
Pre-assembly
When starting to form a bee nest, you need to take into account how many streets are occupied by insects. For example, if 7 streets are densely covered, you need to leave 8 frames; if 8 streets, that means 9 frames. Wintering conditions must also be taken into account. If the hives are in a warm winter hut, you can add 2 frames to give the insects more space. If they remain outside, there should be as many frames as the insects can cover.
Reducing the scope
To reduce the number of frames, beebread, low-copper and empty frames are removed from the nest. Those who think that removing beebread frames will deprive future offspring of protein food are mistaken. Bee bread sealed with honey will be enough for bees. If you leave the bee bread open in the honeycombs, it will provoke the appearance of mold, and such a frame will become unusable. And if the removed frames overwinter in storage, they can be used next season or sent for re-melting.
Strengthening weak families in the fall
Weak families may not survive the winter due to the small number of individuals in the family. It is better to unite such colonies. In this case, the beekeeper must independently decide which queen to remove and which to leave. Also, if there are no reserve queens in the apiary, then a queenless bee colony should be combined with one that has a good queen. After a few days, the nest of the newly formed family is inspected, and excess frames without food and brood are removed. The remaining honeycombs should be densely covered with bees. In this case, two nests are combined into one common one: frames with brood are placed in the middle, and then frames with beebread and honey.
Features of feeding bees
The winter period is inactive for bees, but this does not mean that they do not require feeding. Usually, by the end of winter, the food reserves in the combs dry up, and the insects need help with nutrition. Honey is a natural food, but if it is not available, it can be replaced with a surrogate - sugar syrup.
It’s better to prepare a sweet kandi mixture, which is done like this:
- The honey is heated and liquefied, and a little powdered sugar is added to it.
- The composition is kneaded for a long time until it becomes homogeneous.
- Flatbreads are made from it and packed in plastic film, in which holes are cut.
- Kandy is placed on top of the frames and insulated.
This feeding does not provoke insects to fly out during the cold season and provides them with a sufficient amount of nutrients. You can add a few salt granules and pollen to the mass.
Methods for forming a bee nest for the winter
The final assembly of the nest occurs after most of the young have hatched and the old individuals have died off. As a rule, this happens at the end of September, and during warm autumn in the first ten days of October. The main thing is that the bees have time to put the nests in order after assembly before the onset of cold weather. Listed below are the main methods of forming nests for wintering.
One-sided corner
Single-sided bee nest assembly is suitable for medium-sized colonies. With this method, the fullest copper frames are placed on the southern or southeastern side of the evidence. The rest are arranged in descending order. Thus, the last frame should be the one with the least amount of honey (2.5 - 3.5 kg).
Double sided
Double-sided assembly of a bee nest for the winter is the most popular method among beekeepers. The point is that on both sides of the center there are frames with an equal amount of food. With this method, the fullest copper frames are placed on both sides of the nest, after them - lighter frames (with honey and beebread), then combs with honey of at least 2.5 kg, and in the middle 3 to 5 half-filled combs are placed, depending on the strength families.
Beard
The most economical way to assemble a nest. It is used when there is a lack of food supplies, as well as for wintering weakened families. In this case, full-copper frames are placed in the center, and then honey is poured in descending order, from more to less. This option is used infrequently, since its principle contradicts the natural way of life of honey collectors.
Volokhovich method
According to this method, bees winter in a two-tier hive of the Dadan-Blatt model. The twelve-frame structure in which the bees are kept is installed in the upper tier, and the lower tier remains free. In the liner, two full-copper frames are installed flat on bars. Thus, in total there are 14 frames in the case, densely covered with bees. The lower empty tier ensures free movement of bees from the periphery to the center of the nest, and vice versa, which contributes to a successful wintering.
Wintering in shelters, trenches, under straw
Let's take a brief look at three other popular methods of wintering outside. In essence, this is still the same wintering in the wild (not in omshanik), but there are nuances:
- Wintering in casings - usually for groups of 4-6 hives. Build wooden frames around the hives, fill the space inside with leaves (moss, sawdust, shavings, pine needles). Cover the casings themselves with snow too.
- Wintering under straw bales. Place the hives on wooden platforms and cover all sides with 50 cm bales of straw. Leave both entrances open.
- Wintering in trenches - on the southern slope in dry, elevated places, so that it does not flood in the spring. The depth and width are one meter per meter, slightly narrower at the bottom, wider at the top. Length – according to the number of hives (no more than 25). Cover the floor with 3-5 cm of sand, logs or slabs on the bottom, and hives on top so that they do not touch the walls of the trench and each other. Open the lower entrance completely, bend the canvas at the back wall by 0.5-1 cm. For the hive - croaker and straw 30-50 cm, dry soil up to 50 cm. Make slopes so that water does not penetrate inside, and a drainage groove. In the center there is a 10x10 cm ventilation pipe, cover the top from snow and rain, close it only if it is colder than -20.
Another useful video about the reasons for poor wintering:
The main disadvantage of wintering in the wild is animals and envious neighbors. Mostly, most likely neighbors.
Caring for bees after nest formation
Bees can overwinter both indoors and outdoors. Pros of wintering indoors:
- less feed is wasted
- the service life of the hives increases.
The temperature inside the winter hut should be at least 0⁰C and no more than +4 ⁰C. Before removing the hives for the winter, the premises are deratized and ventilated. In the open air it is impossible to regulate the temperature and humidity of the air, but it is necessary to shelter the hive from the wind. They are covered with roofing felt and installed in a quiet place, protected from sharp gusts of wind. Periodically you need to check whether tree branches knocking on the roof are disturbing the bees or whether rodents are bothering you. If there are woodpeckers and tits nearby, the entrances should be covered with bars. A safe winter is the key to successful beekeeping. If the beekeeper manages to create conditions that are comfortable for bees to winter, the colonies will emerge alive, strong and healthy in the spring.
Video
We offer several videos with useful information on organizing the wintering of a bee colony in the wild and in the winter hut, proper ventilation to prevent condensation and other subtleties of beekeeping:
An avid gardener, beekeeper and gardener, partial to dogs and cats and other pets. Spends spring, summer and autumn at the dacha and experiments in the garden beds. Loves to communicate with “advanced” summer residents and find something new and useful for himself. Collects the best methods of preparation and recipes for preparing dishes from products grown with your own hands. He is happy to share his discoveries and secrets with readers.
Found a mistake? Select the text with the mouse and click:
In little Denmark, any piece of land is a very expensive pleasure. Therefore, local gardeners have adapted to growing fresh vegetables in buckets, large bags, and foam boxes filled with a special earthen mixture. Such agrotechnical methods make it possible to obtain a harvest even at home.
Compost is rotted organic remains of various origins. How to do it? They put everything in a heap, hole or large box: kitchen scraps, tops of garden crops, weeds cut before flowering, thin twigs. All this is layered with phosphate rock, sometimes straw, earth or peat. (Some summer residents add special composting accelerators.) Cover with film. During the process of overheating, the pile is periodically turned or pierced to bring in fresh air. Typically, compost “ripens” for 2 years, but with modern additives it can be ready in one summer season.
Natural toxins are found in many plants; Those grown in gardens and vegetable gardens are no exception. Thus, the seeds of apples, apricots, and peaches contain hydrocyanic acid, and the tops and peels of unripe nightshades (potatoes, eggplants, tomatoes) contain solanine. But do not be afraid: their number is too small.
Humus is rotted manure or bird droppings. It is prepared like this: the manure is piled up in a heap or pile, layered with sawdust, peat and garden soil. The pile is covered with film to stabilize temperature and humidity (this is necessary to increase the activity of microorganisms). The fertilizer “ripens” within 2-5 years, depending on external conditions and the composition of the feedstock. The output is a loose, homogeneous mass with a pleasant smell of fresh earth.
Tomatoes have no natural protection against late blight. If late blight attacks, any tomatoes (and potatoes too) die, no matter what is said in the description of the varieties (“variety resistant to late blight” is just a marketing ploy).
Convenient Android applications have been developed to help gardeners and gardeners. First of all, these are sowing (lunar, flower, etc.) calendars, thematic magazines, and collections of useful tips. With their help, you can choose a day favorable for planting each type of plant, determine the timing of their ripening and harvest on time.
In Australia, scientists have begun experiments in cloning several varieties of grapes grown in cold regions. Climate warming, which is predicted for the next 50 years, will lead to their disappearance. Australian varieties have excellent characteristics for winemaking and are not susceptible to diseases common in Europe and America.
You need to collect medicinal flowers and inflorescences at the very beginning of the flowering period, when the content of nutrients in them is highest. Flowers are supposed to be picked by hand, tearing off the rough stalks. Dry the collected flowers and herbs, scattered in a thin layer, in a cool room at natural temperature without access to direct sunlight.
One of the most convenient methods for preparing a harvest of vegetables, fruits and berries is freezing. Some believe that freezing causes the nutritional and health benefits of plant foods to be lost. As a result of the research, scientists have found that there is practically no decrease in nutritional value when frozen.
Making hive frames with your own hands
You can not only buy frames for honeycombs in a special store, but also make them yourself.
The following types of wood are suitable for constructing frames:
- Linden;
- poplar;
- cedar;
- willow;
- aspen.
To make frames, you will need a machine; a metal table with a circular saw built into it is suitable.
- bars;
- overhead table;
- pusher, which is made of wood;
- guide angle;
- boards for the sides.
Step-by-step instructions for making frames with your own hands:
- First of all, dry the wood from which you will make the frames. The permissible amount of moisture is no more than 15%.
- After drying thoroughly, check each workpiece for cracks and knots. All parts must be smooth, without any snags. If they are not there, then you can safely begin processing the material. The most popular manufacturing method is Dadan. The Dadan frame size is usually 43.5 cm in length and 30 cm in height. The body of such a hive can easily accommodate 12 frames for bees. An addition is that a magazine is also inserted into the hive; its length is also 43.5 cm, and its height is half that, 14.5 cm.
- Cut the bars using an overhead table, which is used when creating frames. This table helps to cut bars of the same size, and also allows you to safely work with the saw.
- After cutting, it is also advisable to dry the workpieces. Drying takes 3 days.
- After drying, connect the side frames and all the planks to each other.
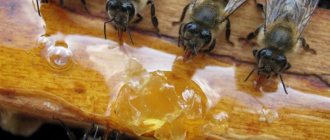
Rules and methods for selecting quality honey for wintering bees
To select high-quality honey, a series of tests should be carried out to show the presence of honeydew in the honey. This is a sweet liquid secreted by insects that feed on plant sap. Unlike nectar, honeydew honey does not contain phytoncides and other beneficial substances. Bees that feed on honeydew can have their lifespan reduced by more than half.
Vinegar-lead method
To carry out analysis using this method, Temnov’s special field laboratory is used.
Items needed for the laboratory:
- case for test tubes;
- glass bowl;
- comparator;
- bottle of water;
- crystalline lead acetate;
- distilled water;
- large water pipette;
- small pipette for reagents.
Step-by-step instructions for the method:
- Take about 1/5 of honey into a small test tube and add water.
- Pour all the contents into a large test tube.
- Pour water into the small test tube again, trying to wash off the remaining honey from it. Pour everything into a large one.
- Add 2 drops of lead acetate to the solution.
- To stir thoroughly.
- Place the test tube in the comparator and look through it, like through glasses, at the horizon line.
- Nearby there is a control test tube with flower honey. If the horizon line is not visible through the first test tube, then there is too much honeydew.
- To better determine the amount of honeydew being tested, add water drop by drop until the transparency is equal to the control tube.
- If, when adding water, the number of drops is more than 60, then the honey is of poor quality and it is better not to use it for feeding.
Alcohol analysis
Mix honey and distilled water in a 1:1 ratio. Next, you need to take 10 parts of wine alcohol and mix everything thoroughly. If cloudy inclusions begin to appear, then the honey contains honeydew.
Lime analysis
Mix 1 part honey and 1 part rainwater; if you don’t have it, you can use distilled water. Also add 2 parts of lime water to the mixture, which you can prepare yourself - for this you need to pour 100 g of quicklime into 1 liter of cold water, mix thoroughly and strain through cheesecloth.
Next, heat the prepared mixture to a boil and examine: if there are flakes that have precipitated, this indicates that honeydew is present in the product.
To prepare bees for wintering, it is necessary not only to prepare the required amount of honey to feed the insects, but also to check its quality. And regular care of the hives will help bee colonies survive the winter without problems and begin their usual work next season.
Home improvement
In order for pets to feel as comfortable as possible in the winter, the hives must be carefully prepared and insulated for the winter. Since bees are our wards, beekeepers must take care of their safety.
If an open type of wintering was chosen, then the “houses” are insulated on all sides, inside and outside. For these purposes, dry moss, straw, and grass are most often used. Styrofoam will also work.
The outer parts are covered with straw mats on top and sides, covered with corn stalks, and the empty areas are covered with sawdust. The selected location for the hives must be protected from wind and drafts, and it is also necessary to minimize the impact of precipitation. You should carefully monitor various rodents that can enter winter hives and disturb the rest of insects.
If the bees are supposed to winter indoors, then the main thing is to ensure good ventilation and the ability to maintain a humidity level of about 80% and a temperature not lower than 0°C. The room can be above ground or semi-basement, well insulated.
Bees are removed to winter huts with the onset of persistent cold weather, when it is unlikely to be warm anymore. Cleaning is done in dry weather. You need to move the houses very carefully so as not to disturb the bees, as this can cause them to leave the club and crawl away, and this threatens their death. The hives are placed on racks in several tiers, with entrances facing the aisle. Weak bees are on the top, strong bees are on the bottom. The entrances are opened only when the bees have calmed down. First, they are kept open for several days, and then the vent is opened to regulate the temperature.