Any person involved in livestock farming knows from his own experience how important it is to competently organize the processes of raising livestock and caring for it, because the overall profitability of the farm is the fundamental task of the farming business and breeding pigs is no exception. The necessary equipment and feed for animals (especially when it comes to large livestock) are not cheap, so it is extremely important to minimize feed losses by choosing the right feeders for pigs.
Equipment for a pigsty does not have to be bought in a store; any farmer can make everything necessary with his own hands from scrap materials
In this article we will look at different types of feeders and tell you how to make them yourself and what you will need for this.
Basic requirements for the product
Farmers should remember that a well-made product greatly reduces costs. After all, it is difficult to spill food from a good feeder (and pigs love to do this), it will not rot, causing leakage of wet food, and most importantly, it will be extremely convenient to use.
Before creating a feeder, you should study a set of unwritten, but extremely important sanitary rules , otherwise the animals will get sick, products will break, and the farmer’s business will suffer losses on a huge scale:
1Feeders must be kept clean
This is a key requirement, so how easy it is to clean the feeders after the pigs eat will be very important. The main thing is not only to be able to easily reach hard-to-reach places, but also to ensure high-quality cleaning of the product from food debris, other dirt, etc. So you should also pay serious attention to the material of the feeder.
2Pigs must not be able to get into the food compartment
This applies even to small piglets, otherwise they will deposit waste products into the feed and bring in dirt or debris. And this means 100 percent occurrence of bacteria, the presence of worm eggs and much more.
A good way to protect the feeder from pigs entering is to be careful about the height of the front wall. Due to their short legs, pigs are not inclined to jump, so this approach will several times reduce the desire of boars to climb into the feeder and make a mess there.
3Feed should not crumble
Therefore, it is necessary to make a certain recess in the feeder and protect the food with the side walls from being scattered by animals. However, this is just an example, and a more precise structure will be created in the drawings.
It is also important to remember that the liquid food compartments must be sealed. If the liquid leaks, it will increase the humidity in the room. Such situations have a negative impact on the health of pigs, and, consequently, bring losses for the owner.
4Pigs should have as much access to feed as possible
A feeder with cut/beveled corners will work great. But a completely round feeder is an ideal solution.
However, problems with its stability may arise (there are not many ways to achieve this in such conditions). On the other hand, if a round feeder is stable, it will most likely be heavy. This means that it will be more difficult to wash, clean, carry, etc.
5Other nuances
It is advisable that the feeder be inclined. This will allow food debris to always accumulate in one place, and not be scattered throughout the entire area.
The product must be made of such material that it does not deteriorate from exposure to the sun and/or heat. There is nothing worse for animals than melted plastic or rusted metal. It is also important that no toxic substances are released during operation: this is critically important for young piglets and sows.
The edges of the structure must be completely safe for animals. The probability of cutting yourself is 100%, because pigs are not very neat animals, as well as clumsy.
Feeders, if used for different feeds, should be divided into sections: for dry feed and for liquid feed. If you need to provide pigs with drink, then for this you need to create separate structures - special drinking bowls.
The best solution would be the size and type of design so that several heads can feed at once. Also, for small piglets and adult boars, vessels of different sizes are needed.
It is impossible to raise a piglet into a mature pig using one size feeder. There must be several of them: an adult will not be able to get its muzzle into a small hole, just as a small piglet simply will not reach the food in a large vessel.
For piglets, you can make a feeder with a canopy: due to their small stature, they will have access to food without problems, but adult pigs will not be able to do this.
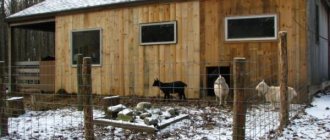
How to properly set up a pigsty
When designing a barn for pigs with or without separate pens, make sure that the animals live comfortably and that caring for the farm does not cause unnecessary difficulties. Make drinking bowls and feeders for wet or dry food so that they provide pigs with free access to feed and water, but prevent them from becoming clogged with animal waste products, and so that the containers can be easily cleaned at any time.
Make drinking bowls and feeders for wet or dry food so that they provide free access for pigs
You can build a pig shed from wood, brick, adobe, or cinder blocks. The main thing is not to use concrete and reinforced concrete, as they have poor thermal conductivity. Ruberoid or slate is suitable for the roof, and the ceiling itself will need to be insulated. It is also advisable to make the floor insulated (you can lay unplaned boards, covering them with straw) and be sure to provide a slight slope of the floor surface towards a groove dug near the wall to drain pig excrement.
https://youtube.com/watch?v=gzyO8qTlzug
Video about a pig drinking bowl
Sufficient height for a pigsty is about two meters. The area depends on how many pigs you intend to keep.
In order to maintain cleanliness, it is recommended to arrange a feeding area with feeders and drinking bowls in one half of the pigsty, and raise the other half slightly above the floor level and adapt it for resting animals.
For pregnant females, sows and breeding boars, it is advisable to make separate pens equipped with individual drinkers and feeders. For one pig you will need a pen with an area of three to four square meters, and for sows with piglets - at least five square meters.
In the summer, to ventilate the pigsty it will be enough to keep the windows and doors leading to the walking area open, but in winter it is necessary to take care of making the simplest ventilation from a metal pipe led through the window opening from the barn to the street. In addition, in winter you will need to provide heating for the pigsty, since a comfortable temperature for pigs should be at least 13 degrees, and for newborn piglets - from 18 degrees.
For pregnant females, sows and breeding boars, it is advisable to make separate pens equipped with individual drinkers and feeders
Required dimensions
To make a pig feeder with your own hands, you need to understand the dimensions of the structure. They fluctuate greatly and depend on many factors:
- number of goals;
- type of pigs (piglets, adult pigs, sow, young animals, etc.);
- breed of pigs (directly affects the size and height of the sides in the feeders);
- dimensions of the room where animals are bred, etc.
On average, it is recommended to focus on the following width in feeders:
- adult pigs: 500 mm for dry feed, 400 mm for liquid feed;
- weaned piglets: 300 mm for dry feed and 250 for liquid feed;
- suckling piglets: 150 mm for all types of feed with a front board height of 100 mm.
As for length , it depends on the age of each individual:
- suckling piglets – 150 mm;
- young animals up to 5 months – 250 mm;
- young animals from 5 months – 300 mm;
- sow – 400 mm;
- adult boar – 450-500 mm.
For a large number of heads, it is best to make one long feeder. This will ensure continuity of nutrition and ease of feed consumption.
Separation of feed supply for animals of different ages
In a large farm, young animals and adults should be fed separately. Eating food together between pigs of all ages can have the following consequences:
- adults can trample piglets;
- bacteria and harmful insects from older pigs can cause diseases in young animals;
- the piglets will not receive the required amount of feed and will be stunted.
To ensure that the young animals eat well, a separate structure is made for them. Separation between animals occurs by adjusting the thresholds and sides: in this way, adults will not be able to reach the piglets’ feed, and young animals will not eat from a common high trough.
The best option would be a do-it-yourself pig feeder, the sides of which are at the chest level of small piglets. This will allow animals to eat without tilting their heads, which will have a good effect on the development of bone and muscle tissue.
The food tray should be angled so that food collects in one place. To achieve this effect, you need to make the rear pillars a few centimeters higher than the front ones. This design not only simplifies eating, but also facilitates the process of cleaning the container.
To make the feeder last longer, you can adjust the height of the threshold using hinges. To do this, grooves are made in the side walls of the feeder, and the front sheet of plywood should go down to the floor in front of the racks. To secure the adjustable side at the desired height, you can use self-tapping screws.
To prevent young animals from getting into the trough of older pigs, you need to install a ceiling made of boards. This will not be an obstacle for adults, and piglets will not be able to scatter food. To properly cover a pig feeder with boards, you should watch a video or photo from master classes.
Wooden pig trough
One of the most environmentally friendly materials for making a feeder is wood. It will not require large financial costs, and you can get by with a minimum of tools.
Boards can also be used of the third grade, since the wooden trough is disposable - literally for the life of one piglet, i.e. from 7 months to a year. In order to ensure disinfection, such a trough is then burned. A new trough is made for the new piglet.
The main disadvantage of wooden feeders is their poor moisture resistance.
The first version of a wooden trough
To make a wooden trough you will need:
- front and rear walls: board 1 m long, 20 cm wide and at least 3 cm thick – 2 pcs.;
- side walls: board 40 cm long, 20 cm wide and at least 3 cm thick – 2 pcs.;
- bottom: board 1 m long, 25 cm wide and at least 3 cm thick – 1 pc.;
- screws, nails;
- screwdriver, hammer;
- saw (circular or hand), jigsaw, jointer, planer and similar tools.
Here is a drawing of the trough with dimensions (in mm):
Work order:
- For boards intended for the front and back walls, remove the gussets from the longitudinal edges to obtain beveled corners.
- Attach the board intended for the bottom to the beveled cut of the side wall with the long side, and secure with self-tapping screws. For greater strength, reinforce the product with nails.
- Screw the second (front) wall in the same way. The result will be a structure shaped like an inverted isosceles trapezoid.
- Take one of the boards for the side walls. Attach this board to the end of the previously obtained structure, and draw the outer contour of the trough. Do the same with the second board.
- Saw out the excess to create pieces that are accurate in size.
- Install the end parts and tighten them with self-tapping screws. If you took the end boards wider and they ended up higher than the trough, you can shape them with an arc, cutting them out with a jigsaw.
This trough is designed for 2 buckets of feed for two piglets. For added strength, attach a cross beam in the middle.
You can learn more about the manufacturing technology of such a feeder by watching the video below:
To prevent the trough from leaking, you can lay twine in the joints during assembly.
Second version of a wooden trough
A pig feeder can also be made from two boards connected at an angle:
You will need:
- 2 rectangular edged boards of the same length;
- 2 triangular parts that will be the end walls of the feeder;
- 3 bars with a cross-section of 20x50 mm, equal in length to the width of the finished trough;
- 2 beams 50x100 mm for support.
Assembly sequence:
- Connect two long boards so that they form a right angle. Secure with nails or screws.
- Attach triangular parts to the ends of the trough, secure them with nails or self-tapping screws.
- For greater strength of the product, and also as upper limiters, fasten the crossbars at equal intervals, having previously shaped their ends at an angle of 45 degrees.
- Two beams can be used as support. Cut a groove for a trough in each of them. Place the trough on supports.
The feeder is ready!
Drinking containers
Raising pigs on farms, as well as on farms, involves arranging not only feeders, but also drinking bowls for pigs.
Such designs can be purchased at any specialized store or made with your own hands.
Drinkers for pigs must meet sanitary standards and requirements:
- Clean condition.
- Availability of water.
- Availability of fresh drink.
- Uninterrupted supply of clean water.
- Long service life and durability.
- Easy to clean and wash.
Sippy cups for pigs can be made of different materials and have different equipment.
The best option is metal products made from anti-corrosion metals, equipped with a filter to maintain cleanliness and a device that regulates the water supply.
In winter, in open areas there is a high probability of water freezing in tanks. Therefore, it would be advisable to install a water heating device under the bottom of the containers.
Depending on the method of water supply, there are several types of drinking bowls for pigs.
Cup systems. The advantage of this design is the economical consumption of drink and the convenience of drinking. The disadvantage is that it gets clogged quickly and requires frequent cleaning.
Pig drinkers equipped with nipples are versatile. These are drinking bowls for piglets and adults. This is a simple design that consists of three elements - a nipple-shaped valve, a metal body and a special seal. By pressing on the valve, the artiodactyl activates the mechanism for supplying water from a container or water supply. The main advantage of such systems is hygiene, economy and rationality of water consumption, and reliability.
For the convenience of drinking young artiodactyls, it is necessary to use small containers with a weakened valve; drinking bowls for mature pigs are equipped with large nipples.
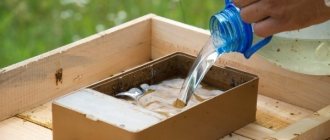
Self-production
The easiest way is to make it from a ready-made trough or metal box, the height of which is 50 cm - so that the pigs will not climb into it with their feet, and so that they do not turn the container over - fasten it to a wall or other stationary object so that it can be detached - for washing the container.
A good idea is to hang a small metal or plastic trough on the wall at an angle. The water will be clean, but it will need to be renewed daily.
An excellent and inexpensive option is to take half a plastic pipe, make a plug on the sides, and for stability, build a rectangular gutter from an old brick. Such a drinking bowl can be easily removed for washing, and animals cannot climb into it.
How to make a nipple drinker with your own hands - we provide detailed video instructions.
It is worth remembering that it is feed that affects the quality of pork, so their choice should be taken with full responsibility.
Keeping piglets and adults under conditions of underfeeding and inadequate diet reduces the productivity of animals. This leads to a delay in their growth and development, and as a result, an increase in the cost of finished products.
To improve the quality of pork, the following types of feed are required:
- Cereals – barley, wheat.
- Legumes.
- Combined silo.
- Alfalfa.
- Root vegetables - beets, potatoes, carrots.
- Millet.
- Recycled dairy products – skimmed milk, whey.
Animals are fed in accordance with their weight, age and intensity of feed consumption
In pig nutrition, it is very important to choose a balanced complex of vitamins, minerals and protein. Anyone can raise pigs
If you follow the above recommendations, keeping pigs as a business will definitely bring good luck and success to everyone.
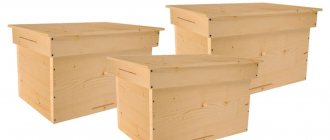
Plastic barrel feeder
Industrial companies purchase the necessary equipment and containers from suppliers, but for a small number of pigs you can make a feeder yourself.
And most importantly - completely free, not counting the tools. One of the simplest options is a feeder made from a plastic barrel.
Using an unnecessary barrel, you can make an excellent feeder for pigs. However, first of all, you need to make sure that no toxic or poisonous substances were stored in the plastic barrel (it will be incredibly difficult to get rid of the chemical residue). If the keg is made of food-grade plastic, this is a huge plus.
Manufacturing option
The scheme for creating a feeder is very simple and consists of a couple of steps that can be completed in literally 1-2 hours. To work you will need:
- marker and ruler;
- saw, jigsaw or grinder;
- wooden blocks;
- screwdriver and screws;
- sandpaper.
Manufacturing process:
- Using a ruler and marker, you need to mark the barrel.
- Using a saw, jigsaw or grinder, cut the barrel in half according to the markings.
- The cut parts should be secured using self-tapping screws on wooden blocks. This will seriously increase the stability of the future feeder.
- Sharp edges need to be sanded down to prevent the animals from getting hurt.
Pros:
- the easiest way to make a pig feeder;
- minimum costs;
- ease and efficiency of use;
- easy to carry and clean.
Minuses:
- pigs can climb entirely into the feeder without any problems;
- very unstable;
- plastic can release harmful gases when exposed to the scorching sun (you must be careful when choosing the location for installing such a feeder).
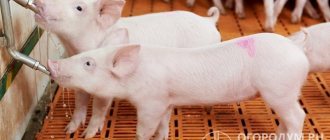
Purpose
As is already clear from the name, a feeder is a special structure that is used for the orderly supply of feed to pigs. Using this device, you can not only improve the quality of saturation, but also save money by using feed more efficiently.
There are many types of feeders, which include not only different designs, but also the use of various devices that simplify and automate the process of feeding feed.
Typical feeder design for feeding seven piglets at the same time
Feeder from a gas cylinder
Another way to create a feeder, similar to the previous one, is from a gas cylinder. It’s not for nothing that this type of feeder is included in a separate item: compared to analogues made of plastic or wood, the cylinder consists of heavy-duty metal. Welded to an iron frame, this structure will last 20 or even 30 years.
Required tools:
- grinder or hacksaw;
- welding machine;
- other materials as needed.
Manufacturing process:
- The first step is to open the valve completely to make sure that there is no gas left in the cylinder.
This point should never be ignored, otherwise an explosion may occur when cutting the container. Follow safety precautions when creating feeders: even a piece of wood when working with a saw can fly off and get into vulnerable places on the body (eyes, throat).
- Then the valve is cut off from the cylinder using a grinder or a hacksaw.
- After these steps, you should fill the container with water and rinse it this way several times (to wash off the condensation). It is better to drain the flushing water in places far from people and animals, because the condensate from the gas can have a rather strong and unpleasant odor. To protect bystanders as much as possible from toxic fumes, you can pour water directly into the sewer.
- Next, the gas cylinder must be cut with a grinder into 2 equal (for adults) or unequal (for boars and piglets, respectively) parts.
- Additionally, metal rods can be welded across the container - they will not allow the pigs to get into the confines of the feeder.
- To increase stability, it is enough to weld a metal (or knock down a wooden) frame.
It is better to weld the feeder from a gas cylinder at a slight angle to make it easier for pigs to consume feed.
Another way to make a pig feeder from a balloon is shown in the video below:
Advantages:
- significant structural stability;
- durability;
- variability during creation (you can add or change many details without worrying that the design will break);
- Complete immunity to sun rays or excessively high/low temperatures.
Flaws:
- may rust if you do not take care of cleaning;
- difficult transportation;
- It will be extremely difficult to make such a feeder without special skills;
- at high temperatures, the metal heats up and can cause burns when touched (but when installed under a canopy, the problem is solved).
Self-production
Today, manufacturers offer a wide range of ready-made containers for animal feed, but despite this, many farmers prefer to make them themselves. A feeder for pigs will not require special skills or money from the livestock breeder, since the simplest and most affordable materials are suitable for manufacturing. We offer several original ideas that you can use when looking for the basis for simple and convenient feeders.
The optimal parameters and technology for assembling a homemade bunker feeder for pigs are presented in the following video:
Gas cylinder
Gas cylinders are strong and durable, so they are perfect for making a feeder out of them. To turn an old cylinder into a necessary and practical thing, you must adhere to the following procedure:
- Unscrew the cylinder valve using the handwheel. Check that there is no gas left inside. The easiest way to do this is to apply soap suds to the outlet hole and observe. If bubbles appear, this means that there is gas; if there are no bubbles, the cylinder is suitable for further work.
- Lay the product on its side and cut off the valve with a hacksaw. This will not be difficult to do, since it is made of soft metal – brass. The main thing is to try to ensure that there are no sparks during sawing.
- Fill the bottle with water to the very top. Shake to remove condensation from the sides. Pour the used water as far away from the house as possible, as the liquid will have a specific odor that does not dissipate for a long time.
- Cut the balloon lengthwise into two parts. Please note that when making a feeder for piglets and adult pigs, the parts may be different; if the product is intended exclusively for adults, cut the container exactly in half.
- Weld reinforcement across the body of the cylinder halves; this will further strengthen the structure and eliminate the possibility that animals will climb into the food container.
- To completely eliminate the smell of gas, it is recommended to additionally burn the finished product with a gas burner.
Detailed step-by-step instructions for creating a practical feeder from a gas cylinder are presented in the video:
Plastic barrel
If a plastic barrel is no longer suitable for its intended use, you can use it to build a convenient feeder. This is easy to do even without a special drawing.
The procedure is as follows:
- Make markings and divide the barrel into the required number of sectors using a jigsaw.
- Attach the resulting container to the wooden legs using screws.
- Remove burrs and sharp edges using sandpaper.
The photo shows design options cut from a plastic barrel
Wood materials
Wood is the safest and most environmentally friendly material, which is often used in the manufacture of structures for feeding livestock. You need to do the following:
- Prepare boards and bars of the required sizes for the walls, bottom and legs. Fasten all the parts with nails or screws (the trough can also be cut from a wide tree trunk).
- After the work is completed, you should sand the surface with sandpaper, removing all roughness.
Wooden products are environmentally friendly and simple, but inferior in durability
Asbestos cement pipe
A pig trough can be constructed from a long asbestos-cement pipe. This is done like this:
- The pipe is cut longitudinally and installed on a concrete support.
- The cuts on the sides are covered with wooden plugs or covered with cement.
- Attach a protective grille that will prevent animals from getting inside the product.
Long feeders made of pipe are usually placed permanently in the pigsty
All proposed design options are quite simple and practical. We hope that you will be able to do any of them without extra effort and financial costs.
Hopper metal (welded) feeder
Such a feeder is a bunker for food and a tray into which it will flow evenly. Making such a structure is quite difficult. But the advantages of this bunker feeder are that:
- the farmer's time for servicing the livestock is reduced (feeding occurs in a semi-automatic mode, since the feeder replenishes itself, and feed is replenished only when the bunker is empty);
- metal washes well and is easily disinfected with special means.
First version of the feeder
To make it you will need:
- 2 iron pipes with a diameter of 310 mm (or two old gas cylinders);
- 4 pieces of metal to make the ends of the trough;
- metal corner for legs;
- metal reinforcement for crossbars;
- Bulgarian;
- welding machine with electrodes.
Sequence of work:
- Cut one pipe, 1 m long, lengthwise into 2 equal halves.
- Place these halves side by side and weld them together along the long side.
- Cut semicircles for the ends from separate metal sheets and weld them.
- Weld the legs for stability. They can be anchored to the floor so that the feeder does not move from its place.
- Weld the sides at the edges so that the pigs do not get injured by sharp cuts when feeding, and also so that the pigs do not scoop the feed out of the feeder and spill it on the floor.
- Install the second pipe vertically in the center of the welding seam of the halves of the first pipe.
- Use a grinder to cut out a groove so that the second pipe “sits” on the partition. Weld it.
The size and shape of the groove can be used to regulate the flow of feed into the feeder. Choose the best option for yourself.
- To prevent pigs from getting into the feeder, it is recommended to weld cross rods in the middle.
The following video shows a mini version of such a feeder:
Second version of the feeder
Required materials and tools:
- steel or aluminum sheets about 3 mm thick;
- a metal pipe 1 m long and at least 60 cm in diameter, otherwise the container will be too small;
- Bulgarian;
- welding machine with electrodes.
Here is an approximate drawing of this feeder:
Stage 1. Make a metal trough:
- cut the pipe in half lengthwise;
- Attach the plugs from the ends using welding.
Stage 2. Next, make a bunker (it should hold at least 40 kg of feed). The walls of the bunker must be inclined so that the feed goes down them under its own weight:
- Using a grinder, cut out 4 parts for the bunker from a metal sheet according to the diagram.
- Weld 3 sides of the bunker.
- On the fourth wall, make a “cone” - a special rod that, when touched by pigs, moves and breaks the compacted food in the bunker:
- On the inside of the bunker wall, in the center at the top and bottom, weld 2 nuts flat and one nut on top of them.
- Thread the reinforcement rod into the nuts.
- Weld 2 transverse sections onto it.
- Bend the lower part of the reinforcement with a hook; it will be in the feeder.
- Assemble the bunker by welding the last, fourth wall with a cutter.
How the bunker is assembled is shown in the video below:
Step 3. Connect the hopper to the trough by welding. Secure the feeder to the wall or floor, otherwise the pigs may knock it over. Ready!
Kinds
In addition to the usual wooden trough where the feed is poured, there are two more types of more technologically advanced feeders.
Bunker
They consist of a trough and a bunker tank, which is mounted on top. The structure is mounted on a stable body, which allows convenient access for a person to fill with feed and for its consumption by pigs.
A damper is installed on the bunker, which opens or blocks the flow of food from its cavity to the trough. The trough can be divided into separate modules; in this case, several valves are installed to dose the feed.
Hopper feeder divided into three sections.
Automatic
By design, it is a bunker feeder, which is equipped with an automatic mechanism for dosing and supplying feed. Meals are provided strictly according to time, which is controlled automatically. This allows you to achieve better results in live weight gain.
The automatic mechanism is equipped with an electric drive that drives the shutters.
Complex design of an automatic bunker feeder for a private pig farm.
Ceramic pipe feeder
Feeders made from such pipes are resistant to corrosion and rotting.
Materials and tools:
- ceramic pipe with a diameter of 450 mm;
- concrete: M500 cement, sand and crushed stone in a ratio of 1:2:3;
- cement mortar: M500 cement and 5 buckets of sand;
- boards for molds for concrete supports;
- reinforcing bars with a diameter of 15 and 20 mm (for fencing grilles and holders, respectively);
- 2 plastic plugs for pipes (for example, external ones for transporting pipes with a diameter of 450 mm);
- Bulgarian;
- welding machine with electrodes;
- tape measure, marker for marking.
Dimensions in mm
Manufacturing procedure:
- Carefully cut the pipe in half lengthwise.
- Cut a 100 mm wide ring from the sides.
- Make two rectangular molds from wooden boards according to the dimensions shown in the drawing above, adding 2-3 mm. Fill each mold with concrete, avoiding any voids. To compact the mixture and get rid of air bubbles, you need to take a metal rod and “pin” the concrete over the entire area in increments of 5-10 cm. Lay an oilcloth on top and lay a half-pipe ring. Press down on the ring to force out excess concrete.
- After 1-2 days, when the concrete has dried, remove the wooden formwork from the product.
- Place the half pipe on concrete supports.
The manufacture of supports can be simplified. Fill a strong plastic bag with concrete and tie it tightly. There must be two or more supports (depending on the length of the ceramic pipe). Place the bags of concrete in a row, and lay the half-pipe on top, pressing it a little so that the bags of concrete take the required shape. After the concrete has dried, remove the polyethylene.
- Plug the ends of the half-pipe. If you don’t find ready-made pipe plugs on sale, you can fill a strong plastic bag with cement mortar, tie it and place it on the edge into a half-pipe, giving the mixture the desired shape to form an end.
- To seal the trough, coat all seams with cement mortar.
- To prevent pigs from climbing into the feeder, weld a grid from reinforcing bars according to the dimensions indicated in the drawing. Secure it to the trough.
The feeder is ready!
Mobile bunker feeder (winter version)
This is an excellent option for keeping a large number of pigs outdoors during the winter. It is easy to move this feeder as it glides on the snow. The only condition is that the winter must be snowy.
You will need:
- plastic barrel with a capacity of 200 l;
- a pair of old skis;
- plywood about 12 mm thick (you will need pieces of 1250 x 600 mm - 1 piece, 355 x 500 mm - 2 pieces, 550 x 600 mm - 1 piece and 420 x 600 mm - 2 pieces);
- 1 board 50 mm x 350 mm x 2.5 m;
- 1 board 50 mm x 180 mm x 2.1 m;
- 1 board 50 mm x 130 mm x 1.2 m;
- 1 beam 50 mm x 150 mm x 1.4 m;
- 1 beam 50 mm x 80 mm x 5 m;
- hammer and nails;
- screwdriver and wood screws;
- jigsaw;
- two sets of door hinges with a width of 7 cm;
- belt with ratchet mechanism.
Manufacturing sequence:
- Saw a board 350 mm wide into 2 equal parts 1.25 m long. Cut the corners on both sides according to the diagram to create a trapezoid. Do the same with the second part of the board. You will get two trapezoids like this:
- Take a 50 x 150 mm timber and cut it into two sections, each 700 mm long. Cut grooves in each block as shown in the diagram below:
- Take a board that measures 50 x 130 mm and cut it into two sections of 600 mm each. Connect the two trapezoids obtained earlier to each other by nailing a piece of board at each end. Install the crossbars that were made from timber in the previous step into the grooves.
- Turn the structure over and nail a sheet of plywood measuring 1250 x 600 mm onto the base.
- For rigidity, attach crossbars to the bottom: on both sides and in the center. The boards should protrude slightly beyond the edges of the feeder. They can be any width, but the wider, the more stable the structure will be. In this case, three boards 50 x 180 mm and 700 mm long each were taken.
- Remove the bindings from the skis. Screw the skis to the bottom of the feeder (fasten them at three points in the crossbar area).
- Make a “Λ”-shaped structure by fastening two pieces of plywood (355 x 500 mm each) at right angles using furniture glue, and secure it in the center of the feeder with the angle up.
- Apply furniture glue to the ends of the structure obtained above and secure it in the center of the feeder (see photo below). Let the glue dry.
- Seal all seams in the feeder with silicone and leave to dry overnight.
- Attach a piece of plywood (550 x 600 mm) with a round slot in the middle using nails on top. The diameter of the slot will coincide with the diameter of the bottom of the plastic barrel.
In the photo, the slot is made in rough form. Then, using a jigsaw, we shape the hole to perfection. - Cut off the bottom of the barrel, leaving a bend at the bottom for better grain movement.
In the photo, the edges of the barrel are not cleared of chips and still have unevenness. - Cut a trough lid measuring 420 x 600 mm from plywood and hinge it. Do the same on the other side.
- Secure the barrel to the feeder. Seal the connection between the barrel and the feeder with silicone putty. Additionally, wrap the bottom of the barrel with roofing waterproofing or other moisture-resistant material.
- To prevent pigs from knocking down the food storage container, make side supports at least 2/3 of the height of the barrel. To make such supports you will need a 50 x 80 mm beam. Cut it into the following pieces: 4 pcs. 800 mm long and 6 pcs. 300 mm long. Cut the grooves to size as shown in the diagram below:
- Connect the supports using a strap to the ratchet (tie the remaining end of the strap around the ratchet and tie it so the ratchet doesn't move on its own). To prevent the belt from slipping, secure it with wooden blocks and self-tapping screws.
The feeder is ready!
General view and top view (if you look into the barrel)
Step-by-step instruction
Self-manufacturing of a feeder from sheet metal is carried out in several main stages:
- galvanized steel sheet is carefully bent in a semicircle using a rubber mallet or hammer;
- the upper part of the metal workpiece is fastened with wooden blocks, which are pre-treated with standard antiseptic solutions;
- a pair of semicircles are cut out of sheet metal, after which the blanks are welded to the end parts of the bent metal element;
- a pair of strips are cut out, the dimensions of which are equal to the length of the feeder being made, and the width is 20-50 mm;
- the cut strips are welded at the bottom of the feeder, which will give the structure maximum stability;
- the upper part of the feeder must be treated using a protective silicone cord or a wooden beam;
- Also, the upper part of the completed structure must be equipped with special frame jumpers, installed in increments of B40 cm.
The resulting feeder is simple and easy to use and maintain. Galvanized iron can be washed and disinfected, and wooden parts treated with an antiseptic are perfectly preserved for a long time.
If desired, you can supplement the metal trough with a bunker, which is located in the upper part of the structure and can significantly facilitate the entire process of feeding farm animals.
Today, a wicker fence is coming back into fashion, because it looks original, and you can make it yourself.
The technology for constructing a wooden fence and recommendations for care during operation are described below.
Other feeders
There are so many things you can create designs for pigs. PVC (polyvinyl chloride) water pipes have proven themselves to be excellent:
- created using the technique mentioned above;
- you can measure the length of the future feeder by centimeters;
- cheap material;
- ease of creation and operation.
However, the most common types are bunker feeders. They are purchased from large farms as professional equipment, but creating such a design yourself is quite problematic.
This type of feeder is distinguished by its very complex structure: the presence of a container for creating a supply of food, automatic feeding (with a regularly set dosage), many protective walls made of durable plastic (completely safe for people and animals; resistant to corrosion), etc.
Purchasing raw materials alone to create a bunker feeder will cost a pretty penny. And if you create a structure using not the best metal/plastic, then very soon the first negative effects on pigs will appear. Does a farmer need sick animals? Not at all.
That is why it is much more profitable to buy such a feeder and manually create structures that are simpler in structure.
If you take a responsible approach to the process of creating feeders for pigs, any materials that are safe for animals will be suitable. A competent farmer will always foresee all the negative consequences and then reduce the risk to a minimum. And although simple feed containers seem like a stupid idea, they do their job of feeding pigs flawlessly.
1
3
Copy link