04/20/2021 16,035 Horse riding
Author: Olga
It is difficult to imagine village life in the outback of our country without a faithful and reliable assistant - without a horse. Therefore, here you will need both a cart and a sleigh for the horse in winter, when it gets snowy. You can bring cargo on horseback, firewood from the forest, plow your garden, and just go to the market off-road. Previously, almost every village had a cart and sleigh maker. And today you will have to either buy them or make them yourself, which we will talk about in our article.
[Hide]
What is a cart
A horse carriage is usually a cargo type vehicle with 4 wheels. It is also called underwater. Carts are rarely used as passenger transport due to the inconvenience of their design. Nowadays, the term “cart” refers to many types of horse-drawn carriages. In fact, this was originally the name given to 4-wheeled springless carts, which were harnessed to one horse. Their carrying capacity varies between 500-700 kg. In most cases, a drawbar and shaft type harness is used. But there are also heavy trucks that can transport up to 2 tons of weight.
Despite their primitiveness, carts are still used as freight transport in many countries. The design is quite complex. They are commonly used on farms and households.
It is believed that carts were first used in the 12th century. The design made at that time is practically no different from today's, with the exception of a few improvements. Modern specimens, as before, are made of wood with a lower metal structure. Spring-type rubber wheels. Quite often the rear wheels are slightly larger than the front wheels. There are platform and side carts.
In order for the horse to be properly harnessed to the cart, it is necessary to understand its design. The process itself depends on this. The harness performs the function of transferring traction gain from the animal to the cart itself. Then the horse remains functional for a long time. To achieve the best effect, the harness is selected individually for each horse, depending on its size and constitution. Additionally, special belts are used for adjustment.
There are 3 main types of harness: for one horse, a pair of horses, and also a multi-horse variety, which is used for threes. As for the latter, in Western countries there are still subspecies for four, six and eight horses. In addition, there are harnesses: traveling, transport, arcless and arc. A more detailed classification is also known: row-and-drawbar, clamp-shaft, row-by-row and Russian. All these options differ in their design and way of harnessing the horse.
Shaft-arc harness
Shaft-arc type harness is considered a traditional method. By the way, it is an original Russian version. To understand how to harness a horse, you must first know what parts the structure consists of. It is imperative to check the presence of all elements. There must definitely be a horse clamp with tugs. A cap, a bow, a saddle and other parts are also required. Clamps are selected for all horses, based on the individual parameters of each. This design should fit neatly to the horse's shoulders. If the part is too large, then it is narrowed inside by sewing felt. If the structure is small for a horse, then it cannot be used with a cart. You also don’t need to use a saddle strap without a saddle, since the thin strap rubs the skin a lot. It must be pulled tight and passed through the top of the saddle. The harness must be completely assembled. This part evenly distributes pressure on the horses body.
Now there are several types of such vehicles
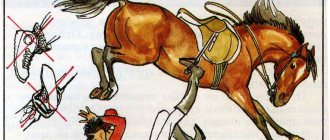
Each detail has its place and sequence when put on. To harness a horse, you must perform the following steps:
- You have to start by putting on the bridle. In cold weather, you first need to warm up the bit. Otherwise, the cooled iron can harm the tissues.
- Now the harness goes as follows: take the harness in your left hand, place the saddle in your right hand, which is supposed to be placed on the back of the horses. First, place it on the area that is located closer to the withers, and then straighten the hair and bring the part further.
- The front of the saddle should be located higher than the withers, and the back, on the contrary, should lie lower on the back - approximately between the 9th and 15th ribs.
- I straighten the harness of the saddles and place them about 10 cm from the horse’s elbow. Tighten the girth so that 2 fingers can be inserted between the body and the girth.
- Then you need to put a collar on the horse. It should be turned with the bottom side up and passed through the horse's head. When the part is level with the narrow part of the neck, you need to turn the clamp over and install it correctly. Then straighten the fur and throw the harness over the animal’s body.
- Now you need to lead the horse into the shafts. The ends should be located approximately near the tugs.
- On the right side, you need to fasten the interlace to the loops. Then do the same on the other side.
- Hold the tug in your left hand, and carefully take the horse's bow. It should be carefully brought under the left shaft and circled counterclockwise. Then tighten the ends into loops. Repeat the same steps only on the other side to install the right shaft.
- Now you need to go to the horse’s shoulder blade, take the soup and tighten the 2 ends of the clamp. Be sure to check if there is enough tug. If the ends cannot be closed, then it is necessary to lengthen the clamp itself. If the ends are closed, then the arc is poorly positioned, then it is recommended to shorten the tugs.
- Reins must be attached to the bridle, which can be threaded through the middle part of the arch if the harnessed horse is obedient. If she doesn’t listen well, then it’s best to do it from the outside.
- It is necessary to ensure that the tugs are located behind the arc, not in front. You should definitely check the horse cart for stability and mobility.
What types of carts are there?
Don’t think that there are only one or two types of vehicles; everything is much more complicated.
Carriages
This is a cart with a closed body and mandatory springs. This type of crew is the most convenient, comfortable and expensive. The horses are driven by a specially trained person - the coachman, who sits on a box in front of the carriage. It cannot be said that the trip here is comfortable: it is the driver who experiences all the tricky weather conditions. If the carriage is of a simpler type, then it may not have goats, and then the coachman sits on the handle or edge of the cart.
recommended articles:
- Why do horses need horseshoes and how to shoe them correctly?
- Aviary keeping of rabbits and its features
Inside the carriage there are several soft seats and side windows. Through the window located in front, you can give special instructions to the coachman. At the back there are heels, on which stand footmen accompanying a noble person to the ceremonial departure.
Boarding the carriage was carried out using a folding step. It was the footmen who folded back this ladder, helped open the doors and lit the lanterns on the carriage if the trip was carried out after dark.
The number of horses harnessed depended on the lightness of the design. Threes and fours were the most popular. The lightest carriage could be carried by a horse couple. Such a vehicle was a luxury and an indicator of prestige in society. In the absence of a personal carriage, it was necessary to hire a pit cart.
Strollers and tarantasses
A stroller is a lightweight, simple carriage with a folding top. Its advantage is convenience and mobility. A harness might require a pair or three horses. Particularly wealthy people harnessed six-wheelers. It all depended on the position in society. Phaeton and landau are just types of strollers.
The second type of vehicle was more suitable for road travel. Here, the main distinguishing features were durable manufacturing materials, and not their beauty. And what is the point of carved decoration if the cart breaks down in the middle of the journey? Instead of springs, long springs up to 6 m were used, to which the body was attached. Thanks to them, the shaking on the bumpy road was softened and was much easier for travelers to bear.
What is a britzka
This type of cart is a lighter version of the tarantass. There is a folding top. On britzkas, similar to tarantats, they made long trips. There are several types of such carriages: with springs, without them, and postal type. Today, a one-horse harness is often called a chaise.
Britzka
Gig
This concept includes a horse-drawn carriage equipped with two wheels. The word itself takes its name from the concept of two-wheeled, the first part of which means “two”, and the second - “wheel”. These carriages can be either with springs or without. The gig has a track width of approximately 100 cm; there are only two seats in such a carriage. One of the passengers directly controls the horse. The body part is made of boards or plywood, and a shield must be installed in front to prevent dirt from splashing passengers. Directly under the seat you can place a small amount of things or necessary tools.
DIY making
If you are interested in how to make a cart with your own hands, you must first read the instructions, prepare the appropriate tools and materials, and complete diagrams and drawings. Only after this can you make a horse cart with your own hands. The algorithm of actions is as follows:
- First you need to complete the chassis of the entire structure. The chassis consists of a welded solid frame and axles for the wheels. You can carry out welding yourself, but if you do not have the necessary experience and skills, then it is best to entrust this work to a specialist. The axles and frame can be made from a profile: then they will be solid. Another option is pipes with thick walls.
- Now you need to make a stationary axis, which will be located at the rear. Then make the one that will be in front. It should turn on the pin (2 washers should be fixed).
- Before you finish the axle that will be located in the front, you need to decide on the type of cart. If it is a drawbar, then you will have to additionally make a special clamp for the drawbar. The shafts must be welded to the front axle, and a special clamp will also be needed. In other words, the shafts will not be removed, but they must be positioned movably so that, due to the holder, they can be directed to the sides, up, down. By the way, they can be fixed on a bracket. For reinforcement, cords are used - these are wire rods. Their diameter should be approximately 1 cm. The wire rod should be fixed to the front axle and shaft.
- The chassis needs to be completed by installing the wheels. If necessary, they also install brakes.
- Now you need to make the body to your taste. You can simply cut the boards and make a platform that will be attached to the frame. This option can be modified.
- Shafts can be made from metal pipes. Wooden beams are also suitable.
- You can make a seat in the back.
Horse carts are the oldest means of transport. Gradually they were improved and modified, so that new designs appeared (for example, carriages). The harnessing process also gradually became more complicated.
Video “How a sled is made”
An interesting video about how sleighs and horse harnesses were made to secure the sleigh in the old days.
Sorry, there are no surveys available at this time.
Was this article helpful?
Thank you for your opinion!
The article was useful. Please share the information with your friends.
Yes (50.00%)
No (50.00%)
X
Please write what is wrong and leave recommendations on the article
Cancel reply
Rate the benefit of the article: Rate the author ( 6 votes, average: 3.17 out of 5)
Discuss the article: