It is believed that wooden hives are the best. Our grandfathers and great-grandfathers used such hives from time immemorial. But in the modern world, an alternative to wooden hives has appeared - these are beehives made of polystyrene foam. Every beekeeper tries to modernize his apiary. Since the success of the whole business depends on the condition of the hives.
Some people buy ready-made hives, and some beekeepers decide to make a hive from polystyrene foam with their own hands. It's not that difficult to do. Expanded polystyrene is an easy-to-use material. Experienced beekeepers believe that wooden hives are best for bees, but each material has its pros and cons.
History of beekeeping
Since ancient times, people have made attempts to care for bees. Due to the lack of experience and knowledge it was very difficult. The first mentions of people’s relationship with bees appeared in ancient Egypt and Greece. In the beginning, beehives for bees were made from tree bark and reed twigs. The ancient Egyptians took their structures away from the city and left them there in the meadows. After some time, they brought everything back, pumped out the honey, but at the same time all the hives were destroyed.
The Greeks went a little further. They made their hives from clay. A bee family multiplied in such vessels. In ancient India, also, during excavations, remains of beekeeping were found, which speaks of the art of taming bees, long before the appearance of modern houses for honey workers.
Technology for keeping bees in a hive-bed
When kept in a hive-bed, the bee colony becomes stronger, and its productivity increases almost 2 times compared to keeping in multi-hull houses.
The technology for keeping bees in such structures is described in detail below:
- opposite the entrance there is brood with nurse bees, it is located on one side of the hive;
- during the process of egg production of the queen, the amount of brood increases and it occupies additional frames;
- the rest of the sections are side stores and are intended for collecting honey, as well as housing flying bees;
- To increase the amount of honey during the honey harvest period, you need to limit the egg laying of the queen. To do this, she is placed in the center of the nest along with several sections of brood of different ages, and sections with honey are placed on both sides so that the queen does not have room to lay eggs;
- after the end of the bribe, the queen is returned to her original place so that she intensively lays eggs and strengthens the family for winter;
- when the bee colony occupies about 10 sections (before entering the swarm state), the space near the entrance is vacated and a frame with the queen and laid eggs is placed there, gradually adding another 7-8 sections to it. This part is separated from the rest of the hive using a special dividing grid, through the cells of which all bees except the queen can pass;
- when using a dividing grid to fence off the queen on the other side, first frames with seeding are placed, then sections with offspring of different ages (from the youngest larvae to the oldest) are placed, and then frames with sealed brood are placed. Next, sections with honey, artificial wax and drying are placed;
- In order for the queen to continuously lay eggs, and for the bees to build new honeycombs near the entrance, sections with brood need to be moved behind the bars every week. Instead, frames with artificial foundation are inserted so that the process of egg production of the uterus continues;
- in the general compartment, the brood is fed and sealed, and young bees flying out of the outer sections free the honeycombs to fill them with honey. Each bee that flies out through the entrance passes through the compartment with the queen, maintaining contact with her;
- when rearranging sections with future offspring from the compartment with the queen to the general part of the hive, they are placed near the dividing grid, moving the remaining frames to the opposite side of the structure. If there is not enough free space, honey can be removed. This allows you to create a continuous conveyor in the beehive for building new honeycombs, placing eggs in them and filling the empty cells with honey.
Despite its large size, a hive-bed allows you to get a larger yield of honey compared to multi-hull hives and greatly simplifies the work of a beekeeper with a bee colony. Using the recommendations listed in this article, you can easily build such a structure with your own hands.
Hives - today, appearance and advantages
It is generally accepted that the first to invent a hive using frames was the beekeeper P.I. Prokopovich in 1814. However, the first patent, which was registered in 1851, was assigned to the American L.L. Langstroth. It is he who is considered the inventor of hives with frames removed from above. This method is still relevant today.
In our open spaces you can see the following types of hives:
- Horned is very simple and easy to use. It holds 10 frames and this species is very common in apiaries;
- Cebro is a multi-body hive. This type of house tolerates severe frosts well down to -40, as well as extreme heat up to +35 degrees;
- Cassette is a rather rare model. It looks like shelves in a closet, which is very convenient when pulling them out of the house;
- Japanese hive or Varre - this structure completely lacks frame material. With a good harvest, the weight of one body together with honey is 15 kilograms;
- The Russian hive - the original model has not been used for a long time. It was modernized many times and became approximately the same as we see it today in apiaries;
- Vee Voh - Finnish bee houses. Made from lightweight polystyrene foam material. Today it is gaining popularity here too.
Read Multi-story building for bees: all the benefits of Ruth’s invention
So, as you can see, there are a lot of models of hives. You yourself can come up with something and modernize it so that the manufactured hives are suitable for your climatic conditions.
Comparison with others
This option may not be the best, but it is very cheap and simple. This bee house is suitable if this is your first DIY hive. Assembly can also be carried out without grooves and joints, which will greatly simplify the work. The cost of this option will cost you about 200-300 rubles. Simplicity and low cost are the key factors that differentiate it from others.
The main feature of plywood hives using polystyrene foam is the provision of comfort for insects. These materials prevent overheating and strong cooling inside. Hives made from multi-layer wood panels are easy to clean and repair. Replacing a part that has become unusable is quite simple and does not take much time.
If there is something that was not clear to you or you want to visually examine the process of creating a hive, please refer to the video materials below. We hope the information received was useful to you.
Expanded polystyrene - what is it?
Almost every person has come across such a material as polystyrene foam in their life. This material is obtained by heating polystyrene mass. Many people think that polystyrene foam and polystyrene foam are the same thing, but this is not entirely true. The density of expanded polystyrene is four times higher than the density of polystyrene foam.
Moisture resistance, thermal insulation and thermal stability are also many times higher. Therefore, if you choose between two materials, we give preference to expanded polystyrene. The only negative is that it is more expensive than polystyrene foam.
Advantages of polystyrene foam hives
Polystyrene foam hives can be an excellent home for your insects. This material is environmentally friendly, retains heat well, does not rot, and does not crack. It will make a quiet and cozy home for bees. Very light in weight. When you try to make beehives from polystyrene foam with your own hands, you will see all the benefits of your work. The houses are easy to move to different places convenient for bees. If necessary, they can be easily repaired. The white color of the hives will give you the opportunity to immediately notice uninvited guests to the bees: mites, bugs, wax moths and other insects. Another important advantage is its price. It is an order of magnitude lower than wood hives.
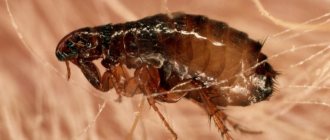
The downside of such hives is their lack of durability. If you are buying a ready-made hive made from fragile polystyrene foam, pay attention to the hole in the bottom. It is very large, so rodents can get in there, and this is very dangerous for the bee colony. Using a blowtorch to control pests is not possible in these hives. You will have to use preparations containing chemicals that can harm the bees. Some beekeepers use water and alkaline cleaning agents.
Of course, bee houses made of wood will last much longer, but caring for them is more labor-intensive, their weight is heavy, and this causes difficulties during transportation. In winter, you need to carefully insulate it: with pillows, blankets and cotton wool. Very often, birds pull out insulation materials from evidence cracks, so regular checking should be mandatory.
Manufacturing
Purchased high-quality EPP products from well-known manufacturers are quite expensive. But hives made of polystyrene foam (expanded polystyrene) can be made independently, with your own hands, with very little effort.
It is important to purchase high-quality polystyrene foam (expanded polystyrene) - this will ensure that the insect hive will meet all the standards required for such structures and remain environmentally friendly
Materials and tools
Before you begin directly to work, you need to prepare the materials for making hives from PPS. You need to get:
- Polystyrene foam, polystyrene, with a thickness of at least 5 cm.
- An adhesive suitable for gluing plastics. You can also use liquid nails.
- Metal corners that will ensure convenient use of evidence. Thanks to them, it will be easier to remove and install frames. In addition, it is these metal parts that will help maintain the folds over a long service life without damage.
- It is also necessary to prepare a sufficiently dense Whatman paper on which it will be possible to cut the structure according to the completed drawing.
- Measuring tools, marking pencils or markers.
- A knife with a sharp blade that can be used to cut material.
- Sandpaper with medium or fine grain, with which the edges are processed to bring them to the desired level of smoothness. Thanks to this manipulation, it will be possible to achieve a tight fit between two adjacent elements and the absence of gaps.
Preparation
The most important thing that needs to be done when deciding to make hives from PPS yourself is to choose the design of the hive.
After this, you should make all the necessary calculations and create a drawing based on them. At this stage, it is necessary to provide all the important elements, not only the main hive box, but also the entrances, tray, ventilation holes, as well as a mesh that will plug additional holes.
Dimensions and drawings
Before you start making a bee hive from polyurethane foam with your own hands, you need to decide on the shape. It can be done in the form:
- Dadana.
- Hive bed.
After this, you need to decide on the required sizes. They will depend on the number of frames included in the design. But, regardless of the size, it is worth considering that the thickness of the main walls must be at least 5 cm.
In the vast majority of cases, the standard housing design has the following dimensions:
- Height about 650 mm.
- Length – 870 mm.
- Depth about 530 mm.
But, in addition to these three main parameters, all other dimensions must be reflected in the drawing.
Assembly
During assembly, perform the following manipulations:
- First, assemble the body from the front, rear and side walls. It is mandatory to make edging or so-called strapping to enhance the rigidity of the structure.
- Then the folds for the honeycomb frames are cut out.
- After this, the lid is constructed structurally, not forgetting to strap it and cover it with material that protects it from moisture from the outside.
- Then the bottom is designed and executed.
- Then all the elements are assembled.
The main fastening elements are liquid nails and self-tapping screws where necessary. All small structural elements are cut out after the main assembly or fixed with glue, such as the handles of a hive.
After complete assembly, the entire structure is tied with belts. This is necessary in order to fix the product for a certain moment so that the glue dries completely.
The final stage
The presence of minor defects is leveled out with polyurethane foam. To improve the appearance of the structure when making beehives from polystyrene foam with your own hands, external painting is used.
How to make a hive from such material
How to make a beehive from polystyrene foam? First of all, you must prepare all the necessary material. Anything you need:
- Expanded polystyrene - it is sold in construction stores in the form of slabs;
- Screwdriver, glue or liquid nails, ruler, stationery knife;
- Special corners, measuring 15 by 15 mm;
- Metal mesh that will be located on the bottom;
- Self-tapping screws 7 and 5 cm;
- Sandpaper;
- Polyurethane foam;
- Sheets of paper for drawings.
Read Features of the design of the Alpine hive
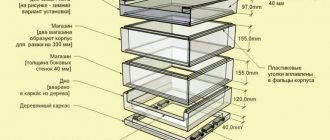
Diagram of a polystyrene foam hive
Polystyrene foam hive body
Roof of a polystyrene foam hive
Making the bottom of a hive from polystyrene foam Technique for making the side of the bottom of a polystyrene foam hive
To make it easier to work and assemble such a hive, first make yourself drawings. Your design has three main elements: the base, the covers, and the body. After making the drawing, we transfer the obtained dimensions to the material, but with a margin. Cut out very carefully with a stationery knife. Try to work with maximum precision, as light will penetrate into the gaps left, and the bees will simply gnaw holes in these places .
To connect all the elements, we use good glue or liquid nails. When the parts are connected, we secure the entire structure with self-tapping screws, which we tighten at a distance of 10 cm from each other. We remind you once again that there should be no gaps or gaps, as the bees will perceive this as an additional opening for flight.
While working, also remember that polystyrene foam is a fragile material and you need to work extremely carefully. When the entire hive is assembled, you need to leave it for a day so that the glue binds all the parts well. After this, you need to carefully grind the entire surface with sandpaper, without pressing. If you notice that gaps remain here and there, blow them out with foam. After hardening, trim off the remaining foam.
Assembly
- You need to cut the board into the required number of sections of 520 and 466 mm, using a hacksaw or chainsaw.
- We attach the timber to part 6. The grooves are combined with the plywood using screws. It is also necessary to cover all joints with PVA - this will not allow moisture to penetrate inside.
- Another beam is attached to the same plywood. Paz looks out. Using a ruler, a twenty-millimeter stick is measured for attaching the honeycomb frames. Fastenings are created using self-tapping screws.
- We turn the side bars to the same place. To avoid deformation, we use clamps and a corner.
- The second side of the hive is made in a similar way.
- We attach the sides to the front and back walls using screws. Don't forget to control the process with a corner and a clamp.
- At the final stage, parts 3 and 5 are screwed to the front and rear walls. The protruding ends of the screws are ground off.
- We grind or cut off the pieces of plywood on top, but so that there is somewhere for the water to drain. We use these trimmings to strengthen the grooves when installing insulation from the outside. The outside of the insulation must be covered with foil.
- We insert an additional three-millimeter layer of plywood into the grooves of the frame along the entire outer surface.
Shutdown
What will need to be done in the final stage:
- Fix the corners and strips on the sides and in the recess of the hive;
- We place frames inside;
- We attach a mesh to the bottom. A car is very often used; it is ideal for these purposes;
- A cover is installed, which should not exceed the weight of the structure itself;
- Paint is applied to the surface of the hive.
Painting of manufactured polystyrene foam hives is carried out with water-based or rubber paint. This paint is very suitable for such bee houses. It is non-toxic, protects from sunlight and does not destroy the material. This paint can be used several times a year.
Preparing parts
The next stage is the preparation of blanks for the walls, roof and bottom, during which the following steps must be taken:
- Remove a 4–5 mm thick layer from one side of the sheets around the perimeter using a cutting machine. This is necessary so that the inside of the hive is completely smooth.
- Cut the layer along the length of the sheet to get even and smooth ends.
- Trim the edge of the sheet to the width.
- Cut a piece of sheet 540 mm long. It will go to the bottom, lid and 3 walls.
- Cut the walls 380 mm wide from already cut pieces.
- Cut out the remaining pieces into folds for the roof and bottom, 380 mm long and 90 mm wide.
- Cut the walls 145 mm high from pieces 380 mm wide and 540 mm long.
- Cut the blanks for the bottom and roof, 467 mm wide and 540 mm long.
- Make selections for frames on wall blanks measuring 11x11 mm.
- Make a sample for a plastic corner for bottom reinforcement 20x20 mm.
- Make a cut for a corner on the sidewall 10x10 mm, 1.5 mm thick.
- Cut guides for the roof and under the rebates on the bottom from the leftovers, 24 mm wide.
Wintering hives made of polystyrene foam
Wintering such houses has its pros and cons. But first, let's talk about the positives. It is very convenient to transport the houses, as they are light in weight. During the cold season, there is no need to insulate with pillows and blankets. This material is quite warm in itself.
Read How to make propolis ointment: its properties and applications
Well, now about the cons. When transporting, you need to secure the hives very well, since due to the fragility of the material, they can simply break . Therefore, for transportation you need to have special straps for fastening. Make supports from large stones or bricks. Another disadvantage is that the insides of the bee house are difficult to clean from wax.
As you can see, by following basic rules, you can make and use these hives for many years.
Some features when using
Thermoregulation and ventilation in hives made of polystyrene foam are not the same as in wooden hives. In summer, ventilation occurs through an open entrance and holes on the bottom. To save heat, we open the hole for the winter, and close it with the first warm days.
Walls of this design do not absorb moisture, which is very important. From the bees' breathing, condensation collects in the hive, and then it flows to the bottom hole, while the house is quite dry. This fact excludes the appearance of various fungi and diseases.
Design nuances
Externally, the EPS structure is similar to a conventional wooden hive, but when creating and installing it, you must remember that the floor in the polystyrene foam hive is made of an aluminum grid with cells no larger than 3.5 mm, which serves for ventilation. A retractable tray is installed under it, which makes it possible to regulate the air flow, increasing it when you need to lower the temperature in the hive or get rid of excess moisture.
The bottom mesh also serves as protection against small rodents and insects. Grates are also installed between the buildings: they are needed to collect propolis. The product is covered on top with a lid designed so that the hive can be ventilated. You should take care of a special bar for the taphole, which will regulate its size and, accordingly, air circulation.
When installing a purchased product, it is necessary to connect all elements as tightly as possible to avoid gaps
When making it yourself, it is important that all parts correspond exactly to the drawing and do not have distortions or irregularities. It is imperative to protect the ends of the EPS parts with plastic covers: polystyrene foam will not crumble, and keeping the hive clean will become much easier
The house will need to be firmly secured. The simplest method, used for small structures, is to place a brick on the roof (for tall hives consisting of several buildings, you need to choose a more reliable option, such as a wire bracket).
The easiest way to secure the hive cover
Reviews from experienced beekeepers
There are a lot of reviews about polystyrene foam hives.
- Making such a hive yourself is very difficult. Due to the fragility of the material;
- When the body is cleaned, grains of material fall off, and the entire structure gradually becomes unusable;
- The mice really liked to gnaw on such hives;
- In winter, food for bees quickly deteriorates. It is necessary to lay a mesh on the bottom to prevent mold from appearing;
- Cracks constantly appear that need to be sealed with propolis.
Most beekeepers are of the opinion that the best house for bees is a wooden one. The tree is much stronger and better for honey.
In Europe, beekeepers have not produced wooden hives for a long time. Expanded polystyrene products are highly prized and are considered durable and use a dense material.
The most important thing is that you, dear beekeepers, can try these hives yourself. Equip it with everything you need and decide for yourself after one season whether such a house is suitable for your bees.
An experienced beekeeper knows what kind of hives his bees need. Some conservatives will never exchange wooden hives for hives made of modern materials. But our ancestors also once switched to new technologies. And through trial and error, they found exactly the option that suited them.
Some more useful tips
To make a warm, high-quality and reliable hive, consider several important points.
- The most important thing is to accurately calculate everything and apply the dimensions, since inconsistencies in the process will cause cracks to appear, which, in turn, can lead to undesirable consequences.
- Having finished manufacturing, make a few more slabs as a reserve - they may be needed for repairs, because PPS can hardly be called a durable material. Make “spare parts” so that you can easily replace damaged parts if necessary in the future.
- The polystyrene foam hive does not need insulation - the body itself will perform all thermal insulation functions.