A long time ago I wrote an article about sensory boxes for very young children. These were the simplest boxes, which were designed to diversify the baby’s sensory experience and develop his basic motor skills (folding, rearranging, finger grip, handling a spoon and scoop, etc.). But sensory boxes are not only a great exercise for your fingers, they are also a wonderful platform for role-playing games and themed activities. In a sensory box, you can recreate a small world with its inhabitants and characteristic environment, play out simple life situations and thereby consolidate your child’s knowledge on the topic being studied. Thematic boxes will be discussed in this article.
Such boxes will be of interest to children from about 2 years old. Perhaps something a little earlier, something later, be guided by the interests of your baby. And children over 3 years old will be happy to take part in creating sensory boxes with you.
I would like to note that if you are making a themed box for a child under 2 years old, then try not to add too many details, because... A small child needs more space to turn around, and constantly falling fences and trees can frustrate him.
Sensory box "Farm"
The Pet Sensory Bin is a great first themed box. As a rule, children simply love to feed someone, and this box is simply a blessing for the little “breadwinner”; you can pour as much food into troughs and cups as you like. During the game, you can unobtrusively repeat the names of pets, remember who eats what, who eats what helps a person, etc.
How to make such a sensory box? I used buckwheat as soil, but beans, peas, pasta, lentils, brown or colored rice are also suitable. Or you can mix several different fillers at once, it will also turn out interesting.
It is advisable not to make a pond out of real water; it risks quickly mixing with the entire contents of the box. Options for filling the reservoir are hydrogel, blue dyed rice, decorative glass stones, or yarn, like ours (only, please note that not all yarn is convenient to play with, some constantly cling to the legs of animals).
It's great if you have sheds and pens for animals from ready-made kits, they will perfectly complement your farm. But if you don’t have any, it’s okay, a shed can be easily made by cutting off one wall of a milk carton or any other suitable box. I made a trough for animal feed in the same way. I painted both cardboard boxes on top with acrylic paints in two layers, and although this did not completely hide the factory inscriptions about the expiration date and place of milk production, for my daughter this was completely unimportant, the main thing for her was functionality, and the boxes did an excellent job with this.
And, of course, you will need a set of pet figurines (Ozon, My-shop, KoroBoom), you definitely can’t do without them here
How did we play with the box?
- The most interesting thing is, of course, feeding the animals by pouring cereal into their trough. Sometimes I was even surprised at how long Taisiya hung over this seemingly completely monotonous task, but apparently the normal human desire to take care of someone takes its toll.
- They put the animals to bed, placing them in the barn for the night;
- They sent the animals to graze, drink at the pond, and even swim;
- Children came to our farm, where they enjoyed riding horses and donkeys;
- Sometimes you had to corral some naughty goats who were jumping over the fence, etc., there are a lot of options for the game, they depend only on your imagination and the age of the child.
Summary:
1. investments - 5,585,000 rubles.
2. payback period – 32 months.
3. average monthly profit - 176,666 rubles.
Sources
- https://business-poisk.com/biznes-plan-molochnoj-fermy.html
- https://to-biz.ru/kak-otkryt-molochnuyu-fermu/
- https://vipidei.com/proizvodstvo/vyrashhivanie/otkrytie-molochnoj-fermy/
- https://agrobuilding.com/objects/livestock/barn/stroitelstvo-molochnoj-fermy-investitsii-i-okupaemost
- https://biznesovo.ru/biznes-plany/biznes-plan-molochnoj-fermy
- https://www.beboss.ru/bplans/185-biznes-plan-molochnoy-fermy-na-100-golov
- https://Proekt-sam.ru/proektzdanii/proekt-mini-fermy.html
- https://pokras-stroy.ru/ferma-dlya-krs-na-50-golov
- https://pokras-stroy.ru/stroitelstvo-molochnoy-fermy
- https://mirfermera.ru/688-tipovoy-proekt-korovnika-na-50-golov.html
- https://molferma.com/sozdanie_mol_fermi/stroitel-stvo-sovremennoj-molochnoj-fermy-kak-postroit-korovnik.html
- https://pokras-stroy.ru/kozya-ferms-na-50-koz
- https://BusinessXXL.ru/molochnaya-ferma/
Sensory box “Beach” (“Summer”)
Another great platform for role-playing games is the “Beach” sensory box. I think it could easily be called the “Summer” sensory box because swimming in the lake/sea is perhaps one of the most vivid summer experiences for children.
This time I made the pond from hydrogel (aqua soil). For variety, our resort shore is made half of pebbles and half of decorative yellow sand for aquariums. Stones can be taken from river, sea or decorative ones. Unfortunately, I didn't have any of the above on hand, so I took gravel from the playground (but, I should note, I returned it there after the game!).
Everything else is also made from scrap materials: sun loungers are made from empty matchboxes, a kiosk is made from a small cream box (painted with acrylic paints), umbrellas are skewers for canapés. Oh, yes, I also bought decorative tiny shells for aquariums.
What we played in the beach box:
- Sunbathed;
- We swam, of course;
- We bought ice cream at a kiosk (the seller, however, constantly went out to sunbathe or swim, it was not easy to catch him);
- They collected shells;
- We played beach sand (we had small children's dishes (a mug and a spoon) as molds and a scoop)
- Fleeing from a raging crocodile, etc.
Examples of finished children's paintings and layouts
Creating a farm from cardboard with your own hands for children opens up wide scope for creativity and the development of imagination. When creating crafts, you can use any available materials. If you carefully play with the model of a livestock farm, the toy will last for many years - when the child grows up and acquires new skills, he will be able to gradually supplement and improve the paper farmstead.
Sensory box "Sea"
This marine sensory jelly box is very simple to make and has a very unusual feel. All you need is water, gelatin, any dye (food coloring, gouache, liquid watercolor), and a little patience so that it all hardens well.
Don’t look at the fact that in the photo Tasya is already so big, you can safely play with jelly even from the age of 1. But the fact that at 4 the child will be happy is also true. Children really like to tinker with this unusual consistency, explore it by touch, pick holes in it, find hidden figures, and just splash on it, in the end.
I try to hide the figures in the jelly so that some of them are completely hidden from my daughter’s view (they are completely invisible in colored water), and some of them temptingly show their edges so that I really want to get them out. For starters, so to speak
A little advice: in order for the figures to show their edges and not fall in a limp mass to the bottom, some of them need to be attached to the bottom with plasticine in the position you need (this must be done before the jelly hardens).
While we are taking the animals out of the jelly, we remember what they are called and their main features. We have a set of sea animals from Happy Kin, the one with a shark and a sperm whale. The set is simply excellent, the quality cannot be faulted. Here’s another, in my opinion, good option from Wenno.
Step-by-step instructions for creating simple farms in the form of applications with children in kindergarten
Most of it is drawn
A do-it-yourself farm layout applique for a kindergarten can be made individually or as a group. To create common work in the younger group, the teacher can give the children a large drawing of a farm made of paper and already cut out animals - the kids just have to stick them in the right places.
Older children can make their own paper animals using basic shapes. By cutting out ovals or circles from paper, children will be able to invent and add details to them to create the chosen animal.
Sensory box “Arctic” (aka sensory box “Winter”)
Of course, the Arctic and winter are not exactly the same thing, but I believe that playing in an Arctic box with a child is a great way to show him life in the conditions of “extreme winter”, in the Far North. I wrote about this box in detail in an article dedicated to the thematic lesson “Arctic”, but I will repeat myself a little here so that everything is in one place.
The most burning question for winter sensory boxes is what to make snow out of? In fact, there are a lot of options, here are some of them:
- Semolina;
- Rice;
- Coarse salt;
- Cotton wool or cotton balls;
- Real snow from the street;
- Crushed foam;
- Shaving foam;
- A very pleasant consistency is obtained by mixing starch (400 g) and shaving foam (200 ml), which I used in the “Antarctica” box (see below). It is better to buy foam for sensitive skin. The only thing is that you and your baby need to prepare for the fact that after playing you will smell like your dad after shaving
The ocean here is made of jelly again. In order for the jelly to retain its shape, it will need to be kept in the refrigerator between games, but this has a big plus: during the game, your ocean will always be cool, which fully corresponds to its Arctic nature. Moreover, thanks to the jelly consistency of the ocean, ice floes (they cotton pads) stay on it perfectly.
In our games, the polar bear hunted for fish, attacked a seal, set up a den for himself,
Polar scientists who arrived on an icebreaker tried to get acquainted with the local Eskimos and photograph the animals,
The Eskimo arranged his home, rode a reindeer and also fished.
By the way, the igloo, as you probably already guessed, is made from a paper cup, with cut-up cotton pads used as snow blocks. We did it together with Taisiya.
Choosing the right place
To build a farm for cows without any problems, you need to choose the right piece of land. This should be a flat and well-trodden area. The presence of a small forest belt near the mini-farm will protect animals from drafts and/or strong winds.
Natural reservoirs and/or sources of drinking water, according to the legal norms of the relevant laws of the Russian Federation, must be at least 30 m away from places where mass livestock are kept, otherwise the owner may be fined a large amount. In this case, the mini-farm will have to be moved to another site.
An equally important point is the absence of residential and/or other buildings near the place where the mini-farm will be set up, cattle - this is an inevitable unpleasant smell. You should not create discomfort for residents of nearby settlements. On its own site, a mini-farm for cows is set up closer to the place where fruit and vegetable crops are planted. This will make it easier to use manure to fertilize the soil. A modern farm should be located at a distance of 15 meters or more from a residential building. Additionally, the main wind direction in the region should also be taken into account.
To build a farm for cows without any problems, you need to choose the right piece of land
Sensory box "Antarctica"
Very often, the concepts of the Arctic and Antarctica are not distinguished at all. I myself, until I started studying geography with my daughter, was firmly convinced that a polar bear and a penguin were swimming somewhere on neighboring ice floes, which is exactly how they are often depicted in pictures. Maybe, of course, for a three-year-old child there is no fundamental difference, but I decided that since it was time to educate myself, it was right to do so (so that later I wouldn’t have a mess in my head, like my mother), so we had a separate box dedicated to each pole of the earth.
This time the snow is made from starch (400 g) and shaving foam (200 ml); for the iceberg, I froze ice in a bowl in advance. I wasn’t able to come up with a lot of different details in Antarctica, which is essentially a wasteland, but it was still interesting to play (and more than once). Plus, we liked just messing around in the pleasant snow-starchy mass.
- Our penguins and seals fished, and also rode off an iceberg and jumped into the ocean at full speed.
- The little penguin kept getting lost, and then, with our help, he found his way to his grandmother.
- Scientists and travelers arrived in Antarctica. To shelter from the icy winds, they hastily built themselves a shelter from refined sugar.
And this, by the way, is a sensory box “on the road”
Phased construction: drawing
Before construction begins, there are some steps that need to be taken. Any structure needs calculation and planning. First you need to create a detailed project diagram based on all available data. Then, according to the plan, the building materials and costs required for construction are calculated. A well-executed preparation phase greatly facilitates construction. After this, you can begin to choose the location where the building will be located. It must meet some requirements:
- The distance to residential buildings must be at least 15 m.
- The well or borehole must be located more than 20 meters away.
Made of brick, adobe
Adobe (raw brick) is made from a mixture of clay, straw and sand. The most budget option for construction, because its components can be found in any household. Building a barn with bricks is profitable, but often expensive, and not everyone can afford it. However, during construction they try, if possible, to make the floor or walls of brick. It is durable, strong, and can protect against frost and fire. Brick flooring is warmer than concrete and more stable than wood. The minimum service life of a brick floor is 10 years. In areas with low temperatures during construction, brick walls must be laid out in two rows with insulation laid between them. This significantly increases construction costs.
From sandwich panels
Sandwich panels have lower conductivity than brick. The protective coating of the panels increases resistance to aggressive environments, which extends their service life. If you have a ready-made foundation, a barn made of sandwich panels can be assembled by a couple of workers in a few weeks. Windows in such a structure are also made of this material. The panels are lined on both sides with treated steel, which can be painted if necessary.
An example of a barn construction diagram.
Do-it-yourself prefabricated
Prefabricated barns are manufactured according to special drawings. The longest stage of such construction is the assembly of the finished structure. It may take two to three months. This type of barn is distinguished by its special appearance, durability and strength. Sandwich panels or sheet steel are usually used for external and internal cladding. The material is additionally treated with a special compound to prevent corrosion. With proper design, such barns can increase labor productivity.
You can learn about rubber mats for cattle here.
Sensory box "Dinosaurs"
Dedicated to all dinosaur lovers - the world of dinosaurs in your home, almost like the real one. I will not go into detail and again describe all the components of the box, I think, having familiarized yourself with the previous copies, you have already perfectly grasped the essence.
We have already made this sensory box together with our daughter. She was almost 4 years old at the time, and she enthusiastically set about creating the box, throwing in her own design ideas. At that time, we had already repeatedly read an absolutely masterpiece book about dinosaurs - “Such Different Dinosaurs” (there were others, of course, but this one is beyond competition), and I think it was thanks to this book that scenarios for games in the sensory box poured out of my daughter like from the cornucopia: and how predators attack herbivores,
and how herbivores lay eggs, and oviaraptors kidnap them,
and how plesiosaurs, protruding from the water, grab pterosaurs flying by, etc. Oh yes, and, of course, how dinosaurs become extinct. In general, we got very rich games with this box.
Well, just in case, a few examples of sets of dinosaur figures: Ozon1, Ozon2, KoroBoom.
Overview of the dairy industry in the country
Milk is on the food safety list. This is an essential product, just like bread. But, in Russia, until 2000, the percentage of production of this product was steadily falling, and only by 2015 there was a significant increase in the production of milk and dairy products.
An interesting trend is emerging today - the number of small dairy farms registered as small businesses is growing. These small enterprises have overtaken large agricultural enterprises in such indicators as:
- increasing the number of dairy herds;
- increasing the productivity of dairy cows;
- increase in product marketability.
A business plan for organizing a cattle breeding farm can be viewed here - https://business-poisk.com/biznes-plan-fermerskogo-hozyaystva.html
Small dairy businesses have become especially active after the introduction of state support for the state program “Development of Dairy Animal Husbandry.” Farmers in this area cooperate directly with dairies, a third of them sell milk independently.
Since the level of initial investments in the dairy production business is quite high, and the payback period is calculated for 3-5 years, farmers should focus on modern technologies for keeping and feeding cows, robotic installations and mechanization means.
It is also necessary to consider in the business plan not only the production of raw milk, but also in the future its processing and production of various dairy products. This will undoubtedly require additional investment. With such a low-profit business, investing is quite risky. Read about how to properly draw up a competent business plan here.
All countries practice state support for the development of agricultural enterprises. In Russia, there is also such government assistance to entrepreneurs involved in agricultural production.
Support and lending to dairy production
The milk production business is expensive and requires significant investment. The state provides support to milk producers through several programs:
- subsidy per liter of commercial milk sold. Only premium grade milk is subject to subsidies.
- Subsidized interest on loans through accredited banks.
Reimbursement of a certain portion of expenses for business projects. Refunds are made up to 40% of investments for modernization and re-equipment, for the purchase of highly productive livestock - up to 50%. Refunds are made no earlier than 2 years after the launch of the milk production project.
Kinds
Depending on the shape and complexity of the structure, the following types of trusses are used in private construction:
- Triangular . The simple form allows you to assemble the truss quickly; there is no need for complex calculations. They are used when constructing roofs at a large angle and canopies. Provide good natural lighting of the under-roof space. The thickness of metal and wood for the arrangement is selected taking into account the weight of the roofing material. When welding metal parts, you will have to work hard to get sharp corners on the supports.
- Polygonal . Made from profile pipes. Application – roof of warehouses, hangars. The spans are large. Welding parts requires serious skills. Plus - economical consumption of metal.
- With parallel belts . An excellent option for a durable truss. Convenient to assemble from metal. All elements are repeated. The number of joints is minimal. This design can be welded on your own.
- Trapezoidal with support on racks . It will be the optimal solution when it is necessary to securely fix the building. Has braces on the sides.
The shape of the truss is directly related to the type of roofing. For a flat pitched roof covered with roofing felt or ondulin, it is best to choose a trapezoidal or rectangular truss. For a roof with a steep slope, where metal tiles will be laid, corrugated sheeting is better to choose a triangular truss.
There are 3 options for constructing a farm, taking into account the slope of the roof:
- 6-15 degrees;
- 15-20 degrees;
- 22-35 degrees.
With a slope of up to 15 degrees, it is better to make a pitched roof with a trapezoidal truss. Moreover, the lower the weight of the roof, the higher the truss should be. With a larger slope, more complex designs of rafter systems are used.
Requirements for a barn
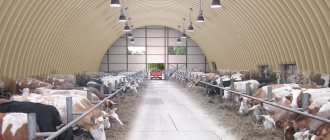
The main requirement for livestock farming and livestock sheds is the availability of reliable and spacious premises. The inside of the building must be dry, clean and warm. According to established standards, the walls of the building must be at least 2.5 meters in height, and the roof - 3.5 meters close to the ridge. In addition, the building must be equipped with a ventilation system; window openings must be made slightly higher than the animals’ heads reach, so that daylight can enter the barn.
If these requirements are met, it is possible to make a good profit regardless of the period of the year. The owner of the farm will have to care for the herd, milk the cows, keep animals for meat, and sell the skins. This will ensure a stable material income, since these products are always in demand. To increase profits, you can expand your farm over time.
Stage II. We purchase a high-quality profile
So, before drawing up a project for future farms, you first need to decide on such important points as:
- contours, size and shape of the future roof;
- material for the manufacture of the upper and lower chords of the truss, as well as its lattice;
- inclination angle and planned load.
Remember one simple thing: a profile pipe frame has so-called balance points, which are important to determine for the stability of the entire farm. And it is very important to choose high-quality material for this load:
Profile pipes for trusses come in two types of sections: rectangular or square. They are produced in different diameters and with different wall thicknesses:
- For small-sized buildings, we recommend pipes up to 4.5 meters long, with a cross-section of 40x20x2 mm.
- If you will make trusses longer than 5 meters, then choose a profile with parameters 40x40x2 mm.
- For full-scale construction of the roof of a residential building, you will need profile pipes with the following parameters: 40x60x3 mm.
The stability of the entire structure is directly proportional to the thickness of the profile, so do not use pipes intended for racks and frames to make trusses. Also pay attention to which method the product was manufactured: electric welded, hot-formed or cold-formed.
If you undertake to make trusses yourself, take square-section blanks - they are the easiest to work with. Buy a square profile 3-5 mm thick, which will be strong enough and its characteristics are close to metal bars.
Be sure to consider snow and wind loads in your area when designing. After all, the angle of inclination of the trusses is of great importance when choosing a profile:
You can more accurately design a truss from a profile pipe using online calculators.
Let us only note that the simplest structure of a truss made from a profile pipe consists of several vertical posts and horizontal levels onto which rafters for the roof can be attached. You can purchase such a frame ready-made, even to order, in any city in Russia.
