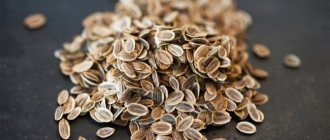
Typically, summer residents sow dill in early spring, immediately after the last snow has melted.
At the same time, self-sowing dill, freely “walking” around the site, by this time is already producing the first shoots. So why not sow dill before winter to enjoy a rich harvest in early May?
If you do everything wisely, complete success awaits you!
From the article you will learn how and when to plant dill in the fall, from choosing a variety to harvesting the succulent greens.
Is it possible to plant dill before winter: the pros and cons of the method
To find out whether it is possible to sow dill before winter in your area, you need to take into account the characteristics of the winter climate. If there are long thaws in winter with high temperatures above zero (above +5 degrees), the seeds will probably hatch ahead of time. Then the next serious frost will cause their death.
Fragile seedlings can also be caught by a sudden cold snap in spring . To prevent this from happening, when sprouts appear, insulate the bed with non-fabric or install arcs and stretch the film over them.
There is another small drawback to this sowing method: you will need to increase the sowing rate from 1.2-1.5 grams to 1.6-1.8 grams per square meter. That is, at least 20-30% of the usual amount.
Two tiny minuses more than cover the five big pluses of winter planting dill:
- Early harvest. Early ripening dill sown in autumn is ready for harvesting 10-14 days earlier than usual. This is explained by the fact that during the winter, moisture in the soil dissolves the essential oils with which the seeds of the crop are saturated. At the first warming in spring, they swell and sprouts emerge from the soil.
- More juicy, aromatic greens. During the winter, fertilizers applied to the soil when preparing the bed have time to reach the desired condition and are easily absorbed by plants. The plants develop quickly and grow a lot of lush greenery.
- Healthy and strong plants. The bulk of harmful insects wake up in May, when the dill has already grown and has become unattractive to them. And the dill has undergone natural hardening and now it is not afraid of short frosts in March.
- Less work in the spring. At this time, the summer resident begins to completely park. Therefore, it is important to transfer some tasks to the fall - for example, sowing winter-hardy crops and pruning garden and berry plantings.
Harvest and storage
Depending on the variety chosen, it takes from 25 to 50 days to grow fresh winter greens. Cutting dill begins at a height of 7 cm. If you grow greens for sale, wait until the height is 20-25 cm. The entire crop is harvested at once or as needed.
The collected greens are used for food and stored briefly in the refrigerator. For long-term storage, dill is dried or frozen. For freezing, the greens are washed to remove dirt and finely chopped. It is convenient to freeze the spice in ice containers to add portioned cubes to various dishes.
What varieties of dill are suitable for winter sowing?
Early ripening blooms quickly and is not as productive. But at the same time it grows literally before our eyes.
For November sowing it is better to use early varieties. This type of dill produces rather scanty plants and quickly acquires umbrellas. But it ripens a week and a half earlier than late and mid-late varieties.
Bush dill of medium and late ripening is more productive and suitable for repeated harvesting of greens.
I advise you to make two mini-beds for dill on your site with different growth rates. This way you will provide yourself with spicy herbs until mid-summer.
When purchasing seeds, also pay attention to the winter hardiness of the variety and its propensity to stem.
The following varieties of dill have proven themselves well:
- Early ripening - Early miracle, Aurora, Gribovsky, Grenadier.
- Middle and late - Alligator, Patterns, Moravan, Amazon, Kibray, Borey, Buyan, Salyut, Umbrella, Anna.
Landing
To plant dill, you need to make grooves in the beds no more than 2 cm deep, scatter the seed in them and cover them with earth. If frost is likely, you can protect the beds with covering material. In autumn, greens should be planted at a temperature of 3-4 degrees. After planting, mulching is necessary so that in winter a crust does not form on the soil surface, which can subsequently create an obstacle to germination.
It is not recommended to water the seedlings immediately after sowing, as dry soil will allow moisture to be retained in the soil.
The place for sowing should be well lit and protected from constant wind. It is better to place greens behind vegetables, flowers and other herbs. A significant condition for planting dill is its proximity to crops that favor growth. The plant should not be placed next to caraway and fennel. Suitable precursors include cucumbers, cabbage and vegetable crops with similar characteristics.
See also
How to grow and care for dill in open ground, how many days will it take to grow? Read
Timing for sowing dill before winter
The main mistake that novice gardeners make is planting dill too early before winter.
I advise you to start this task when the soil freezes to a depth of 2-3 centimeters and three conditions are met:
- The long-term forecast does not predict warming of the weather for the next 10-14 days.
- Over the past week, daytime temperatures have remained in the range of 0…+3 degrees.
- At night it froze to -1...-3 degrees.
In the middle zone, such weather does not set in until November-December.
Climate nuances in the region
Before sowing dill, you need to sort out all the climatic features, since the conditions in this region are very different from the middle zone and warmer southern regions
To get a good harvest, it is important to foresee all possible problems and carry out the work correctly. The main differences are:
- The climate in the area is temperate, ranging from continental to oceanic. Summers are moderately warm, often cool, winters are mild, but there can be significant drops in temperature for several days or weeks.
- The main difference between the weather is its variability, since this region is affected by different air masses. Humid air comes from the sea, causing warming in winter and, on the contrary, cool periods in summer. Continental currents bring cold temperatures in the winter months and heat in the summer months. Arctic masses always provoke a drop in temperature.
- Temperatures can drop sharply, and even in summer there are frosts. The differences are up to 20 degrees per day.
- Due to the large area, conditions vary in individual areas. It is necessary to take into account all the features of the place where the dill will be planted.
- There are often strong winds and rain. There can be a lot of precipitation, which is dangerous due to flooding of plantations and their death.
- In winter, during prolonged thaws, the seeds get wet; if it gets colder sharply, they will die.
- Late spring. The snow melts until mid-April, so seedlings appear most often in May; during this period there is a danger of return frosts.
Advice! To eliminate the possibility of flooding, plant dill in high beds.
Preparing a bed for dill
The dill bed is made no wider than 100 centimeters, otherwise it will be inconvenient to care for the plantings
Spicy grass grows well in sunny areas with light to moderately rich soil. It is advisable that the garden bed be protected from the cold north wind by garden buildings or bush crops.
On acidified soil, dill leaves turn yellow and curl. Such soil must be limed in the fall.
I recommend placing the plot after crops that have received a generous amount of organic fertilizer. Dill is sown where potatoes, onions, tomatoes, beets or cabbage previously grew. Unsuccessful predecessors for it are carrots and various types of celery.
The bed for greenfinch is prepared a month before autumn sowing. The work consists of seven stages:
- They outline a garden bed. It is desirable that it extends from south to north.
- Clear the ground of remnants of tops and weeds.
- Phosphorus-potassium fertilizers are scattered at a rate of 20-30 grams per square meter. I do not recommend wasting scarce compost and humus on dill. When there is a lot of nitrogen in the soil, greens accumulate nitrates. And we don’t need this at all.
- The bed is dug up using a shovel, all large clods are broken up and the surface is leveled with a rake.
- Mark grooves at a distance of 10 to 20 centimeters and a depth of 4-6 centimeters. The larger the dill bush, the wider the row spacing. And the grooves are made so deep for two reasons. Firstly, the soil will have settled slightly by the time of planting. Secondly, when sowing in autumn, the seeds are covered with 3-3.5 centimeters of soil (not 1-2 centimeters) so that they do not freeze in winter.
- The bed is covered with film so that it does not become overgrown with weeds and is not washed away by rain.
- Prepare a soil mixture for filling the furrows - humus (compost) plus peat plus garden soil in a ratio of 1:1:1. Bags of earth are kept warm so that the soil in them does not freeze.
There is also a method of sowing dill randomly. In this case, there is no need to cut any furrows; the seeds are simply fanned out over the dug up and fertilized soil. But I don't like him. It is inconvenient to care for such plantings - thinning and weeding. And if the soil hardens by the time of sowing, you will not be able to properly fill the seeds.
Watch the video to see how a regular board helps make smooth and neat grooves:
Features for the Leningrad region
Seed preparation
Before you start planting, the seeds should be soaked in warm water for 2-4 days. It is useful to add a little wood ash (up to 20 g) to the water. After soaking, the planting material must be dried in the sun.
How to plant
The bed is dug up, large clods of earth are broken up and fertilized. Then grooves are formed (from north to south), the depth of which should be slightly greater than when planting in spring. The distance between the rows is up to 20 cm, so that the bushes do not shade each other later. The seeds are poured into the grooves and covered with soil (it is better if it is humus, peat or compost). Watering is not recommended.
How to sow dill before winter
So, winter cold has arrived in your area and perhaps even the first snow has fallen.
It's time to start the autumn sowing. Remove the snow cover and film from the bed and distribute the dry (!) seeds along the furrows. Do not forget that you need to sow the seeds more densely than in the spring.
Sprinkle the grooves with the stored soil, roll it lightly and additionally cover with mulch of chopped straw, sawdust, dry leaves, peat, humus - with a layer no thicker than 1-2 centimeters.
Caring for dill in spring
Good neighbors for dill are potatoes, onions, lettuce and cucumbers.
As soon as the first timid sprouts appear from under the ground, the bed is covered with film and after a few days the dill sprouts in a thick brush.
Then arches are dug over the bed and agrofibre is thrown over them. At the same time, the first careful loosening of the spaces between the rows is carried out.
Caring for winter dill plantings includes:
- Infrequent watering. In spring, the soil is already saturated with moisture, so you will only need to add water to the garden bed during a severe and long drought.
- Regular weeding. Weeds are extremely aggressive and severely suppress young seedlings.
- Thinning of seedlings. Do not delay in removing excess plants - if you are late, the dill will quickly throw out the stem and generally produce little greenery.
Early varieties of dill are not fed or treated with chemicals against pests. Dill that grows as a bush can be fertilized with full mineral fertilizer after mass cutting.
Video on how to save dill from aphids:
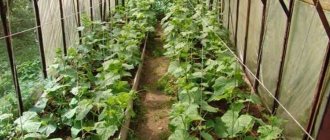
Greenhouse equipment
Since we are talking about winter cultivation, the task is to prepare the greenhouse so that it can create the conditions necessary for the crop. The first priority is maintaining the required temperature – not lower than +15 °C. In the cold, growth stops, the growth of green mass is significantly reduced, and the leaves become lethargic. Ideal conditions are 19-20 °C.
If there is a sharp decrease in temperature, especially at night, when there is no natural source of heat, the plant dies - the tissues of dill contain a large amount of moisture, which quickly reacts to changes. You can provide the necessary conditions in a greenhouse coated with polycarbonate, thick film, or glass, but polycarbonate retains heat better than other materials. A polycarbonate greenhouse has other advantages: it does not require frequent repairs, it lasts longer, and it is easy to handle.
Heating
You can heat a greenhouse in winter in different ways: stove, gas boiler, heater, electric cable, heat gun or pump, hot water containers, phytolamps, solar liquid collectors. The choice depends on the climate of the region, financial capabilities, size of the greenhouse, and crops grown. For example, using stove heating is physically more difficult, but its costs are lower; heating based on electrical energy is more expensive, but it can be automated and easier to maintain. In small greenhouses, heating can be done by heating water in containers installed specifically for this purpose.
In regions with cold winters, it is recommended to grow dill and various types of greens not in beds, but in boxes - it is easier to warm the soil in them to the required temperatures. Deep (20-30 cm) long wooden or plastic boxes with drainage holes, cassettes, glasses installed on racks and tables are suitable to protect the roots from cooling. If heating is carried out using heating pipes laid in the ground, then they can be planted on ridges.
Backlight
To create conditions close to natural, the length of daylight hours is extended with incandescent or daylight lamps. On a sunny day you don’t have to turn them on, but in cloudy weather, in the evening and in the morning, backlighting is necessary. The number of lamps depends on the area of the greenhouse. The interval between the lamp and the plants should be at least 0.5 m, between the devices themselves - 1 m.
The operating mode can be adjusted so that in low light conditions the lamps turn on automatically, then you don’t have to get up early in the morning or go to the greenhouse late in the evening to turn them off (lighting is not needed at night). The length of daylight hours is increased by turning on the backlight early (three hours before sunrise) and turning off the backlight late (three hours after sunset).