For farmers and people raising chickens, a portable chicken coop is a popular device. Such a mobile structure can be moved from place to place throughout the site. A portable poultry house can be purchased at specialized stores. However, a more budget-friendly and profitable option would be to make a portable chicken coop with your own hands, especially since you can arrange it at your discretion, depending on the time of year.
Peculiarities
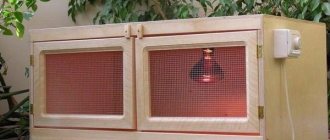
The main nuance of portable chicken coops is their easy mobility. The building can move throughout the entire territory. The device is quite simple - two-level.
The upper part is made of strong timber, the lower part is a mesh. The walls on the lower parts are covered with boards to ensure ease of opening.
In each mobile chicken coop, the space is divided into two parts.
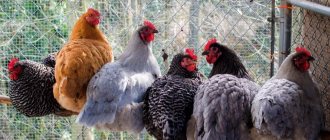
The first part is allocated for hens to hatch eggs, the second part is intended for individuals to walk. Some equip a roof on which natural lawn is planted. It turns out that chickens have protection from direct sunlight.
To provide protection from moisture and rain, structures are covered with film; in expensive options, high-strength roofing is used.
The fence is made of a metal mesh type - it protects against the penetration of predators and other animals. Sizes may vary and are calculated based on the number of individuals in the flock.
Tips and tricks
The advantage of a mobile poultry house is its simplicity of design. However, it is precisely this fact that can bring a lot of trouble to the poultry farmer. Several useful recommendations from experienced poultry farmers will help you better equip your chicken coop:
- Heavy, prolonged rains and sharp gusts of wind contribute to the rapid failure of a light wooden structure. It is better to weld a reliable frame from a profile thin-walled pipe. It will not be heavier in weight, but will withstand greater loads.
- Drafts do more harm to chickens than cold. To prevent birds from getting sick, they try to eliminate all the cracks in a closed house. For ventilation, special windows are installed. The problem of drafts does not exist for an open mesh house.
- When moving the house, a hill is chosen as a new place. The lowlands are always wet and cold, which is bad for chickens' paws. The bird can get sick and egg production will decrease.
- The ventilation vents are lined with mosquito nets. During ventilation, it will become a barrier to harmful insects. However, the net will not save you from fleas. The chicken coop is periodically treated with drugs.
- Typically, a portable or mobile poultry house can accommodate 10 chickens, but young ones. After the young animals grow up, 5 heads are transplanted to another similar house.
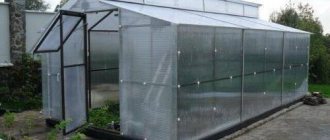
- To keep chickens in the winter, the mini-chicken coop is moved to a barn. All structural elements are additionally insulated with removable panels or mats. Lighting must be provided inside the house. If thermal insulation is not enough, install a safe electric heater.
- When it is intended to keep chickens and adult chickens in one house, it is better to make it two-story. The upper tier is populated by chicks, while the adults remain below.
Following simple maintenance rules will create better comfort for chickens. For this they will thank the owner with good egg production.
Types of chicken coops
Poultry farmers group chicken coops according to parameters. They are classified according to the method of transfer, the presence of wheels, dimensions, zoning, and type of roof.
The main types of differences are divided into three large groups:
- According to the method of transfer - poultry houses on wheels and chicken coops carried by hand.
- By size. Dimensions are calculated based on the space available on the site and the number of heads in the flock. There are tiny houses for a small number of individuals, and there are mobile sheds for twenty chickens.
- By type of construction. The presence of a fence, the number of zones, the number of levels.
How to make it?
Even though this coop will be portable, it should still have three main parts:
- place for hens and laying hens with nests;
- sleeping place, that is, perches in a closed and insulated part of the chicken coop;
- walking area.
Portable chicken coop diagram
Making such a chicken coop with your own hands is not at all difficult. For this purpose, you can even use a ready-made garden trailer or an old car. But we will do the entire structure with our own hands. The size of our chicken coop can be seen in the drawing.
Tools and materials
- blueprints;
- wooden board (inch);
- plywood;
- net;
- old window frame;
- galvanized pieces;
- drill, screwdriver;
- jigsaw, stapler;
- self-tapping screws;
- hinges and staples;
- hand tools as needed.
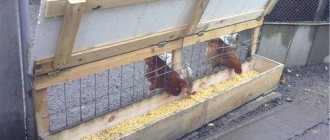
Chicken in a finished house
Step-by-step instruction
- We start all the work by making the frame with our own hands. To do this, we will need three triangular frames made of 20 by 40 mm bars. We fill them with boards and immediately two hewn boards for handles to carry the structure.
Frame of the future structure
Side wall drawing
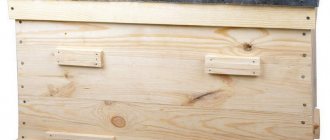
Almost finished house
Diagram of parts of the finished chicken coop
By analogy, you can make any mobile poultry house with your own hands, of various designs. Today there are many drawings, photos and videos to help.
pros
Each chicken coop, whether made by hand or purchased in stores, has a number of pros and cons. Main advantages:
- The design of the mobile chicken coop can be quickly moved to any place in the garden. It follows from this that chickens will always be able to eat animal feed and green herbs - this is an important point in their development.
- Possibility of changing the design of the building. It will be not only functional, but also decorative and will decorate the site.
- The design is easy to clean; you can place it in a convenient place where you can carry out all hygiene procedures.
- A portable chicken coop can be either summer or winter. During the cold season, the structure can be placed close to the house to make it easier to care for.
- The structure is inexpensive and can be easily erected with one’s own hands, with minimal construction skills.
What should be inside
All mobile homes share common design elements:
- Small kitchen.
- Separate paddock for walking.
- A place for nesting and resting.
There are several standard installations that can be made stationary:
- Two-tier triangular - the rectangular side is located on the ground, but the roof is made in a triangular frame. This allows the liquid to flow down during rain, there are no leaks, such a chicken coop will withstand even the cold. This design is usually calculated for no more than 5 chickens. The structure can be placed in the yard, in addition to contamination, it can be moved to another place along with the bird.
- Arched portable chicken coop - you can build it from everything left in the utility room. A large frame is made of wood, then it is covered with metal mesh. Separately, you need to make a place for sleeping; this is a small rectangle of plywood covered with a tarpaulin. For a seasonal hobby that can accommodate up to 3 people, this is enough.
These are the most popular options for chicken coops in the country if the owners come only for the season.
Minuses
Now about the disadvantages, there are quite a few of them, but it is still worth mentioning possible difficulties:
- Small capacity. If you want to raise a large number of birds, then such a building will not suit you. Since it has small dimensions. It will not be easy to add additional areas to it.
- When building on your own, you can make a number of mistakes. It is important to follow the instructions and make clear plans and drawings, otherwise the chicken coop will not be durable.
Three models using modular origami technique
Novice craftsmen are not always familiar with the subtleties of “paper art”. The main thing when assembling origami from triangle modules, as in other types of needlework: embroidery, weaving or knitting, is not to rush and strictly follow the pattern at each stage. Then the work will immediately turn out neat and durable, without requiring any rework. There are other significant points:
- The modules must be folded very accurately, otherwise the product will be skewed and sloppy. The smaller the size of the assembly elements, the thinner the paper chosen for them.
- If the pockets are difficult to open, you can use a toothpick.
- It is better to start getting acquainted with modular origami with easy models, gradually moving on to more complex ones.
- Gluing the elements of the product will help preserve it for a long time and protect it from destruction when dropped.
- Finished work should be coated with transparent wood varnish. This is good protection against dust and fading, as well as the ability to do wet cleaning.
Owl
A good model for those who are just starting to get acquainted with the technique of folding origami from small triangles. It will require only 106 blue modules and 24 pink ones.
"Owl" scheme:
Assembly is carried out on the long sides. The 1st row consists of 16 blue elements. Starting from the 2nd, we add pink details for the owl’s “front” (12+4).
The total number of elements in each row is the same. But the color ratio is different.
3rd row: 10 blue and 5 pink pieces.
4th row: 8 blue and 6 pink.
Next, the modules are distributed in reverse order. For the penultimate row we take 16 blue parts, for the last – 15.
Having collected the owl, we make its characteristic “ears”. They consist of 3 parts that are attached to the last row, according to the same principle as the rest. Then we glue on the bird's eyes and nose from a pink modular element.
An “Owl” of bright fairy-tale color will decorate your home for Halloween or another themed holiday. It will also look spectacular in a nursery.
Chinese mini dragon
Following the principle of gradual complication of models, after the super-simple owl, you can just move on to the symbol of the water element, popular in the east. The dragon in China has long been associated with the cult of fertility; not a single rain-making ritual was complete without its images. In addition, this mythical character denoted belonging to the highest strata of society. Only the aristocracy was allowed to decorate clothes with his images, but such “freedom” was not available to commoners.
In order to make a mini dragon, you will need 515 1/16 origami paper triangles:
- 251 blue (C),
- 264 yellow (W).
Head
We start work from the head. Scheme of its assembly:
We move from the “chin” up.
| Row | Number of modules |
| 1 | 3 C |
| 2 | 4 C |
| 3 | 3 C |
| 4 | 4 C |
| 5 | 5 C |
| 6 | 4 C |
| 7 | 1 S+1 F+1 S+1 F+1 S |
| 8 | 6 C |
| 9 | 5 C |
| 10 | 6 C |
We assemble from top to bottom. Having completed the 10th row, we make spikes crowning the dragon’s head. We assemble them symmetrically according to the diagram, making a gap in the middle. We turn the figure over and bend it slightly - the head is almost ready. We cut out a forked tongue from red paper and glue it in the center of the last row from the wrong side.
Dragon body
The flexible body of the mythical animal is a chain of yellow and blue parts. At first there are three of them: S+F+S. To the first yellow piece in the next row, add two more, putting it on each corner.
Then we repeat the initial arrangement of the triangles again and continue until we have collected approximately 88 rows. The body will require 176 blue and 262 yellow elements. Having completed the assembly, two blue fastening modules are added to the back of the head near the eyes.
We make 4 legs from 5 blue parts. We attach the blanks to the body at the support points. First we bend it, like a roller coaster.
Mini dragon is ready!
Swan
This is one of the most beautiful and sought-after models. An origami swan made from modular triangles easily transforms into an elegant vase for dried flowers, although it is gorgeous on its own.
For the two-color model presented in the next video tutorial, you will need 1522 modules, 1/32 in size:
- 1322 white,
- 180 pink.
Ready-made poultry houses
Most farmers choose ready-made structures. They can be made to order or selected from among completed products. There are various configurations, sizes, designs.
Models of houses that are designed to accommodate ten chickens will be very small and compact.
Mobile bird houses for twenty birds are a full-fledged building in which all the requirements for breeding chickens will be met.
The finished products have a well-developed ventilation system, heating from the ceiling, and temperature control. Some buildings have perches, feeders, drinking bowls, nests - all the necessary equipment for the immediate start and settlement of individuals. There are buildings with and without walking areas.
Some companies offer services for the production of chicken coops according to your personal sketches, taking into account all the requirements and wishes.
Design options
There are two options:
- Triangular, with a similar shaped enclosure;
- Traditional rectangular or square.
Both options are convenient in all respects. But the first one will require less materials, therefore it is more profitable in terms of economy.
You can reduce the area occupied by the structure by raising the chicken room above ground level and installing an aviary underneath it. This will also provide a shaded area in which birds can stay during the heat.
The chicken room can be one or two stories high.
Double decker
It will be more bulky, which will make moving it much more difficult. Therefore, it can be equipped with small-diameter pneumatic wheels.
On the second tier of the poultry house, boxes of soil are often placed for growing fresh herbs.
Triangular
They can be made sectional, which will allow increasing the area of living and walking areas by adding new sections of a similar cross-section.
There are two roof options: single-pitch or gable. The birdhouse is made with an open exit or a closed door or crossbar.
Self-construction technology
Scheme for constructing a portable chicken coop independently:
- First they make the frame. They use two triangular frames, the material is timber. The frames are fastened with boards, to which handles for carrying are screwed.
- Then, the walls of the lower side part are made from slats. A mesh is stretched between each wall. Use a chain link with small mesh. The ceiling between the levels is made of plywood with a hole for birds. A ladder is inserted into this hole.
- Decide which wall will be removable. This will be the entrance to the room. The second wall is being built from clapboard.
- The second tier is divided into two zones. The first zone will contain perches, the second will house a recreation area.
- Make sure you have quality shelter. It is made from pieces of plywood held together with loops. In hot weather the roof can be removed. One of the parts of the roof should always be removed, this will ensure ease of cleaning in the poultry house.
- At the end of the work, treat all parts of the house with protective agents or varnish.
These are the main stages of building a chicken coop, the remaining features are additional: light, heating, ventilation.
Lighting and ventilation
To protect livestock from the harmful effects of drafts, precipitation and various wild animals, it is necessary to ensure the construction of a ventilation system that will not have large gaps.
Fresh air is necessary for the life of birds; it will protect the chicken coop from rapid rotting and dampness.
Make a small window - sunlight will come through it, which is very useful, and it will also become an additional source of natural heat in the summer.
Projects
There are many different designs for building a chicken coop. Only small designs for 5-7 chickens will be considered here. Poultry houses can be either stationary or portable.
Mini-chicken coops have a number of undoubted advantages:
- are small in size;
- can be mobile;
- projects with insulated walls do not require additional heating;
- the door serves to ventilate the internal space;
- Inside you only need to equip perches, 1-2 nests for laying hens, drinking bowls and a few feeders.
If you are going to build a permanent chicken coop, choose a place with average light from the sun, protected from gusts of wind. The ideal option would be near a tall bush, the shadow of which will protect the bird house from overheating, and the sparse branches of the bushes will allow diffused light to pass through. To prevent dampness, choose an area on a hill for water to drain.
A portable chicken coop does not require such conditions. By the way, to make it easier to move around your site, attach the wheels to the bottom and handles to the side walls.
First, choose the type of chicken coop you have – stationary or mobile. Then determine the size of the future poultry house (note that veterinary standards define the living area for 1 chicken as 0.33 sq. m. For 5 chickens you will need a chicken coop with an area of approximately 2 sq. m. You can design a chicken house with a square base (1.5x1. 5 m), you can use a rectangular one (1x2 m). Calculate the height based on your own height + 20 cm - this will make it more convenient for you to clean and disinfect the interior of the poultry house.
Typically, a chicken coop is built in two sections - a house with nests and perches and an aviary for walking and feeding birds. The size of the nests should be at least 40x40 cm. The perches should be located at a height of no more than 1.2 m (for flightless breeds) and equipped with a suitable ladder. Place a litter tray under the house. The size of the enclosure is approximately 3-5 square meters. m, the more the better. After all, their egg production depends on how much chickens move.
There are one- and two-story projects. Naturally, the two-story structure is more compact - the house rises above the aviary and does not take up extra space, which can be used for walking birds. The shape of the enclosure depends on your imagination; some farmers make it in the form of a hut.
Climate
When planning construction, do not forget to take into account climatic weather conditions. If you live in a cool area with frequent rain, then any atmospheric phenomenon poses a threat to the integrity of the building.
Place the chicken coop at the highest point of your site if it rains often in your region - this will ensure high-quality drainage and a moderate amount of moisture. Do not make gaps in the building; ventilate when necessary through a removable roof.
Mosquito nets are placed on the door and windows. This protects not only from insects, but also from foreign birds and dust.
Place in the construction world
Since ancient times, the Egyptian triangle has found a place of honor in architecture and construction.
The pyramid design is different in that it allows you to create a building with perfectly correct angles without any additional tools. The task is much easier if you use a protractor or triangle. But, previously only cords and ropes, divided into segments, were used. Thanks to the marks on the rope, it was possible to accurately recreate a rectangular figure. The builders replaced the protractor and square with a rope, for which they marked 12 parts with knots on it and folded a triangle with segments 3,4,5. A right angle was obtained without difficulty. This knowledge helped create many structures, including the pyramids.
The properties of the Egyptian triangular figure obey the truth - the square of the hypotenuse is equal to the squares of the two legs. This Pythagorean theorem is familiar to everyone from school. For example, we multiply 5x5 and get a hypotenuse equal to the number 25. The squares of both sides are 16 and 9, which adds up to 25.
Thanks to these properties, the triangle has found application in construction. You can take any part in order to draw a straight line with the condition that its length must be a multiple of five. After this, notice one edge and draw a line from it that is a multiple of four, and from the other a line that is a multiple of three. In this case, each segment must be at least four and three in length. Intersecting, they form one right angle of 90 degrees. Other angles are 53.13 and 36.87 degrees.
Chicken coop with wheels
Chicken coops are equipped with wheels for easy movement around the garden. In general, the construction stages are similar to the construction of a simple version of a chicken coop:
- Initially, a construction scheme is developed. Information about the dimensions of each element is taken into account. Without drawings it is impossible to make a durable building. After all, you won’t be able to remember the sizes of all the parts and their positions at once. It is worth saying that many builders with extensive experience can build a shed without drawings if the building has small dimensions.
- Then they make the frame - this is the second stage. The frame has the shape of a cube or rectangle. The height varies from one to two meters. It is worth understanding in advance where the closed part will be located in the chicken coop. The wheels are attached to this side. This is due to the fact that when moving a building, it becomes necessary to lift one side. If you place the wheels where the net is located, the moving process will be complicated by the high mass of the closed side. The frame on wheels is made of large bars, cross-section 7 by 5 centimeters.
- Next, additional structural parts are attached that are needed for the construction of partitions and walls. Based on the drawing, they are positioned so that the building is divided into two main zones - an open space with a grid and a closed space with a window.
- Depending on the dimensions, you need to make a number of zones in the closed area of the birdhouse. Perches are placed in the small section, and a resting area for chickens in the wider section. At this stage of construction, walls are built and insulated (if you will be farming in winter). Do not forget to make the entrance small in size; a ladder is mounted near it.
- Roof. The doors can be opened for easy cleaning of the room. Loops are most often used. During this installation, do not forget to ensure maximum strength of the roof so that it does not collapse from precipitation.
- The open part of the building is covered with gratings. Cells are only small in diameter.
- The nets are attached to the sides and top. This will provide the chickens with access to the grass to roam.
- Don't forget about the carrying handles. They are tightly attached to the sides of the shed. At this stage of construction, the wheels are screwed on. The diameter of the wheels is medium or large to drive on the ground.
How to build the simplest portable chicken coop for 3-10 chickens with your own hands
Since this design is in greatest demand today, we chose it to describe the construction of a chicken coop. The construction of a mobile poultry house consists of several stages.
Building a frame
Portable chicken coop dimensions
From three wooden blocks with a cross-section of 20x40 mm, using nails and a hammer, you need to make a triangular frame. There should be two such frames. The bottom side of each of these two triangles should be approximately 1.6 m. Next, you need to install the frames opposite each other at a distance of about 2.5 m on two longitudinal planed boards. Secure the frame of the structure with a hammer and nails. If the longitudinal boards were longer than 2.2 m, cut off the protruding parts. Secure the corners of the structure with metal corners.
Each of the two triangles of the frame can be made into walls using plywood or boards, or you can attach a metal mesh to them.
Making walls
Chicken coop wall dimensions
The walls of a portable chicken coop can be made from different combinations of materials. Mostly part of the wall consists of plywood or wood, which is necessarily supplemented with metal mesh.
Measure the side of the frame. Based on its length, saw off two wooden crossbars and nail each of them to a block with a cross-section of 20x40 mm. Additional crossbars are needed to strengthen the walls.
Take two slats with a cross-section of 30x20 mm, 2.5 m long (along the length of the chicken coop) and connect them with two bars of the above cross-section to form a rectangle. The length of the bars should be equal to the height of the chicken coop wall. Nail the third rail between the other two parallel to them (the middle rail should be located at the height where the perch will be built). Turn the structure over and nail the beam with the crossbar on the reverse side perpendicular to the rail. The base of the side of the mobile poultry house is ready. The base of the opposite side is made in the same way.
Experts recommend sewing up one side of the house with moisture-resistant plywood to prevent drafts.
As a rule, a removable metal mesh is installed in the lower part of the side of the poultry house, additionally strengthening it with a lath. The top part can be covered with plywood in the same way as the entire opposite side, or it can be made open using plywood or boards that are attached to the frame using door hinges.
A pair of handles can be attached to opposite sides of the house for easy carrying.
Wooden chicken coop with attached handles
Making a roost
Perch dimensions
The perch is made of several bars, and the height of its location depends on the size of the birds.
If the breed is characterized by the small size of chickens, then the height of the perch should be no more than 70 cm, for large chickens - 100 cm.
Several bars are attached to the middle slats located along the opposite walls, on top of which a round-section pole is placed along the entire length of the portable chicken coop. It is fixed with nails or self-tapping screws.
Setting up the floor
The floor in a portable chicken coop can be made of mesh or planks. The first option is more convenient and practical: the house is placed on legs or a stand, and a tray is placed under the mesh floor to collect droppings. In the second case, the floor boards are placed very tightly to each other and covered with roofing felt on top.
The portable chicken coop is built!
- Reboot for the chicken coop: getting the house in order after winter
Chickens are unpretentious birds. But they won’t refuse a comfortable chicken coop either. What do laying hens need to be happy and healthy?
If desired, a mobile poultry house can be erected in this way in just one weekend and thereby please your birds with a new, unusual home.
Finishing
In order for the chicken coop to blend with the landscape and serve as a decoration for the garden plot, it is painted or decorated with decorative elements. Use paint with additional properties: protection against wood insects and protection against moisture.
Do not forget about the safety of decorative elements; they are free of splinters and have smooth edges so that the chickens do not get hurt on them. Do not use too bright materials; let your chicken coop have calm tones.
A mobile chicken coop is suitable for keeping birds at any time of the year. The convenience is that the room can be moved from place to place, the chickens will always have access to grass. Used on small farms and cottages.
In winter, chickens are moved to the second level of the chicken coop, heat sources are supplemented, and self-heating is used in warm regions. Some people use such houses in urban environments, if access to the yard allows it.
Optimal sizes
If you approach the issue of determining the size of a chicken coop scrupulously, then for each breed of bird there is a certain standard of “living space”. But in a country house or in a private house they rarely keep a purebred bird. Therefore, they start from the average.
There are some general guidelines to follow when creating a chicken coop project.
Estimating the area and dimensions of the building
When building a chicken coop, they usually proceed from the planned number of birds. It is believed that 2-4 chickens can live on 1 square meter of area. If we are talking about broilers, you can take 3-4 pieces per square meter. They are inactive and this area is enough for them. If we talk about laying hens or meat and egg breeds, it is believed that the optimal number is 2-3 birds per square area. So, a chicken coop for 10 broiler chickens can have an area of -2-3 square meters, a poultry house for 10 chickens - when keeping laying hens or meat and egg breeds - requires 4-5 square meters. If you decide to build a chicken coop for 20 chickens, the area for broilers will be 5-7 squares, for eggs and meat - 8-10 squares.
A beautiful chicken coop for 10-20 chickens does not need to be hidden in the backyard
But knowing the area of a chicken coop for 20 chickens or 10 is not everything. We still need to decide on the sizes. Most often they try to make a rectangular building: 3 * 1.5 m; 4*, etc. In this case, you can clean the poultry house without going inside - a rake, scraper, broom will reach even the far corners. Square ones are not so convenient in this regard, although a small chicken coop for 10-20 chickens will still not be large. So a square is fine.
How tall should the chicken coop be?
When building a chicken coop, you still need to decide on the height of the building. For birds, a height of about 140-150 cm is sufficient. But you must remember that you will have to clean the house, collect eggs, and change bedding. So when choosing the height of the poultry house, they proceed from their own convenience. For this reason, the roof is made higher than head level - so that you can walk upright.
The height depends on whether you will go inside for service or not.
No overlap
There are two options when installing a roof. First: if the poultry house is without a ceiling (ceiling), you can remove the walls by about 140-150 cm, make the roof gable and raise the ridge by 180-200 cm (or a little higher, as is convenient for you). In this case, you can move around the center of the room without problems, but we still rarely go to the edges. There is usually a perch and nests there, and there may be bedding
You will have to work carefully in this area, protecting your head.
There may also be no overlap inside
The benefit of this option is that with this arrangement we save on wall material. The downside is that more is spent on insulating the roof: it must be insulated over the entire area, which is significantly more than what is required when insulating the ceiling. But, in general, this option turns out to be less expensive, but also less convenient (you have to take care of your head).
With attic
The second option for how to build a chicken coop for 10-20 chickens is to make a mini-copy of a regular house. In this case, the walls are driven to the height required for free movement inside. This is a person’s height, plus 10-20 cm. But keep in mind that part of the height will go to the ceiling, there will also be a floor and bedding on it. Each requires about 15 cm of height. So, if the owner of the chicken coop is 180 cm tall, you will have to make walls with a minimum height of 220-230 cm.
With overlapping you will have to insulate less
As you can see, this option will require more materials for the walls, but only the ceiling (ceiling) can be insulated, and the attic can be left cold. The attic can also be used to store straw, bedding, etc. But don’t forget about rodents, who love such storage facilities and can become a problem.
On poles
Another option: make a chicken coop for 10 chickens on poles. In this case, 4 beams are dug into the ground at the corners of the building, the floor covering is made at a height of 50-80 cm from the ground level. The roof is made at a height of 180-200 cm. In general, this is a convenient option for a mini-chicken coop for a summer residence. This is more of a summer option, but can be insulated. In order for the bird to be able to get in and out, an inclined ladder is made from boards with thin perches nailed about 10 cm apart to make it easier for the bird to move.
Why not a mini-chicken coop for 5-6 chickens?
In general, you choose the height and general construction plan at your own discretion.
https://www.youtube.com/watch?v=b5aiuIHN9Oc?ecver=1
Historical reference
Modular origami most often means figures made from small triangles. However, there are also kusudama balls and polyhedra from the so-called “Sonobe modules.” Both varieties are native to Japan. Kusudama is a paper ball made of several sections sewn or glued together, known since the Middle Ages. It was filled with aromatic herbs that released healing essential oils, and hung in the house to protect against infectious diseases, as well as create a calming atmosphere.
Polyhedra from modules in the form of a parallelogram curved in a special way were developed in the 1960s by the Japanese origami artist Mitsunobu Sonobe and named after him. The master most likely borrowed the idea from his predecessor Hayato Ohoko, who in 1734 first described and presented the diagram of a three-dimensional cube made of several identical elements.
Origami from triangular modules is an invention of Chinese masters. Its origins are precisely unknown, but the Western world had to become acquainted with this unique technique under very sad circumstances. In 1993, 286 illegal immigrants from China arrived in the United States aboard the cargo ship Golden Venture. The “New Homeland” greeted them unkindly. When the ship ran aground near New York's Rockaway Beach, passengers tried to swim to the “promised land”, and 10 of them drowned. The remaining illegal immigrants were arrested by the Immigration and Naturalization Service (INS) and scattered in prisons across America.
While waiting for a response to their request for asylum, Chinese prisoners whiled away their time doing national handicrafts, including origami, which is called “zhezhi” in Pinyin. In the process of work, illegal immigrants invented triangular modules, creating large-scale figures from them: vases, swans, pineapples and ships. Instead of regular paper, they used covers of old magazines and newspapers. Later, when the technology became widespread, Chinese banknotes were often used for modular elements.
Inmates gave modular origami sculptures to those who supported them or sold them to raise funds for legal services. Some of them are presented at the traveling exhibition “Freedom Flight”, organized by the American Immigration Center.