Among the many types of dog equipment, a halter often goes unnoticed. It is modestly packaged in a box and it is difficult for an ignorant person to understand its straps. “What is it and why is it needed?” - the buyer is perplexed and, leaving the halter on the shelf, goes further, in search of another strict collar, with brand new shiny links. Meanwhile, a halter is the most effective and safe device of all that is customary to put on a dog’s neck.
A properly sized halter is safe enough for the dog. She can't pull it hard enough to hurt herself. The owner does not need to use jerks - the dog does not pull on the leash if it is wearing a halter.
This is the structure of the dog: it easily “fits” into a collar or harness like a sled husky and pulls the owner, but it can only resist the pressure on the head of the halter by turning its whole body towards the owner and backing away. This explains why a dog in a halter should not be tied and generally left unattended. A halter is designed for walking with a dog on a leash, not tying it up.
How it works
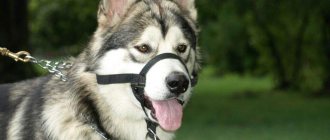
Halti has a fairly simple design. It consists of a nose strap that goes around the dog's muzzle and is connected to the neck strap by cheek straps and chin straps. The second strap passes through the back of the pet's head and secures the halter. Under the muzzle, where the 2 ends of the nose strap are connected, there is a ring for attaching a leash.
If necessary, you can connect the halter and a regular collar using a carabiner on the safety belt. This will ensure reliability and additional fixation of the ammunition.
Important! Halti
should not be used to tether a dog or placed on a dog and left unattended. This may harm the animal.
Benefits of use
A halter has a fairly large number of positive qualities compared to a collar. Among them are:
- ease of use, can be used together with a collar;
- minimal risk of causing harm to the animal;
- simplifying the training process, teaching the dog the commands “don’t pull”, “near”;
- achieving maximum control over your pet;
- the ability to easily hold a large dog;
- concentration of the animal's attention on the owner.
Did you know? The halter was originally called "gentle leader", which translated into English means "gentle driving".
Can a muzzle be replaced?
Very often in stores you can find the wrong name for halters, such as “training muzzle”. It is worth understanding that halti works completely differently. The device only helps to control the dog.
In it, she can quite calmly pick up something from the ground or bite someone. Such equipment does not limit the dog in any actions, as a muzzle does.
If your dog is aggressive, then it is better to use a muzzle as an addition to avoid unpleasant and dangerous situations.
You should not try to turn the halti into this piece of ammunition by tightening the nose strap as tightly as possible. This may rub the animal's face or cause other injuries.
Check out the features of choosing a regular collar, leash, harness and muzzle for your pet. An alternative to a halter can be an electronic or collar collar.
Why do you need a halter and what is its use?
The halter is the ingenious invention of Dr. Roger McFord. In fact, this is a special bridle for dogs that helps the owner keep his dog on a leash, even if he is heavy and huge, like the famous Beethoven. The most famous company that produced halters was Halti. The brand name quickly became a household name and today many suppliers of equipment for pets are unaware of the original name of the equipment. Thanks to the halter device, you can easily keep the dog with you even if he has injuries to bones, muscles, and tendons. It is also used by dog trainers and dog lovers to train their pets.
This is what halti looks like for dogs
Can a halter replace a muzzle?
Another incorrect but popular name for a halter is a training muzzle. The error here lies in the principle of operation of the device - the halti does not prevent the movement of the jaws. An equipped dog can bite through the halti, pick up an object from the floor, or even grab someone.
Note! A halter cannot in any way replace a full-fledged muzzle, but can only complement it.
How to choose the right size
To achieve maximum effectiveness when using halti, you need to choose the right size. There are halters for large, small and medium dogs. Each of them can be adjusted to perfectly fit your pet's face.
A properly selected halti does not interfere with the dog and does not irritate it. The cheek straps should fit snugly against the muzzle, but under no circumstances should they press. The tension can be adjusted using the neck strap. The nasal must be placed directly in front of the animal’s eyes.
Unlike previous belts, it must be completely free so that a finger can fit between it and the pet’s nose without any problems.
Important! It is better to have a looser nose strap than a tight one. Otherwise, it may injure the dog's face.
At what age can you
You can teach your dog to wear halti from the first walks on the street, namely at 3-4 months. Essentially, it is an alternative or addition to a collar. But when using a halter with puppies, you need to understand that babies are very active and will try to chew the accessory and remove it.
If you want to let your pet play with other dogs, you should definitely remove the equipment. Without doing this, the puppy may be injured.
You also need to constantly adjust the size of the halter and check whether it is secured correctly. This is explained by the fact that puppies grow very quickly and require gradual replacement of the small halti with a larger one.
Material
And the last point is the material. A whole series of qualities depend on it - from weight to reliability.
To summarize, we can highlight a couple of the most universal models - mesh leather or plastic. They are well suited for regular use and are available for most breeds. And for the largest and most wayward animals, it is better to prefer solid leather or metal models, but in this case you need to take into account the season and their level of activity.
Source
How to train a dog
The dog gets used to the halti quite easily if it is used correctly. The process of accustoming an animal to this piece of equipment is almost the same as to a collar.
In order for your dog to positively perceive the new accessory and wear it obediently, you must:
- Introduce the animal to the new thing. Let him smell the halter and examine it.
- When your pet completely loses interest in the new thing, you can try putting it on.
- First, you need to take the halti by the nose strap to form a ring. Next, attract the pet’s attention with a treat and place your hand with the treat so that the pet, in an attempt to reach it, sticks its head into the hole.
- This procedure should be repeated until the animal lowers its head into the halter on its own to receive the reward.
- Try putting the piece of equipment on and off completely several times so that your pet gets used to the sensations. Don't forget to constantly praise and treat your dog.
Video: how to train a dog to wear a halter On the first walk, your pet will try to remove the halter, but will soon get used to it. Try to distract your pet from a new thing and praise him every time he switches his attention. After some time, the dog will stop pulling on the leash and will not experience discomfort from the halti.
Description and purpose of the accessory
A halter, or halti, will be an addition to a dog collar. It is not difficult to use, and there are many benefits: with the help of such a device you can wean your dog from pulling on the leash and prevent it from going out for a full walk. Thanks to him, the dog better perceives the commands “Near!” and “Don’t delay!” The halter is harmless to the dog, does not put pressure on the neck, and the animal will feel comfortable.
Dog lovers purchase this device because it makes it easier to focus the pet’s attention. If while walking he barks and lunges at cats and other dogs, pull the halter towards you and the dog will turn his head to the side and switch to the distraction
Do the same when the dog sees a treat on the ground. Then she won't be able to reach it to eat it. With the help of such an accessory it is much easier to walk a large dog. This way you can quickly teach your large pet to follow commands.
A dog halter is a useful device that is best used not on daily walks, but on special occasions. For example, if you want to take your pet to the veterinarian, but he is stubborn. Even when you go to a store or take public transport, wear this accessory. When you are going to let your dog out to play with other pets, remove the halter: you don’t need any unnecessary injuries to the animal. You cannot leave your dog unattended when walking around with this accessory, otherwise it will get caught on something.
Some novice dog owners confuse a halter with a muzzle. These are two completely different subjects. A dog wearing a muzzle will not be able to eat or pick up anything from the ground. The halter is designed to ensure that your four-legged friend stops pulling on the leash. Please note that using only a halter is not a good idea. Use a halter with a leash while walking or training your dog
Thanks to this device, you will redirect your dog's attention to distractions.
If you pull the leash too hard, the animal tends to break free. Your task is that if the dog sees another pet and rushes towards him, pull the halter towards you, then loosen it so that he can independently assess the situation. If the pet is no longer distracted by the stimulus, reward it and feed it something tasty.
Why is it important to properly adjust to the shape of your dog's head?
Today there are many dog breeds that have their own body structure. In accordance with this, there are some nuances when using khalti. The ability to use a halter safely and without harm depends on the shape of your pet's head.
Problems with the use of the mentioned accessory occur in animals with very drooping lips. When the leash is pulled, when the nose strap is pulled together and covers the dog's mouth, the animal often bites its lips.
Therefore, the use of a halter for such breeds is not recommended, as it can lead to injury.
When you take your first walks in a halti, you need to make sure that your dog doesn’t get a sore nose. This is a fairly common problem, because the owner and the animal itself are not accustomed to the peculiarities of using the accessory. Owners of setters, spaniels, huskies, malamutes and other breeds of dogs with a slightly convex occipital part of the head have a problem with the fact that the animal easily removes the equipment with its paws.
In such cases, for better fixation and reliability of the halter, you should fasten it to the collar or pull the neck strap under it.
Get to know typical spaniels in parts 1 and 2, including: Cavalier King Charles Spaniel, Irish Water Spaniel, Springer Spaniel, Russian Spaniel, American and English Cocker Spaniel.
Measurements to be taken
Tools needed to take measurements of a dog: measuring tape, collar or string
2. Neck circumference . By rope. The centimeter goes around the neck.
5. Waist circumference for “boys”. This measure is for “boys” only. The centimeter runs around the animal's body in front of the genitals.
6. Circumference of the hind legs around the thigh. Measure around the widest part of the thigh of ONE PAW.
7.Girth of the front legs at the lower joint. Around the ankle.
8.Width of the chest between the front legs. Measure the dog in a sitting position along the chest between the front paws.
9. Distance between front and hind legs. The measurement is taken from the side of the front paw to the thigh of the back paw.
At the time of measurement, make sure that the dog stands in a stance and is not hunched over. It is better to measure several times and take the most frequently occurring result.
10. Front sleeve length . Measure from the middle of the back (spine) to the required sleeve length at the bottom
. 11. Back sleeve length . Measure from the middle of the back (spine) to the desired level of the bottom of the sleeve (to the hock or ankle)
12. For "boys". Distance from the front paw to the level of the genital organ.
12a The distance from the free collar along the stomach (between the paws) to the genitals.
13. The distance from the point of intersection of the collar and the line of the spine along the front paw (along an arc) to the floor.
14. Neck length (desired collar height).
1) distance from the forehead to the base of the neck (measure from above through the head between the ears)
2) neck length under head
***For hats and hoods additional measurements are required:
1) distance from the forehead to the base of the neck (measure from above through the head between the ears)
2) neck length under head
4) distance from eyebrow ridges to ears
5) distance between ears
6) the width of the ear at its base
Source
How to sew a halter with your own hands
Any owner can quite easily sew a halter with his own hands. This piece of equipment will be the most convenient for your pet, as it is made according to its individual dimensions. To create the mentioned accessory you will need:
- belt tape (can be bought at any sewing store);
- 2 small carabiners for a safety leash, which is attached from the halti to the collar;
- plastic latch;
- 2 rings, which must be solid, so that the tapes do not jump out of possible gaps and do not cling to them;
- felt;
- measuring tape to measure the parameters of the animal and cut the appropriate pieces of materials.
In order to sew the mentioned accessory, you can use a sewing machine or do everything by hand.
It will be useful for you to know how to cure a dog from: fleas, lice eaters, ticks (ear and subcutaneous), ringworm, worms and dandruff.
The second option will take a little longer, but the technology is the same in both cases:
- Before you start sewing, you need to measure the circumference of your pet's neck and nose.
- Sew the latch to the tape, which is longer in length and will serve as a neck strap.
- Sew the ring to another piece of ribbon, cut it off and place it in the middle of the neck strap.
- Sew the nose strap (not forgetting the seam allowance for the rings).
- Cut the felt to the size of the previous parts and sew it on the side where the fabric is adjacent to the dog’s face.
- The last step is to create a safety leash. You need to measure the distance from the nose strap rings to the collar. Then cut a piece of tape with a small margin to sew carabiners on both sides.
Video: how to sew a halter for a dog A halter will serve as an excellent assistant for you when training your pet. Such ammunition, without a doubt, contributes to greater obedience of the pet. Also, with its help, even those people who rarely do this and therefore have poor control over the dog will be able to walk their dog. Using a halti will prevent excessive tension on the leash and unnecessary picking up of objects from the ground.
We make halti ourselves
A halter for dogs is easy to make with your own hands. To do this you will need a little time, patience and a few tools and materials. We bring to your attention simple instructions for creating a muzzle-bridle with your own hands.
Tools and materials
First you need to prepare the following materials and tools:
- belt tape (sling) – 2 m;
- 2 rings – 25 mm;
- 2 small carabiners;
- fastener (fastener width - sling width);
- needle;
- strong threads;
- meter for measurement.
Materials must be selected according to the size of the pet.
Step-by-step instruction
To ensure that the process of creating a bridle collar with your own hands is quick, and the result is no worse than one ready-made in a store, you must follow the instructions.
- Measure the circumference of the animal's neck and muzzle and write down the data.
- Measure the distance between the muzzle and neck girth measurement points.
- Measure the distance from the collar ring to the halter.
- Cut pieces of belt tape according to the dimensions obtained.
- Using a needle and thread, sew a ring to a sling equal to the circumference of the muzzle.
- In the same way, sew the clasp to a section equal to the circumference of the neck.
- Now you can sew the carabiners to the sling. When making a halti, do not forget to adjust its dimensions to the dog itself.
- Assemble the halti, place it on your dog and attach the bottom ring to the leash.
>Video “Teaching a puppy to halti”
Don't know how to train your dog to eat halti? See how experienced dog handlers do it.
Sorry, there are no surveys available at this time.
Making a comfortable halter for your pet
A halter is one of the accessories that is used for dogs. However, despite the existence of this element of dog equipment, a significant number of pet owners are not aware of what it is and for what purposes this accessory should be used. Why is it so important along with other equipment for a pet, and how to make it yourself at home, we will talk about this in detail in this material.
When a person decides to get a dog, he immediately purchases the accessories that he will need in the process of keeping a pet. The first thing, of course, is to buy a collar, and in addition to this, purchase toys for the pet. At the same time, many people forget to buy a halter or halti. This is exactly what this accessory is called differently.
A halter should be understood as an accessory that is intended for dogs and its main function is to fix the animal’s muzzle, so that the pet can be walked without any difficulties. Quite often this accessory is also called a bridle collar.
Thanks to the collar-bridle, a secure hold on the cheeks and jaws of your pet is ensured. If we talk about the composition of this accessory, then it contains two straps. One of them is secured on the upper part of the scruff. The other is fixed on the back of the dog’s nose. Using two point straps, the halti's neck strap is securely connected to the bow strap. The straps should fit snugly on the cheeks, but under no circumstances should they be pressed into them. In order to correct the behavior of a pet at home and on the street, a bridle collar is used.
When choosing, you need to focus on the size of your pet and choose this accessory based on this. Then you won't go wrong with your choice. You should know that if the collar is very tight, then when the pet makes sharp jerks during a walk, then by such actions it can injure itself and the animal’s jaw will be damaged.
If your dog is wearing a bridle collar, then under no circumstances should it be left unattended.
Please remember that this accessory should only be used for walking your dog on a leash.
The nose strap should be located directly in front of your pet's eyes. It should lie on the muzzle quite freely. This strap must be inserted into the metal ring that is present on the chin strap. The leash itself is attached to another ring. When the leash is pulled, the central ring is pressed against the lower jaw, and in such a way that the leash-bridle does not slide to the side.
When you first put on your pet such an accessory as a muzzle-bridle, it will be unusual for your pet to be in it for the first time. Therefore, it is necessary to accustom your pet to this accessory in the same way as to a muzzle.
There are several types of halters. One of them is khalti. The other is called Gentle Leader. The halti must be worn together with another collar, since its fastening is quite loose. This accessory does not tighten, so it is optimal to use it for a dog that has a large muzzle.
As for the Gentle Leader halter, the muzzle fixation is better in such a bridle collar. It is in this regard that this type of accessory differs from halti. Therefore, when using this device, another collar is completely unnecessary.
The Halti should not be considered as a muzzle. You should also know that such a collar-bridle cannot cause harm to your pet when worn.
Making Halti yourself
If you decide that you need such a halter, then you can easily make it yourself. In order to create it you will need a little time and patience. In addition, it is necessary to prepare the necessary material and tools before starting work. We will present simple instructions on how to make a halti collar-bridle below.
Tools and materials for making Khalti
Before you begin making this accessory, it is necessary to carry out preparatory work, which will be expressed mainly in the preparation of the necessary materials, as well as the tools that you will use in the manufacture of this accessory.
The materials you will need are a belt 2 meters long. You also need to prepare two 25 mm rings. In addition, you need to find or purchase two small carbines in the store. You will also need a fastener: the width of the fastener should be equal to the width of the belt. In addition, the tools for making the accessory will require a needle, strong threads and a meter for carrying out measuring work.
Please note that the materials for making this accessory should be selected according to the size of your pet.
Step-by-step instructions for making Khalti
In order for you to spend as little time as possible on making the collar-bridle, and to please you with the end result, you must strictly follow all the steps contained in these instructions and not deviate from the recommendations.
The first thing you should do when making this accessory is to take measurements and find out the girth of your animal’s muzzle. The data you obtain during this work should be recorded.
After this, you need to measure the distance between the measuring points of the neck and muzzle.
The next step is to measure the distance to the halter from the collar ring.
Next, you need to cut off pieces of the belt tape in accordance with the dimensions obtained earlier.
The next step is to sew the ring to the sling, for which you will need thread and a needle. In this case, the size of the sling should be equal to the circumference of your pet’s muzzle.
You must proceed in the same way at the next stage, when you need to sew a fastener to a segment that should be equal to the circumference of the pet’s neck.
Then you can move on to the next step - sewing on the carabiners. When you make a halti, you need to constantly adjust the accessory to the size of your dog.
When the bridle collar is ready, all you have to do is put it on your pet, and then fasten the lower ring to the leash.