Why know how to make a human trap? Some are driven by simple curiosity, others need it for reasons of their own safety, and others want to catch a burglar.
Usually people hunt birds and animals, set traps for large and small game. Since ancient times, man has adapted to provide himself with furs and meat by captivating animals. Let's get acquainted with some of these devices to find out whether and how to make a trap for a person at home.
Venter, mousetraps, nets, pits
Traps are technical devices made of metal, ropes, branches, and the use of natural features of the terrain to capture a victim or take his life. The object can be either an animal or a person. And for the hunt to be successful, it is necessary to take into account not only the size, but also the habits, lifestyle and disposition of the intended victim. How to make a human trap? Here is a small list of devices that can help in this endeavor:
- Snares, networks, tenets. Although they are usually used to capture hares and birds, these traps may well detain a potential victim, in our case, a member of the human race.
- A bucket of water mounted above a slightly open door is one of the options for a homemade trap.
- A banana peel thrown at the feet of an attacker will cause him to fall to the floor.
Repeaters and clocks
The red repeater can be modified by the player to create a delay in the Redstone signal being triggered in the circuit. As you know, the delay of the red repeater is 1 Redstone clock (that's two game clocks). In Minecraft, this figure can be increased to 4 ticks of Redstone, but no more. In this design, repeaters delay signals in different mechanisms, hence they will fire at different times, thus allowing the player to create more complex piston systems.
Like in the movies
There are traps that make it impossible to survive if you fall into them. Similar constructions were usually set up during hostilities by partisans in Vietnam. And the hunters of African tribes knew well how to make a trap for a person.
You should always be careful in the forest, as an ordinary anthill can turn into a trap. Moving logs, stones falling from nowhere and other “miracles of engineering” are very colorfully demonstrated in many films, and so clearly that even instructions on how to make a trap for a person are not needed.
However, let’s leave these methods for the movies, and in modern realities simple and safe methods are used. Although. Let us remember the well-known and beloved film “Home Alone”. Not all of the traps prepared by M. Kalkin’s hero can be called safe for health. And of course, they became an unpleasant surprise for the villains. However, we will talk about thieves, or rather about ways to “eliminate” them, a little later, but for now.
How to put loops on a hare
The hare knocks down the guard with its muzzle and belly, the noose is released and picks it up by the paws. In such a loop, the animal remains alive for more than a day, so the hunter does not remove a cold carcass. Snow is thrown on top of the trap for camouflage (photo No. 13, No. 13.1).
| Photo No. 13 | Photo No. 13.1 |
If it begins to snow, the live trap will still remain in working condition. Coniferous wood interrupts the smell of a person and the hare loses its vigilance, feeling its safety.
Gaming and fun net
Of course, traps are not only scary and dangerous, but also playful. How to make a human trap in the house? If you want to entertain the children and the space allows, you can arrange the game “Overcoming laser obstacles.” You need to do the following:
- place several chairs around the room at different distances from each other;
- take a ball of thick thread or a long rope;
- tie one end of the thread to the leg of one of the chairs;
- stretch a thread or rope from one piece of furniture to another, securing it at different heights in any order;
- the second end of the rope must also be attached.
As a result of such manipulations, you should get a kind of “obstacle course”, reminiscent of a network of light rays.
Participants, being on one side of the room, must move to a free part of the room. Whoever gets out the fastest wins. Is it worth mentioning that you can’t touch the “laser beams”?
Spring mousetrap
Spring mousetraps
The device is designed to catch several individuals at once. The construction process consists of several stages:
- Take a wooden beam about 40 cm long. Drill 6 holes at the end with a diameter of 2-2.5 cm and a depth of at least 1-2 cm. These will be holes for potential captives.
- At a distance of 1 cm on the same side, saw the block lengthwise to the bottom of the notches.
- Drill 2 more holes perpendicular to the holes, into which the springs will then be attached.
- Build a spring mechanism from a knitting needle, and at the end make a loop of strong thin wire.
- Insert the free edge of the spring into the previously prepared hole, secure it to the block, and hide the loop in the cut.
- Pass the thread through the free holes.
- Place bait in the center.
The mouse will try to get to the treat and gnaw the thread, as a result of which the spring mechanism will work, and the rodent will end up in the hole prepared for it.
How Auntie Scared Thieves
Of course, in peacetime, variations on the theme “How to make a trap for a person” are usually sought in order to protect one’s home from the invasion of uninvited guests. Our people are cunning, they invent such methods that you are simply amazed.
For example, one of the townspeople made a large rag doll, dressed it in her old robe, and put a wig on her head. Before leaving for the dacha, the woman hangs this mannequin in the corridor in front of the front door. Any thief, having climbed into a house and seen such a picture, will forget about the purpose of his “visit” and retreat. Well, okay! After all, the main thing is to protect your property, and not to catch the villain.
Some craftsmen connect one of the lamps with a timer, which turns the lamp on and off from time to time. This creates the impression that there are owners in the house.
Redstone circuits
Redstone circuits can be divided into two parts. The front part controls the pistons and is powered by a red flame. The back connects to the stretch mechanism discussed above. These two sections are separated by blocks on which a red torch is installed, which is used in the game to activate various mechanisms. In this case, the red torch acts as an intermediary between the two sections, indicating that they will never be activated at the same time.
A trap on your home street, or About safety precautions and inattention
How to make a trap for a person on the street? It is not always necessary to deliberately dig holes, insert stakes or set snares. An open sewer manhole and an unfenced trench, a construction pit and a well with boiling water from a heating main can become a deadly trap on the streets of a modern city.
If there is construction going on near your home, you must supervise children and teenagers. After all, they are so interested in being in the “excavation” territory, and games in such a place often end in failure: spinal injuries, fractures and concussions.
To avoid falling into an open well, you need to carefully watch your step when moving on the sidewalks. Of course, builders and repairmen must install fences and warning signs when working on potentially hazardous sites. However, to maintain your own health, you need to take care of yourself.
Traps are designed not only to catch various living creatures, but also for protection. For example, if a thief comes to your summer cottage or apartment, he can easily fall into the trap that you set for him.
Content:
Remember that in the forest you can find traps set for animals. However, if the trap is designed for a large animal, it will also harm you, so be careful.
In total, there are four types of traps that operate according to different principles - impact, suffocation, suspension and immobilization.
Remember that, for example, traps can immobilize or injure a person, so be careful when placing them. If you nevertheless decide to make a trap for a person, take care of its careful camouflage, since a person is more careful and cunning than animals.
Now we will tell you how to make a trap using available materials.
Fish traps on rivers with a single channel.
The same principle can be used on rivers with a single channel. To do this, part of the stream must be blocked with a primitive net and the fish must be directed inside a long arm-cage arranged parallel to the shore.
In the dead-end part of the cage, you need to dig a pen-trap in the form of a deep hole, connected to the river by a narrow long channel. When the fish gets into the cage, it must be driven into the trap, making as much noise as possible, and the exit from it must be closed (Fig. 20). In stagnant bodies of water, traps are made in the form of labyrinths, consisting of many semicircles and spirals connected to each other. The role of the entrance is performed by two semicircles located close to each other, forming a narrow figured corridor. Such a trap is also constructed from stakes driven into the bottom, connected to each other with wire, rope or any other available material for strength.
Based on materials from the book Great Encyclopedia of Survival in Extreme Situations. Andrey Ilyichev.
The easiest trap in the room
Pull the thread between walls that are close to each other (for example, between the walls of a corridor).
Place the wooden block vertically so that the thread keeps it from falling.
Now take a spoon and place it where the block will fall after hitting the thread. Calculate everything so that the spoon flies up after the block falls.
Now you can put a small object, for example candy, on the opposite end of the spoon. After someone snags the thread, the end of the bar will hit the spoon, and the candy will fly towards the “offender”.
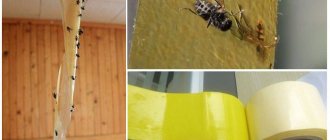
Adhesive structures
Glue traps To make a mousetrap, you will need small cardboard squares, sheets, each side at least 5 cm. Construction residues can be used for the base - drywall, MDF panels, fiberboard, chipboard.
The second necessary component is glue. You can prepare it with your own hands according to the following recipe: mix rosin, petroleum jelly, pine resin and bitumen pitch. If you don’t want to prepare the glue mass yourself, then the easiest way is to purchase special glue for rodents in a specialized department. The further construction of the trap is outrageously simple. Glue is applied pointwise to the workpiece. A fragrant bait is placed in the center. The mouse is firmly fixed to the adhesive mass. The only drawback of such structures is the heart-rending squeak of a caught pest.
To get rid of mice in a private house or apartment, a house mousetrap is often used. A cardboard frame is made. The inner walls are covered with rodent glue and in the middle there is a traditional treat for mice. This design eliminates the risk of an animal smeared with glue moving around the room.
How to make a human finger trap
This trap was invented a long time ago in Asia. The essence of its work is that both index fingers are inserted from different sides of the tube. After this, it is almost impossible to pull your fingers out of the trap, and the more effort you put into this, the tighter the trap tightens.
Making such a trap is not at all difficult.
In ancient times, the Chinese used bamboo for the base, then the trap was durable. We will use paper for this purpose.
Take two sheets of paper of different colors, then the craft will look nice. In addition, it will be easier to do.
Cut out four strips from paper - two from one color and two from another. Their thickness should be twelve millimeters, and the length of a standard sheet of A4 paper on the longer side.
Now glue them together to form corners. To do this, glue a strip of a different color to a strip of one color at an angle of ninety degrees. Do not overuse the amount of glue, otherwise the paper will get wet.
Now you will need a cylindrical object of such length that both of your index fingers fit there. Since the craft is absolutely not dangerous, it can be done even for a child, but take into account the length of the cylinder.
Pit with snakes
Pit with snakes
A real nightmare for herpetophobes. But even for those who do not seem to be afraid of snakes, it is an extremely unpleasant and often deadly trap, which, as you can understand, is a pit with snakes. These were used to catch the enemy, as well as for torture and sophisticated executions in medieval Europe and many Asian countries.
It is believed that it was in the pit with snakes that the Viking leader Ragnar Lothbrok was executed after his defeat in the battle with King Ella II of Northumbia, who was rightly known as a cruel and treacherous ruler.
Military man traps
Now let's look at more dangerous types of traps that are used even in war. Let's take the Vietnam War as an example.
In order to warn your own people and not forget about the mine yourself, the location of the trap was marked with different marks, examples of which are shown below. These same marks even indicate how far away the mine is.
The process of setting a trap.
The most popular and frequently used trap is the punji. The cost of its production is low, so this type of trap was very common during the war.
To make it, dig a small hole and cover it with a board into which you drive nails or place stakes. Place the board with the tips facing up and sprinkle it with leaves. Believe me, by stepping on such a board, a soldier can even pierce his foot.
This type of trap can be improved. The figure below shows everything clearly.
Punja board. It was placed where there was a narrow passage and carefully camouflaged. The basic principle of operation of such a trap is that the soldier falls into a dug hole and receives a blow to the chest and head with a board.
We will not describe traps that use any type of weapon, because it is unlikely that you will be able to get the necessary parts.
Water mine
You need to make a hole with an area equal to one block and a depth of two. Pour water down and place dynamite above it. You need to cover this stuff in Minecraft with a pressure plate. What advantages does this trap have? What are the disadvantages?
Pros:
- Can be built very easily
- Grippers are guaranteed to kaput (if they step on the plate)
- Can be done near the house - explosion in water blocks does not destroy other Minecraft blocks
Minuses:
- The trap is noticeable
- You can only build on sand
Fighting methods
They fight cockroaches with a variety of means, here are the main ones:
- Chemical and folk remedies.
- Freezing.
- Electric repellers.
- Traps.
- Call the SES service.
An important condition is that the apartment is clean and there is no open food. It is its smell that mainly attracts these parasites. It is also recommended to carry out a thorough spring cleaning and empty the trash bin in a timely manner.
Important! In addition to dirt and the smell of food, cockroaches are attracted to moisture. Puddles left on the floor or table, a leaking faucet - parasites can come running to all this.
If any of this attracts pests, they will start looking for ways into the apartment. They can crawl through cracks in the floor, walls, ceiling and windows, then hide in secluded places: behind cabinets, upholstered furniture, under the sink, under peeling wallpaper. After cleaning the room and making the necessary preparations, you can begin processing.
What to do with a caught rodent
The question often arises of what to do with a caught mouse. If the animal remains unharmed and uninjured, the most humane thing to do is to take the captive back to its natural habitat. If it is damaged, it is advisable to feed it to cats or take it to a landfill. Particularly compassionate individuals may first euthanize a mouse in an apartment or house before disposal, for example, by feeding it poison. If a decision is made to keep the gray pest as a pet, it should be taken for examination to a veterinary clinic and only after it is concluded that it is healthy, a new home should be arranged for it.
Important!
Whatever manipulations are performed with the captured animal, it is necessary to do it with gloves, since one cannot exclude the possibility that the mouse is a carrier of various diseases or is simply rabid. The room in which it was located must be thoroughly disinfected.
The forums also offer more creative options for solving the fate of a captive animal: feed and eat it, flush it down the toilet, place it with the mother-in-law.
How to make your own trap
The use of traps is no less common, as is the use of other means. You can usually buy them (they come in adhesive, electric, and poisonous varieties), but it's much less expensive to make your own.
Homemade traps can be made completely safe for households and pets using the most convenient of numerous recipes. Store-bought traps often have toxic odors that are harmful to the human body. DIY traps are no less effective.
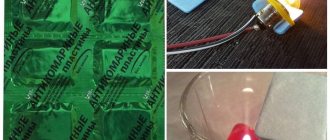
From a plastic bottle
You can use a bottle to create a pest trap in minutes. To do this, take a bottle, cut it so that the bottom part is twice as long as the top. Place the bait in the bottom one and pour water, then cover it with the top one, turning it upside down, spreading the walls with fat or a fat-containing product. One of the disadvantages of such a trap is that the smell of the bait is prevented by the narrow opening of the plastic bottle, so it will not be very effective at attracting insects.
From a box of markers or pencils
Such boxes are convenient because they are flat and have a hole on the outside. Their shape is closest to commercial ready-made traps. The inside of the box needs to be sealed with glue or double-sided tape, and then a treat that attracts cockroaches should be glued in the middle. Its smell will allow you to catch insects that will stick tightly and will not be able to get out.
home
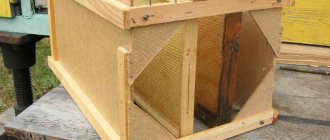
It is also necessary to select a corridor from the ground for raising and lowering the trap. Usually there are slightly fewer branches on the north side. If a person can still squeeze between close branches, then the trap needs a smooth road. When we drag it up, it is somewhat cumbersome, but empty. A heavy trap is more difficult to lower. Therefore, it is necessary to find such an option for moving parallel to the trunk so as not to cause damage to the tree and not experience major obstacles when delivering and removing the trap. Sometimes you can remove two or three knots and make a straight corridor. But you shouldn’t get carried away with cleaning up branches. This may be immediately noticeable. If a curious person notices such a corridor, he may wonder what it is for.
Three branches cut off have no effect on the growth of the tree. You just need to do this not haphazardly, but carefully, near the trunk. Then the tree itself will overgrow this place in two to three years.
You can use this option: remove two knots, and from the third, especially if it is thick, cut out a triangle and take it to the side on the other side, tie it to another branch. Everything will look natural.
If the cut areas of the branches become very white and conspicuous, they should be rubbed with earth. You can remove a piece of bark from a sawn-off branch. Place it on the cut and nail it with a nail. Over the summer, the tree will fill the wound with resin, and after three years it will completely cover it with young bark. Therefore, the corridor can be made with the prospect of next year.
You need to cut down interfering knots at some distance from the base. This is where support is sometimes needed. But if you remove them all the way to the trunk, there will be nothing to rely on. Therefore, when filing branches, step back five centimeters from the trunk, also leaving stumps. You can grab them with your hand or put your foot on them. It will dry out, of course. But reliability will remain for a long time.
We simply carefully move the thin branches to the side and tie them. On deciduous trees you can also make corridors for raising and lowering the trap. With the exception of aspen, deciduous trees do not break in warm weather, and branches should not be cut down, but pulled to the sides and secured. And it’s not at all necessary to drag a bundle of wire with you to do this. Thin branches are pliable. Wrap the branch a couple of times around a thicker branch, lay it behind a suitable shoot so that it does not unravel. Several suitable branches can be tied around the trap and secured. Then the trap will look like a bird's nest.
Place the trap against the trunk and take the string. Tie one end to the trap. The string is tied to the trap with a bow, but better - with a noose. Then we lay the string in rings on the lid. We tie the other end around the waist, preferably with a so-called dog knot. This leaves a free end of 1.5-2 meters.
Start “climbing” the trunk with a one-handed saw or a light but sharp ax. Only the ax is worse - it can slip out of your hands, or you can accidentally hit yourself in the leg while working in an awkward position.
You begin to climb up the branches. Before you pick up a branch or place your foot on it, carefully examine it visually. If the branch bends or cracks, it is better not to use it. Climb up slowly and without fuss. Periodically look down and see if the line is going well.
Whether climbing or descending, you always need to have two points of support: for the arm and for the leg. Cover the branch with all five fingers. Usually they grab a branch with four fingers, but this is wrong. Correctly: four fingers clasp the branch from above, and the thumb from below.
Place your foot on the branch near the trunk. It is best to stand on the branch in the middle of the foot, then the foot will not slide forward - the heel will stop. When you swing back, you will instinctively have time to lower your foot.
When climbing a tree, check for a straight line. The vertical must be strictly observed, without deviating in one direction or the other. The lowered trap is not capable of making zigzags!
As soon as you reach the neighboring tops of camouflage trees, you begin to look for a suitable branch to stand under the trap. It must be on the opposite side of the corridor - this is a must! Then no matter how much you look down the corridor from the ground, you won’t see the trap.
It’s good when there are two more just above the supporting branch. They will hold the trap firmly on both sides. You tie it, and no wind will mow it down.
An important condition: so that neither the branch on which the trap is placed, nor the upper ones, nor the side ones, should be an obstacle to the free flight of the bees of the future swarm. If necessary, interfering branches should be moved to the sides and tied with wire to neighboring ones.
Once you have determined where you will place the trap, stand on the branches and make sure you are standing securely on them. Hold the branch with one hand, and with the other, wrap the loose end of the string that you left when you tied it around the waist around the trunk. Wrap it around your waist and tie the end with a bow.
Check if the knot holds well. To do this, stand on two branches. Also grab two branches with your hands and lean away from the trunk. This movement must be done strongly. Will the harness support your weight? Anything can happen during the upcoming work: your foot will fall off or slip off the branch. The binding must guarantee 100% security.
Now you need to carefully turn your back to the trunk. Place your feet firmly on the branches again. Begin lifting the trap. Since it is now light, when pulling it up, move your hands one by one over the twine. And for greater security, take the nearest branch with one hand (usually your left) in the bend of your elbow. And that's how you work. True, this is not very convenient, but it is more reliable.
Take the trap with your free hand and move it through the branches, pointing it to the side opposite you, behind the trunk. And you yourself quietly turn your face in the same direction. Carefully place it on the designated branch chosen during the first inspection of the tree. Move it close to the trunk. Take out a captured piece of soft wire, preferably aluminum. You can also use the so-called knitting machine. It is also flexible and easy to twist. Here you have to work with both hands. But this is not dangerous: there is a tree trunk between the trap and you. Place wire around them and wrap the ends. All work on wood is done very carefully, at a slow pace. Otherwise, you might drop the trap.
Having finished tying the trap, you need to look where the taphole is oriented so that it does not end up facing the trunk. And the wire did not pass through it, creating inconvenience for the bees. You should try to see if it is standing steadily and not leaning away from the settled swarm. Verticality should be as perfect as possible. Then the bees will build honeycombs without thickening or thinning.
The direction of the entrance does not matter, what matters is the convenient approach. Since branches facing north are less common, the trap is always placed in the southeast-southwest range. But it happens that it is more convenient for the unhindered approach of bees from the north - you can orient the entrance in this direction.
There are observations that if the sun hits the trap entrance, the swarm will not land in it. However, if the trap is located on the south side of the tree trunk, then how to avoid direct sunlight? Shade? But this means interfering with the flight of bees, depriving them of a direct path to the entrance. And the sun is warm. At high altitudes there is always a breeze. It significantly cools the walls of the trap.
In turn, the heat maintains stable dryness in a cramped home. And for the beekeeper, the lighting of the front wall is important. After all, it’s easier to spot bees from a distance of 35, or even 50 meters, on an illuminated wall.
After this, you need to look from the entrance to the ground and determine from what place the trap will be visible from below.
Lower the string disconnected from the trap down the corridor. See if it's stuck somewhere. If it gets caught, you need to get off and remove the couplings. Otherwise you'll have to get up again. You untie yourself from the tree and slowly begin to descend.
On the ground, untie the string from your belt and go to the place you chose from above to make sure whether the trap will be visible. Remember this place, otherwise you may lose the trap.
When you land on the ground, you need to take the cut branches away and stir the forest floor at the roots so that fresh sawdust or wood chips do not turn white. Everything should be natural.
You can place two traps at once on a good, already proven tree.
Some beekeepers place the trap at a height of 1.5 meters to 2.2 meters on large trees. To do this, drive a nail to an accessible height and hang a trap on it with a wire.
What to do if pests don't go away
A less popular method is repellers. Electric repellers are used mainly against mosquitoes, but they do not always work against cockroaches. Although a good, expensive device will almost certainly remove parasites if used correctly.
Another method is freezing. But it only works in winter. And then, only when it is possible to turn off the heating. Cockroaches flee or die from the cold. If it is cold enough, open all doors and windows and leave the apartment for at least half an hour. It is recommended to repeat the procedure several times every 5 days.
Note! Another effective way, but also costly, is to call professionals from the sanitary and epidemiological station. They will certainly finally remove the annoying parasites if the previous methods did not work.
Shifting walls
Place sticky pistons in Minecraft in pillars (“checkerboard”). The space between the pillars is 1. Next, you need to make a tunnel with a length of ten, a width of one, and a height of two blocks. Put a roof over them. At the very end, you should definitely make an iron door so that you can lean against it, and, therefore, it would be impossible to escape in Minecraft. You need to place a stone pressure plate in front of the door. Then you need to connect the red stone to the pistons. You just need to place it on the lower block so that it acts on two pistons at once. You need to make a memory cell under the corridor. In this case, the redstone (from the pistons) and the button should be connected to the part that is disconnected. In the place where the wire passes that connects the other pistons, we install a red repeater. We set the repeater value to 0.4 seconds so that when the pressure plate is triggered, the memory cell can save data before being eliminated by the piston. We make an extension cord next to the door and hide it underground. As a result, we have a corridor, entering which the enemy activates the pistons. They are the ones who squeeze the uninvited guest in Minecraft. What are the positive aspects of this trap and what are the negative ones?
Pros:
- It's hard to survive
- Grief items are saved
Minuses:
- Extremely noticeable
- Difficult to build
Helmet bomb
German helmet from World War II
German soldiers during World War II took advantage of the enemy's desire to take a German helmet as a souvenir. A bomb was hidden under it, and the person who picked it up was blown up. However, similar traps were used by terrorists after World War II, when explosives were disguised as allegedly lost household appliances, toys, or even wallets.
Mousetrap made from a plastic bottle
The material is accessible, easy to process, and most importantly, it produces a humane mousetrap.
The rodent remains alive, which can be important for a certain circle of people. Some people simply want to get rid of pests without killing them, while others specifically catch them to feed predatory animals. From the rich assortment, we will consider the three most popular models offered by craftsmen: The bottle is cut across closer to the neck, but not all the way. It looks like a hinged lid. A locking mechanism is being made. Transverse elements, such as wooden cooking skewers, are inserted from both cut edges. At the exit, they are tightened with an elastic band for money. The result is a structure that tends to close. A cord is attached to the neck, which pulls the upper part. Its other end in the form of a loop is attached to the bait holder. You can use a toothpick. The homemade mousetrap is ready for use. When the mouse grabs the prepared tasty morsel, the loop flies off the holder and, due to the elastic bands, the bottle collapses, and the rodent remains inside.
A hole is made in the roof and bottom. Any suitable rod is inserted into it. This creates the axis of rotation. A simple design is placed above a bucket, to which a board or other suitable object is placed. This will be the mouse approach. The principle of operation is as follows: the rodent will rise to a bottle that has been pre-treated with a product attractive to the pest. When the mouse runs onto the bottle, the simple design flips over. The animal falls into a bucket, from which it will not be possible to get out on its own.
Another simple way is to use the see-saw principle. The bottle is pierced with wire approximately in the middle. The axis of rotation is made with the expectation that the structure is installed above the support by 1-2 cm. On the side of the neck, a block is fixed end-to-end, which is the approach to the hole. The mouse calmly gets inside to the bait. When you try to get back out, the neck lowers under the influence of gravity, and a pre-fixed block blocks the way.
The neck of the bottle is cut off. A hole is made at the edge and a cord is tied, the length of which is determined experimentally. The other end is tied to a support or weight, with the expectation that if a mouse hits the bottle, it will remain in a hanging position. The device is placed on elevated places, for example on a table, shelves, window sills so that the center of gravity is as close to the edge as possible. The bait is placed on the bottom. When the pest tries to get to it, the structure falls from the support and hangs on the cord in a vertical position before reaching the floor.
Any of the above methods is effective. Adjustments can be made to the design based on the materials at hand. Only the principle of how to make a mousetrap with your own hands is proposed, and the details of a specific design may have features.
Zippo lighters
Zippo lighter
The legendary Zippo lighter and the military’s love for it played into the hands of the Vietnamese partisans during the war with the United States and literally did not play into the hands of the American soldiers. The Viet Cong managed to build small explosives into lighters, and a soldier who wanted to light a cigarette would simply have his hand torn off. Must be great motivation to quit smoking in the jungle.
Inhumane approach to rodent extermination
Poisons and chemicals intended to poison mice have a number of disadvantages:
- addiction of individuals to poison;
- refusal of bait;
- poisoning of pets.
And the most significant drawback is the death of the rodent from poisoning in a place inaccessible to humans, followed by the unpleasant smell of decomposition for a fairly long period of time.
Read a question from a reader - What should you do if a rat eats poison and dies somewhere in the house and it stinks?
A humane solution to the rodent problem
Gentle ways to get rid of creatures are ultrasonic repellers and a contactless trap-container, which, if caught, remains alive and well.
More bloodthirsty methods are glue fishing, chemical poisoning and mechanical traps.
A modern invention - an electronic mousetrap - is the most humane, so to speak, method of exterminating pests, since it leads to the instant destruction of an individual without suffering. You can also make a humane mousetrap with your own hands from available materials!
Operating principle of an electronic mousetrap
A modern electronic mousetrap is a specialized trap for small rodents that releases a strong electric current when the animal gets inside. Unlike ultrasonic repellers, traps destroy mice, which helps to completely clean the room of toothy pests.
The operating principle of an electronic mousetrap is extremely simple: a rodent, lured by the aroma of a treat, climbs inside the trap and receives an instantly fatal discharge of electric current with a power of 8000 V.
In addition, the design of the mousetrap is designed in such a way that the mouse is attracted to the rounded shape of the entrance to the trap, this reminds the animal of gnawed passages. And together with the fragrant bait, these factors do not give the rodent a chance to pass by.
What types of mousetraps are there?
For better visibility, here is a brief description of the main types of mousetraps used to control rodents:
- Mousetrap on a spring. The simplest and cheapest option. The spring is tensioned and the bait is placed nearby. The mouse, pulling the bait, activates the spring, and it slams the animal;
- Traps. The principle of operation is the same as that of a spring mousetrap, there is a slight difference in design;
- Cage mousetraps. A gentle method in which the animal remains unharmed and can be released;
- Glue. This is precisely one of the most cruel methods of extermination. The animal, stuck to the trap, dies a long and painful death from hunger and dehydration;
- Homemade devices. Our people are rich in wisdom and worldly tricks. Many craftsmen are able to invent something of their own to combat rodents, but the principles of operation of such devices are the same as those purchased;
- Electronic mousetraps. Modern traps, which are discussed in this article.
How to make an electric mousetrap with your own hands
The skills of handicraftsmen reach the point that many craftsmen make at home not only elementary spring traps, but also complicated electronic mousetraps with their own hands.
Moreover, there is a fairly common option - a harmless cage trap, which, when an animal gets into it, slams shut and notifies with a signal that there is an animal in the cage. Such traps are used not only for pest control, but also for catching small domestic animals without the purpose of extermination (for example, a hamster that has escaped from its cage). A diagram of such a device can easily be found in various sources, including on the Internet.
We also recommend that you familiarize yourself with the Security and Protective Deratization System (OPDS) - operating principle, installation, maintenance and efficiency of the system