Honey is not only tasty, but also a very healthy product. Today, apiaries are a great success. Quite often, a beekeeper needs to inspect frames, so for greater convenience he needs a box for carrying frames (ramonos). You can buy it, but making it yourself is not difficult. To do this, it is enough to have clear drawings, materials and a desire to make things.
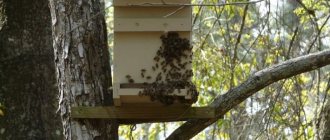
The beekeeper often removes frames from the hive
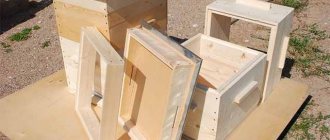
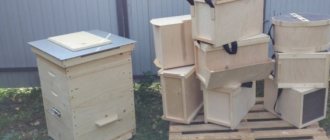
Homemade products for the apiary
The main equipment of an apiary is a beehive. Professional beekeepers make them with their own hands from boards. However, without tools and equipment, the beekeeper will not be able to maintain the hive, care for the bees, pump honey, or melt wax. Beekeeping accessories are available for free sale, but they are often overpriced. Another disadvantage is the inconvenience of working with factory products. Sometimes apiary equipment is ill-conceived and made of poor quality materials.
The beekeeper creates the most convenient beekeeping devices with his own hands. They are completely free, and in terms of quality they can compete with their factory counterparts.
Advice! On the forums you can find amazing homemade products for beekeeping, which have no analogues for sale. The only way a beekeeper can get hold of such a thing is to construct it with his own hands.
Manufacturing procedure
Before you start crafting, you need to determine what to make the box out of. Plywood is considered the best material for making frame frames. Followed by:
- prepare the tool and additional elements of the box - handles, hinges and a lock for the lid, slats and screws;
- cut out the components of the body strictly according to the dimensions indicated on the selected drawing;
- connect them together by making ventilation holes;
- install the hinges and hang the lid on them;
- attach a lock;
- install handles and straps;
- saturate the finished product with drying oil to increase its wear resistance.
Additionally, it is recommended to equip the frame cutter with a tap hole to increase its functionality. The box for carrying bee frames, like any other apiary equipment, must be cleaned and disinfected after each use. You cannot do without it when pumping out honey and when performing other manipulations with bee frames.
“Indian summer” is the right time to make devices for an apiary in the open air, so if you have such a desire, friends, I recommend making a frame frame with your own hands. It will definitely come in handy next season.
That's all for me, I say goodbye to you. Don’t forget to subscribe to my blog, we have a lot of interesting topics and new information to think about.
How to make a frame nose
It is difficult and dangerous for the beekeeper to carry the frames with honey to the honey extractor in the presence of bees. It is similarly inconvenient to deliver foundation to the hives. A frame cutter helps simplify the task. The apiary device resembles an ordinary wooden box that can hold from 6 to 10 frames. It is equipped with a handle for carrying. You can make a simple bee frame with your own hands according to the presented drawing.
The DIY assembly process consists of the following steps:
- First, the size of the apiary frame-noser is determined. It must accommodate the frames used in hives. The frame frame consists of two side walls, a front and a back wall, a bottom, and a lid. In total, you need to put together 6 elements of the box with your own hands.
- For the frame, slats with a cross section of 20x45 mm are used. Do-it-yourself cladding is done with fiberboard. The slats are nailed to the outside of the walls so that it is convenient for the apiary frame carrier to grasp the protrusions with your hands. Inside the box, 2 slats are similarly nailed to form a stand for the frames.
- The bottom is nailed last and the lid is secured with hinges. It should lean to the side. A ventilation hole is drilled in the front panel, but it is optional. Many beekeepers refuse ventilation. Staples are attached to the frame frame, and a handle is hooked from the belt.
- If necessary, beekeepers quickly adapt a self-designed apiary frame to catch a swarm.
The video shows an example of a frame plant:
Requirements for Ramonos
In order for the ramonos to be easy and convenient to use, the design must meet certain requirements:
- lightness - a heavy box will be impossible to use, so it should be small (usually 6-8 frames) and made of light material (usually plywood);
- certain sizes - they must correspond to the dimensions of the frames used in the apiary;
- multifunctionality - in addition to carrying frames, the design can be used to catch swarms;
- ease of carrying - it is necessary to equip the box with handles and a belt;
- moisture resistance - this property is ensured by impregnation with drying oil; it additionally increases the wear resistance of the product.
Ramonos can even be used to keep insects, but only for a short time. This option allows you to replace a special swarm, in the darkness of which the bees are very worried.
Bee remover
The functionality of the apiary bee remover resembles a check valve. Bees from the honey housing move into the nest through special channels. They cannot return back. Having installed the bee remover in the evening, the beekeeper can safely maintain the insect-free frames the next day.
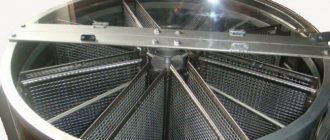
Among the factory-made apiary devices, bee removers from Krasnov and Quebec are popular among beekeepers. The latter is made in the form of a dividing diaphragm and resembles a labyrinth. The basis of the apiary bee remover is four-layer plywood. At the bottom, two triangles are fixed from slats. Their sides do not meet at the corners, but form a gap of 8-10 mm. A hole is drilled in the center of the triangle. The total area of the triangles is covered with a mesh on top.
Advice! 10 hours after installing the bee remover, the beekeeper can observe the movement of bees from the honey housing to the nest.
Assembling a bee remover with your own hands is no more difficult than an apiary frame carrier. You will need drawings. The dimensions must correspond to the internal parameters of the hive so that the bee eliminator can be installed. Plywood thickness – from 10 to 25 mm. The diameter of the hole in the center of the triangle is up to 50 mm.
Triangle slats are used with a width of 20 mm. The distance between the elements forming the channel is about 18 mm. Additionally, you will need bars for the frame.
The DIY assembly technique is simple. Triangles are formed from slats. The blanks are glued or shot with staples. A hole is drilled in the center of the triangle with a feather drill. The edges of the plywood blank are framed with bars with your own hands. The triangle area is covered with a fine-mesh steel mesh.
Advice! It is not necessary to assemble a triangle on an apiary bee remover. If desired, the figure can be a circle, hexagon or other figure.
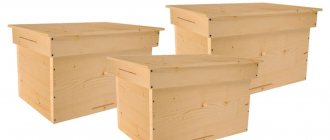
What should the box be like?
Our box for carrying frames filled with honey should be quite roomy, lightweight, and have special fastenings for a belt (to make it easier to carry it around the apiary). Another requirement is a flat, straight lid, which will allow the box to be used as a comfortable chair in the future.
One such box can accommodate 8 frames (based on the suggested dimensions in the drawing). You can increase its capacity by adjusting the size, but then it will be difficult to carry. The total weight of the filled container for 8 frames will be more than 10 kg, excluding the weight of the structure itself. The following photo shows an approximate model of such a carrier.
Pollen collector
Pollen is a useful beekeeping product. To collect it with his own hands, the beekeeper places pollen collectors on the hives. Professional beekeepers do not like store-bought apiary devices. They have many extra holes or their diameter is too small. The most popular are beekeeping homemade products that help the beekeeper collect a lot of pollen.
A special feature of hand-assembled apiary devices is the presence of a shaped hole. A bee crawling through it is guaranteed to leave all the pollen in the collection.
It’s easy to assemble the apiary device with your own hands according to the drawing. First, for the pollen collector, prepare a bar with holes with a diameter of 5 mm with your own hands. A fishing line will help make them curly. The veins are passed into the holes, braiding them in a ring. Overcoming the obstacle, the bees will cling with their paws and push the fishing line apart. Actions will lead to the tearing off of the pollen.
The apiary pollen collector is placed on the front of the hive so that the lower cut of the entrance coincides with the upper edge of the arrival bar. A strip is placed in the slot on the lid of the beekeeper's pollen trap. The landing board is covered with a mesh with 3x3 mm cells. The torn-off pollen will roll into the ditch.
Advice! The beekeeper regulates the quality of pollen collection with his own hands by changing the length and thickness of the fishing line.
The groove of the apiary pollen collector can be used to install a dividing grid to prevent the queen from flying out.
Collect and install a bottom pollen collector with your own hands in the bee pavilion when the bees bring the maximum amount of pollen. On unfruitful days, the apiary device cannot be used.
The design of the bottom pollen collector consists of a valve. When it is lifted, the bees enter the nest without passing through the grate. When assembling the pollen with your own hands, the valve is lowered.
Dimensions of hive frames: measure seven times
The dimensions of bee hive frames depend on the type of structure used. There is a certain classification:
| Hive type | Frame height (mm) | Frame width (mm) | Length of shoulders on both sides (mm) |
| Dadana-Blatta | 300 | 435 | 15 |
| Store honeycombs | 145 | 435 | 15 |
| Lagonstropa-Ruta | 230 | 435 | 10 |
| Ukrainian (standard) | 300 | 435 | 10 |
| Ukrainian (with a narrow-high frame) | 435 | 300 | 10 |
Depending on its size, evidence can accommodate from 8 to 24 frames (in the traditional version there are 12).
When equipping a hive, you must strictly adhere to certain rules :
- frame thickness should be 25 mm;
- distance between adjacent frames – 38 mm;
- the distance from the side slats to the hive wall is 8 mm;
- the free space between the nesting and magazine frames in vertical hives is 10-13 mm.
Here, more than anywhere else, accuracy of measurements and compliance with standards is important. Any misalignment can lead to trouble:
- a longitudinal distortion can lead to the fact that the frame will either come into contact with the wall of the hive or the distance will be less than 8 mm - in any case, the insects will glue them together with propolis;
- lateral distortion will disrupt the correct distance between the honeycombs, which the bees will take advantage of by building bridges between them. In this case, it will not be possible to disassemble the nest without destroying the honeycomb, and the number of cells suitable for scarring the queens will be sharply reduced.
Uterus caps
Special caps are used for placing queens. Beekeepers can improve factory models with their own hands by making a hole and equipping a lid. The device is pressed into the area of the honeycomb where there is honey, empty cells and young growth.
You can quickly create caps for queen bees in the field with your own hands from PET bottles. First, cut off the bottom with scissors. An awl is used to pierce up to 20 holes with a diameter of 2 mm. Three days after installing the cap, the exit is covered with wax, drilling a hole for the queen. If the queen does not come out on her own, she is released by lifting one edge of the cap.
Bee scales
Apiary weighing equipment is expensive, and you can’t do without it. It takes a beekeeper's ingenuity to build a bee scale with his own hands. The design is made according to the principle of a suspension system. You will need to hang a set of blocks from a solid ceiling, pull a cable through them and attach scales.
You can get more convenient scales for hives yourself by converting a factory device with a strain gauge. The scales are being dismantled. The removed electronics are taken outside and secured in a convenient place.
The movable scale platform is mounted on levers connected to the frame by springs. To re-equip, you need to weld a frame from a corner with your own hands and equip it with four bearings. The homemade frame is attached to the main frame with four screws.
To lift the scales, a nut is welded onto the frame and a handle is screwed in. For weighing, 55 mm thick bars are placed under the bottom of the hive. Roll the scales into the gap and press the power button. When zeros appear on the display, turn the handle to raise the movable platform by 20 mm. After weighing the hives, the beekeeper turns the handle in the opposite direction.
The bearings of the bee scales are rolled synchronously. To raise or lower the platform, turn the handle about 20 times.
How to protect honeycombs from wax moths using folk methods?
Salt
Wax moth, if left untreated, can destroy the entire honeycomb stock. So, after you have pumped out the honey and freed a significant amount of the honeycomb, dry it. Take a regular sprayer UOP-5, which our industry produces to combat agricultural pests, in particular the Colorado potato beetle, fill it with a saturated salt solution and sprinkle the honeycombs on both sides. After the water has evaporated and the honeycombs are covered with light dry salt, shake each of them, excess salt will sprinkle off, hide them. Moths will not grow in such “salty” honeycombs, and in the spring, when the honeycombs need to be placed in the hives, sprinkle them with water and then there is no need to give the bees salted water (5 g per liter of water). Such an event completely preserves the honeycombs and provides the bee colony with salt. But at the same time, the wire within the frame must be stainless or chrome-plated, otherwise it will rust. In this productive way, up to a thousand frames can be processed in an hour.
Vinegar
Honeycombs should be stored in empty hives, tightly closing the entrances with tin valves or paper stoppers. Place a vessel with a capacity of 50-100 milliliters at the bottom of the hive, pour acetic acid into it, place it near the frame and close the hive. It is advisable to place a plastic film on its ceiling to slow down the rate of release of acetic acid vapors. 4-5 tablespoons of acid are spent on the hive at a time. Instead, you can use vinegar essence or regular vinegar, spending more of it.
The acid does not have any harmful effects on bees, as it evaporates quickly. Before placing honeycombs for bees, it is advisable to ventilate them for one to two hours. Bees readily accept such honeycombs.
Sandy immortelle (immortelle)
To prevent wax moths from damaging the honeycombs, place a 1.5-2 cm thick layer of shade-dried immortelle (immortelle) inflorescences under and on the honeycombs, tightly close the box or hive in which they are stored, and place them in a dark, dry and cool place .
Drafts
It is best to store honeycombs in tightly closed boxes (hive bodies, etc.). To prevent moths from entering the container at the egg or caterpillar stage, the honeycombs are disinfected by placing formaldehyde in the box at the rate of 50 g per 1 cubic meter of volume. Good results are obtained by pollinating honeycombs with ectobacterin, which does not harm bees or humans, but has a detrimental effect on moths.
You can keep the cells open in drafts, placing them at a distance from one another. Most beekeepers keep their honeycombs in the attic, where they are well ventilated. In drafts, moths do not damage honeycombs and they can be left for the winter, separating those with beebread. The latter are covered with powdered sugar and stored at above-zero temperatures, preferably below 10°C, because under such conditions the moths already die.
Water
There are two ways to store honeycombs without bees:
- Soak the honeycombs in water (preferably rain or river) for 24 hours, pump it out using a honey extractor and air dry. There will be no moths because they damage the combs that already contained brood.
- Dry honeycombs can be stored in a whole plastic bag, tightly tied. This method is simpler, but the first is profitable, since the honeycombs are stored in the air, and there is no ventilation in the bag.
Electrical booster
To simplify the work with wax, beekeepers created an apiary waxer with their own hands. Its peculiarity is that it runs on electricity. To assemble an electric generator with your own hands, you will need an old working battery and 2 wires with clamp terminals.
The essence of the apiary device is that the terminals are connected to the wire on the frame. When the circuit closes, it begins to heat up. The foundation is placed on a hot wire and pressed with glass. Through the transparent sheet you can see how the strings are soldered into the wax.
How boxes are used in beekeeping
In addition to storing the frames themselves, the design is also used for other purposes. For example, to maintain a swarm. Beekeepers consider it a better option than a special swarm, in which bees often suffer from anxiety due to being in the dark for a long time. The swarm is placed directly on the frame after it is removed. The structure itself is installed next to the hive. The queen itself should be placed directly on the frame, while others can be shaken off onto a pre-prepared lower frame. But even in such a box it is not recommended to keep insects for a long time.
Box made for several people
The design feature of the box for two people is that it is somewhat larger in size. There are already 20 to 22 frames from the hive placed there. Dimensions of this ramon plant: 900x800 mm. Such a large structure can later be adapted for storing something. One beekeeper cannot cope with such a box. The structure itself must be very strong, so the end boards must be of good thickness. It is better to use nails for connections. Using screws, the side strips of the upper part are connected to the walls. From the bottom side, the bottom is nailed directly to the edges of the plank. Finally, handles are attached to the ends. Beekeepers use such structures as temporary hives.
It should be noted that making a structure for containing frames with your own hands is quite simple. To do this, you should have an accurate drawing and a consistent action plan at hand. The right approach to business will save you from many problems and make your work much easier. In the future, such boxes can be conveniently adapted for a temporary additional hive.
Inside view of the work drawer
Cut the bottom and lid to size from 4 mm plywood. It is better to determine the dimensions using a tape measure when the box is already assembled, because... It will be impossible to take into account the thickness of the strips (stiffeners) in advance.
If the length dimension is 510 mm, then the thickness will include: the thickness of the board, plywood and planks stuffed onto the plywood. This needs to be taken into account, because it is to the slats (and side boards) that the bottom will be attached - this way the structure will be more rigid. On the inside of the lid you need to fill the slats that will correspond to the inner perimeter of the work box.
Rules and conditions for wintering bees outside
This will ensure the lid closes tightly.
Why didn't I use loops? Sometimes when working, you need extra space to open the hinged lid, but by and large, this is a matter of habit. It is more convenient for me to work with such a lid.
Handles must be provided to carry the box. I made one. I nailed strong staples to the side boards and pulled a sling through them.
The result was the following:
I simply pulled the sling around the ring and tied it in a knot. I tried to place the unit closer to the bracket so that it would not interfere during operation.
Carrying work box in hand
Why did I use this carrying method? Yes, very simple. Most often I use the work box to carry frames. And everyone knows that frames, especially with honey, are a heavy thing. Judge for yourself. A full-weight Rutt frame weighs 3-3.5 kg, a Dadan frame weighs 4-5 kg. And if there are at least four of these frames, then the weight increases to 14-16 kg. You can drag such a weight in your hands... twice. What if there are a lot of frames?
The sling can be hung on the shoulder and distribute the load.
Carrying the work box on the shoulder
What else can you use your workbox for?
In addition to carrying frames into the work box, I plant swarms. It is clear that swarmers were specially invented for swarms. But I prefer working with the workbox. I'll explain why. I've used swarm a couple of times. The bees were acting restless. They had to be kept in a dark place for a long time, and once the swarm simply “ran away” from me.
To catch a swarm, I take a work box and put 3-4 frames there, it is better that at least one of them contains honey.
And with this “wealth” I climb the tree where the swarm has taken root. Inconvenient, I agree. And what kind of turns of phrase do I utter when I climb a tree... Each time I stubbornly prove to myself that I’m wrong and that it’s much easier with the swarmers. Apparently I'm incorrigible.
Most often, I leave the work box at the nearest fork, pull out one of the frames and carefully place it on the swarm and just wait. In 90% of cases, the bees begin to actively crawl onto the frame. You can place the frame from below and throw the bulk of the bees onto it. The main thing is that the uterus is on the frame. And then it all depends on how much time the bees need to guess that the queen is no longer on the branch. Many times I have had cases when I put a frame in a working box and all the bees went into it in a formation. Either the most persistent or the most narrow-minded remained on the branch. It happened that I placed a working box under a tree (when the queen was already in the working box) and observed an amazing picture when a swarm was removed from the branch and climbed into the box together.
It also makes no sense to keep bees in a box for a long time. The time required to prepare a new site for the swarm and install the enclosure is sufficient. The bees are carefully transferred to their new home on a frame and after a few minutes they begin to fly around.
To be able to add a comment, register!
Conductor for assembling frames
It’s easy to assemble a small number of frames with your own hands. For a large apiary, mass production is being established. Special templates - conductors - help speed up the process. Apiary devices can be made of wood or metal. The easiest way is to construct a jig for assembling hive frames with your own hands from wood.
The template is assembled in the shape of a box without a bottom or lid. The internal size corresponds to the dimensions of the frame. Holes are cut out in the side walls of the template, slats are inserted so that a gap is formed between them and the elements of the conductor, equal to the thickness of the blank for the frame.
Planks with eyelets, which are the side elements of the frame, are inserted into the gaps. The side jumpers are inserted into the grooves of the planks, first from above and then from below. The elements are nailed down. The finished frames are removed from the conductor. Usually a beekeeper can make up to 10 pieces at a time with his own hands.
What is a bee frame transfer box?
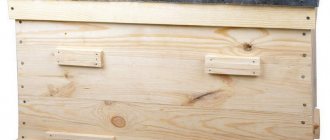
A box for carrying bee frames must be in the arsenal of every self-respecting beekeeper. They are used for any manipulations with frames; there is no doubt about its functionality. Ramkonos must be:
The dimensions of the box must correspond to the dimensions of the bee frames used in the apiary. This is a must when purchasing it or making it yourself. Below I will tell you how to make it from scrap materials. The price of a frame carrier will depend on the model you choose, so if you don’t want to make the box yourself, you can always buy it in apiary supply stores.
How to make a bee analyzer
The beekeeper's complex apiary homemade products are based on electronics. An experienced radio amateur can solder them with his own hands. The most common apiary electronic device is the bee analyzer. The device helps monitor the activity of bees. The apiary analyzer reacts to noise. The frequency spectrum in a normal hive ranges from 260 to 320 Hz. In the event of swarming, disease, or loss of the queen, the activity of the bees decreases. The spectrum of noise frequencies is in the range of 210-250 Hz, which serves as a signal to the beekeeper.
A self-assembled apiary analyzer reacts to the frequency of noise in the hive. LEDs serve as signal indicators. One light bulb signals “Yes” and the other “No”.
In Fig. 1 diagram of the apiary analyzer, and in Fig. 2 – power supply. The numbering of radio components in the second diagram is a continuation of the numbering of the first diagram.
Making a box for transporting bees
Bee bags are used for transporting bees and for long-term transportation. These are structures that should accommodate a bee family, providing it with everything it needs during transportation, but be as small, simpler and lighter as possible. These are the same hives, only they differ in their simplicity of design, the presence of the minimum required space and ventilation, which ensure good transportability.
A bee package is a hive designed to transport bees
Device for stretching wire onto frames
Manually stretching the wire onto the frame with your own hands does not always end successfully for the beekeeper. The string breaks or sags. A special apiary device helps to carry out quick tensioning with your own hands under the required force.
To make your own bee tensioner, you will need an old tabletop or a piece of chipboard. The size of the workpiece should be larger than the frame. On the tabletop, stops are made from 5 blocks to stop the frame. The tensioning mechanism is a lever rotating on a pin with an eccentric. When turning down, the eccentric presses the side rail of the frame. After releasing, the installed string is tensioned.
Bee package design
Usually made for four or six frames. A prerequisite is good fastening from the bottom and top of the frame to prevent damage during transportation. There is even a standard for a honeycomb bag with bees according to GOST, which indicates all the characteristics, acceptable standards and boundaries.
Containers for transportation and its varieties Package boxes, based on the presence of honeycombs, are divided into cellular and non-cellular. In modern beekeeping, honeycomb bee packages are more often used. A special box is made for them. They can be of completely different sizes and for different numbers of frames.
The beekeeper can make them himself, taking into account his own preferences and wishes. This is the main advantage of making a box for bee packages yourself.
Everyone can adapt a box for frames of the desired size, because everyone has different types of hives, and, accordingly, bee frames. Also, everyone should be based on their own experience, understanding what is best for bees and what worsens their condition during transportation.
Before we move on to a more detailed description of the drawings and dimensions, we will outline the main components without which it is impossible to make a box. What is necessary in the design?
- space between frames;
- ventilation holes;
- feeder;
- fastening frames (bottom and top).
How to make your own uterine insulator
To isolate the queen in the nest, beekeepers use a special apiary device - an insulator. The simplest cell is made with your own hands in the field from two necks of plastic bottles. First, they are sawed off with your own hands using a hacksaw. The blanks are connected with tape so that the threaded necks point in opposite directions.
A piece of plastic cut from the side of the bottle is inserted into one of the corks. Ventilation holes are cut in all necks and the inserted piece. Kandy food is pushed into one stopper, covered with a napkin with a small hole, and screwed onto the neck. The second plug is made with a hole so that the isolated queen does not suffocate. When replanting the uterus, it is unscrewed and the neck is covered with wax, lightly greased with honey.
The cage is hung inside the hive with the plug down. The bees gradually gnaw through the foundation and free the queen from the insulator.
Choosing the right material
The quality and strength of manufactured honeycomb frames directly depend on the materials used for the strips and bars, foundation wire and fasteners.
Planks and bars
In recent years, honeycomb frames made of plastic . Their adherents point to greater durability, resistance to rodents and moths, and the ability to save on foundation. Opponents cite the presence of chemicals in plastic and the reluctance of bees to process the foundation. Those who like to chew comb honey also do not like plastic frames. You can’t build such products with your own hands, and if they break (plastic is quite fragile), they can’t be repaired.
The plastic honeycomb frame has a more durable design and does not require assembly. Before placing it in the hive, you need to apply a thin layer of wax to the plastic foundation.
Most beekeepers adhere to the traditional opinion, considering wood to be the best material for making honeycomb frames. Wood is easily accessible, does not contain harmful impurities, and if it breaks, it is easy to repair or replace. The most suitable types of wood for planks and bars are pine (dried) and cedar . In their absence - poplar, willow, linden and other soft species (less susceptible to splitting). As a blank, it is best to use a straight-layer array without knots, which can create many problems - weigh down the frames, release resin, split during assembly, lead to breakage of a complete honeycomb frame under the weight of honey, etc.
The disadvantages of wooden frames include: drying out at high temperatures, getting wet and rotting in conditions of high humidity; in addition, they are often damaged by insects and rodents.
Wire and bushings
The tension of the wire largely depends on the properties of the metal from which it is made. The available choice is wide, but it should be remembered that the use of copper, aluminum and other wires made of non-ferrous soft metals is unacceptable - after a while the strings begin to sag due to stretching. For hives, special beekeeping wire made of low-carbon steel with a diameter of 0.3 to 0.5 mm is used. You can also find cheaper black wire on sale. Its main disadvantage is its susceptibility to corrosion. Wire made of galvanized steel has become widespread (it does not get tangled, does not break, and bends well).
Wire wound into coils or spools is sold by weight (0.25 kg, 0.5 kg, 1 kg, etc.)
A better, but more expensive option would be to use stainless steel (for example, IM-2 or SM-1). Electrically conductive types of wire made of tungsten and nichrome (X20H80) are even more expensive.
For tensioning, you should immediately purchase additional fastening materials - bushings or brackets.
Bushings must be made of brass or other metal that is not subject to corrosion
During operation or when stretching, the wire cuts into soft wood, which leads to gradual wear of the frame and sagging of the string.
There are two ways to prevent this:
- insert brass bushings with a smooth head (for example, 2.5-2.7 mm in diameter) into the holes, through which then pass the wire;
- Using a construction stapler, place a bracket next to the hole on which the string will rest. The downside is the gradual corrosion of the bracket from moisture.
To roughly calculate the amount of wire required, you need to multiply the length of 0.5 m by the number of “waves” on the hundred frame (magazine - two, Ruta - three to four, Dadan - from four to six).
Material for fastening honeycomb frames
For fastening you will need:
- shoe nails (3.5-4x1.6 mm) or small self-tapping screws;
- PVA glue or another suitable for wood (the label should be marked D-3/D-4).
Hive covers
Inside the hive, beekeepers cover the frames with honeycombs with special canvases. It won’t be difficult to make them with your own hands, cutting them to size from natural fabric. Linen or cotton material is ideal. The fabric retains heat well, allows air to pass through, and removes steam from the hive.
Beekeepers cut polyethylene canvases with their own hands. Artificial material retains heat well, but does not allow air to pass through. For the winter, it is better to lay canvases made of breathable material.
Rules for use and care of the product
Ramonos is a fairly simple design, but requires some care:
- Disinfection. It should be carried out after each use of the structure.
- Ventilation. Ramonos need to be ventilated not only before the first use, but also in the future. Bees are very sensitive to odors.
- Before using the ramonosa, it is recommended to cover it with herbs that are attractive to bees.
- Ramonos is a wooden product, so it must be stored accordingly. The storage location should be sufficiently dry, and strong changes in humidity and temperature should be avoided.
- Use during swarming. In this case, you need to put a couple of frames with dry food in the ramon, and then shake off the bees. The cover of the structure and the entrance must be closed. Ramonos are left in a cool place overnight. Properly organized ventilation will provide the insects with the air they need, and will also reduce the temperature inside the ramonosa - this has a calming effect on the insects.
Ramonos are often called a work or utility box. This design in the apiary is very convenient and greatly facilitates a number of works. You can make it yourself - all the materials and steps are simple. Properly executed design ensures its versatility.
1
0
Copy link
What other homemade products can you make for beekeeping with your own hands?
There are many other apiary devices for a beekeeper, and you can make them with your own hands without much difficulty.
A convenient apiary attribute for a beekeeper is a box stool. The base is knocked off the bars. The seat is cut out of the board with your own hands, and a hole for the handle is sawn through. The body of the box is knocked off the plywood. It is convenient for the beekeeper to sit on the stool while servicing frames and hives. All the tools are always at hand in the box.
Beekeepers assemble intra-hive feeders with their own hands from frames. First, the honeycomb and wire are removed. The frame is covered with plywood, the joints are sealed with wax.
Beekeepers make over-frame ceiling feeders in the form of boxes. They are made with their own hands, wooden or plastic.
Important! The feeder is equipped with a floating raft to prevent the bees from drowning in the syrup.
Product functionality
To avoid problems with getting the box out of the hive, it must be made of plywood, making it much more convenient and easier to get the frames with all the contents. There are 6 frames in the box. After removal, the hive is closed.
Manufacturing stages:
- select the necessary materials and tools;
- think over connection work;
- collect elements into a single whole;
- secure the handles;
- coat with a protective compound.
The box's parameters are small. Length from 455 mm; width - 235 mm; in height - 320 mm.
The frames carried by the box are different, so they must be disinfected after each use. Due to the accumulation of moisture on the plywood and in order to avoid rapid wear of the product, the material is impregnated with drying oil. The box itself is installed near or behind the hive so that frames can be placed there while honey is being pumped out. The box should not be heavy, but strong so that it does not break during operation.
Carrying box for ten frames