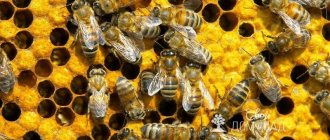
Honey production is a very labor-intensive process that requires very close interaction between the beekeeper and the bees. Manual labor of a beekeeper is impossible without the use of special equipment.
The article will consider a tool necessary for a beekeeper to work in an apiary - a smoker and its types, which are widely used. Methods for making the device yourself and using the device in practice are also described.
Why fumigate bees with smoke?
A reasonable question arises: why is a smoker needed then? We open the hive, move the frames, generally create all sorts of lawlessness there, and then fumigate it with additional smoke.
The answer is simple. The smell of smoke signals danger, and not the kind of danger that the whole family can fight off, but the danger of the highest degree, from which you can only run.
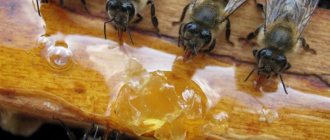
Do you know the expression “alarm suitcase”, when all the money, documents, etc. are collected in order to take off and run at any moment? Something similar happens in the hive due to the smell of smoke. The entire bee population stores honey in their crops and sits in tension and anticipation. At this moment, they simply have no time for you. It is very difficult to fly and defend yourself when you have a goiter full of honey. It is almost physically impossible to even sting.
Analogy : try eating yourself half to death, and then immediately enter the boxing ring. At best, you'll just get there. You won't have time for a fight. It wouldn't burst. Same with bees.
If the smell intensifies, it means the fire is approaching, tension is increasing. As soon as the smoke concentration exceeds the maximum permissible, we’ll head out. I don’t know exactly who determines this concentration and how. Most likely, they are the same scouts who are looking for nectar.
It is very important not to overdo it with smoke. If there is too much of it and it is hot, the bees understand that they are unlikely to be able to escape and become furious. With a wild cry: “then don’t let anyone get you” (they are talking about their honey) they will attack everything that moves, and everything that doesn’t move - move and sting. It won’t matter to them whether the belly is full or not. There is no point in saving energy. Therefore, a competent beekeeper does not create a smoke screen in the apiary, but simply puffs a little so that his striped charges switch to a more dangerous task and do not pay attention to him. That is why we are not talking about any pacification or calming of bees with smoke at all. The mechanics are completely different.
Application in the apiary
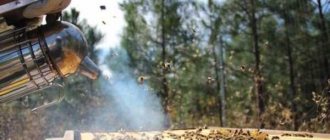
With the help of a smoker, the beekeeper fumigates the hive or the air around it with smoke. This is done for two purposes:
- In the first case, and most often this happens during honey collection - to calm your pets. After all, bees have long lived in the forest, and the most deadly and dangerous enemy for them was fire. Therefore, their very nature has a fear of fire and smoke. By fumigating them, you force the bees to collect a supply of honey into their crops for survival, thereby preventing them from biting a person. True, it is important not to overdo it with smoke, otherwise its excess can lead to the opposite result.
- In the second case, using smoke from special medicines, you can fumigate the hive for preventive or therapeutic purposes. To do this, they use paper soaked in medicine and blow medicinal smoke directly into the hive to get rid of parasites and bee diseases.
Principle of operation
The smoker is a cylinder made of metal and loaded with various materials: tree bark, dry leaves, newspaper. After ignition, the material smolders and smoke is released in the smoker. If you use good flammable material, you can fumigate the hive within 5 hours.
How to use - in order to light a fire in a smoker, you need to stock up on dry herbs, twigs and paper. As soon as the fire becomes large, add rotten mushrooms and close the lid so that the smoke begins to spread.
How to use it correctly
Each type of smoker has features and methods of use - an ordinary smoker requires lighting a fire, the other requires pressing a button. As soon as the fire becomes strong and the smoke begins to spread, you need to take it in your right hand and direct a stream of smoke towards the bees. In order not to harm insects, it is necessary to keep the “proboscis” of the smoker far from the bees and fumigate only the surface of the hive with smoke.
Precautions during operation
When working with a smoker, you should follow the rules so as not to harm insects and the environment. The following rules must be adhered to:
- Light a small fire to avoid fire.
- Keep the smoke stream away from the bees.
- After use, leave the smoker to cool.
- Add fuel carefully.
These measures will help to avoid undesirable consequences and make work in the apiary effective.
Advice from experienced beekeepers
To avoid mistakes, follow the basic rules for working with a smoker. Be sure to listen to the advice of experienced beekeepers:
- Use the device only when necessary. There is no need to scare and anger the bees again.
- Distraction from the fumigation process is not a reason to extinguish the smoke distributor. Place the device on one of its sides (it will not go out and will not emit too much smoke).
- During the event, carefully monitor the reaction of honey plants. You can't let them get too scared. Reduce the pressure.
- Do not touch the frames or hive structure with a hot appliance.
- Initially make 2 blows. Then wait until the bees calm down and start blowing fully.
- To prevent insects from crawling out/flying out during fumigation, open the shelf 2 frames at a time.
- If you need to find the queen, then let less smoke into the hive. Otherwise, she will hide in one of the corners.
The smoker is an easy-to-use device. But you still have to follow safety precautions when igniting and fumigating. And independent production of equipment additionally requires knowledge of design rules. The use of a defective smoker reduces the effectiveness of the effect on bees, which often leads to an attack by pets on the beekeeper.
0
0
Copy link
What to use as fuel?
As noted at the beginning of the article, insects do not like acrid smoke, and therefore the selection of fuel must be approached with all responsibility. Do not use dry straw, sawdust, or wood. It is important that the fuel does not burn, otherwise sparks can burn the bees. Ideally, hives should be exposed to low-temperature smoke. rotten wood as fuel - it can be collected from fallen trees and old stumps. The smoke from the dust will be soft and non-hot, i.e. comfortable for insects.
The main disadvantage of rotten wood is that it burns quickly. The smoker has to be refilled frequently, which may not be profitable. Therefore, instead of dust, they often use a dry fungus - tinder fungus , which grows on trees in the form of solid growths. The smoke from the mushroom is just as comfortable for bees as from dust, but it will emit much longer.
The third option is oak bark , preferably slightly damp. It will not catch fire, will smolder for a long time, and the smoke will be comfortable for insects.
Oak bark
On a note ! Do not use coniferous trees as fuel! When smoldering, they release tarry substances that are harmful to striped workers.
What to fill the smoker with?
The bee smoke atomizer can be filled with absolutely any raw material - paper, egg shells, dry grass, hay, straw, pine branches, cones, firewood, leaves, sawdust, Hessian fabric, etc.
Experienced beekeepers recommend paying attention to the following natural fuels:
- rotten trees, old stumps, dry manure, rotted wood - these materials do not harm insects, but burn out too quickly;
- tinder fungus (mushroom) - ignites well and smolders for a very long time, but finding it is problematic (unless you live near a forest where there are a lot of trees);
- oak bark is an excellent option, since it does not burn, but smolders.
When choosing, first of all, they adhere to the basic requirement - the raw materials must be natural so as not to harm the honey plants. Secondly, they focus on what is “at hand”.
Which equipment to choose?
Beekeepers who lack time and young beekeepers prefer to buy products for fumigating bees. In specialized stores and on specialized websites there is a wide selection of domestic and European models of smokers.
Each beekeeper independently decides which type of smoker to use. However, when choosing, you should still adhere to the following criteria:
- Quality of material. It must be durable (you will have to withstand high temperatures) and stainless, since corrosion of the metal when burned will have a negative effect on honey plants.
- Manufacturer. Experienced beekeepers buy only from trusted manufacturers. They produce high-quality products, provide a guarantee for operation, provide detailed instructions, etc.
- Construction type. The choice largely depends on the ease of use for the beekeeper and the volume of the apiary. The more hives, the more often you will have to use a smoker, and therefore, expend effort. For large beekeeping farms, it is better to purchase electric models.
- Purchased or homemade option. Not everyone has design talent. If you are not confident in making the device yourself correctly, it is better to buy the device.
- Price. There are budget and expensive models in each range of smokers. The cheapest ones are manual ones, average prices are for mechanical ones, and the highest price tags are for electric ones. But even among each group, prices vary, most often depending on the manufacturer. Designing your own will also require some expenses if you don’t have the right materials and tools at hand. But here the time and effort spent are taken into account.
Manufacturing
A bee smoker is a simple device that you can make yourself. One way is to make it, for example, from a teapot, and you don’t even need complex drawings. The device is made as follows: the handle is separated from the metal kettle, a hole with a diameter of 12 mm is punched at the bottom at the place where it is attached, and two more are punched on the same bottom side - 8 mm at different heights for attaching the bellows.
The spout on the kettle will serve as a hole for blowing out smoke. The kettle lid will need to be secured with snap clips. The glass will be an ordinary tin can, in which a large number of recesses are made at the bottom and half the height so that air can pass through to the fuel.
The ends of the metal strips are bent so that the end result is a U-shaped part with a height of 3 mm, and are placed parallel to each other at a distance of 4 cm. A glass jar is installed on these strips. The distance from the bottom of the kettle to the bottom of the tin glass is made to allow air to get into the fuel. Then take 2 more iron strips and also bend them at the ends so that the top is 40 mm long.
Holes with a diameter of 8 mm are punched in the bent ends of the strips. The same notches are made in one of the prepared boards. These notches should fit into the notches on the kettle. A hole is made on the bottom of the same board - 12 mm, it should correspond to the one made on the kettle in height. Then, the iron curved strips are bolted to the body and board.
A tube is installed in the lower recesses on the body and board; it must be attached very tightly. A hole is also punched in another board; from the inside it is covered with a piece of leatherette, which is attached to the top. This will serve as a valve that will let air in, but will not release it when the bellows is compressed.
The second board is attached at an angle of 45 degrees to the first, with a strip of leatherette. A tension spring is placed between the two boards. When holding a 45 degree angle between the boards below, they are fastened with furniture buttons with leatherette bellows.
Refueling and maintenance
The prepared medicinal solution is poured into the container, from where liquid for heating will be supplied.
To extend the service life of the equipment, you should follow the operating and maintenance rules:
- The device should not be disassembled unless necessary. Also, the lack of special knowledge will lead to depressurization of components, making it impossible to further use;
- When using a mixture: ethyl alcohol, oxalic acid, thymol, the system must be flushed after each use to prevent scale formation. Table vinegar is used for this;
- The filter requires periodic cleaning;
- Before storing the smoke cannon for long-term storage, you should flush the working system with kerosene.
It needs constant care, factory equipment, and a homemade cannon for treating insects.
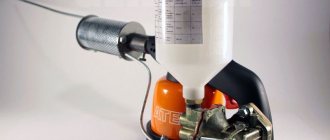
DIY drawing for assembling the Varomor smoke cannon
A good smoke cannon for bees is assembled with an Atex burner. The element is easily attached and removed due to the clamping screws. To disconnect the burner, loosen the bolt on the flange and tank. The element is rotated 90°, after which it is easily disconnected.
Methods for marking queen bees
The coil is bent from a copper tube with a diameter of 6 mm. The thickness of its walls is at least 3 mm. The inner diameter of the tube is also 3 mm. Due to the thick walls made of heat-intensive metal, the smoke gun coil heats up quickly, but takes longer to cool down.
The optimal dimensions of a homemade burner are 70x35 mm. The outer casing is bent from a stainless steel sheet. A flange and plug of the burner are provided with a side of about 5 mm for ease of assembly of the structure. After connecting the parts, holes are drilled in the casing with a diameter and a pitch of 6 mm from each other. A handle is welded to the flange. The second end of the copper tube is arbitrarily pressed with a clamp to the gas cylinder. The nozzle on the sprayer is made with a diameter of 15 mm. The part is turned on a lathe or the nozzle is removed from a household gas stove.
Assembling a smoke cannon for processing bees
The smoke cannon for processing bees is assembled according to the instructions in the following order:
- Connect the gas cylinder to the burner. Threads are cut on the copper tube and fittings are screwed on. Seal the threaded connection with FUM tape.
- The tube is shaped into a spiral of five turns. The outer diameter of the workpiece is 10 mm less than the thickness of the spark arrester flask. The spiral is placed inside the cola towards the end for better heating. A nozzle from a household gas stove is screwed onto the end of the tube.
- The spark arrestor flask is perforated. A strip with a hole for securing the copper tube is welded at the front. A coupling is attached to the back of the flask for connection to the burner. After assembly, the edge of the burner should extend 10 mm beyond the flange. The workpieces are connected by welding. You can drill holes on the flange and tighten them with bolts.
- Install a plastic container for the solution. A spray gun flask with a capacity of 200 mm is suitable.
After assembling all the elements, the supply of solution by the fuel pump is calibrated. A hole is drilled in the center of the foot and a screw is inserted. A solution is introduced into the nozzle and the flow of 1 cm 3 of liquid is adjusted.
Master Class. How to make a simple smoker with bellows
Let's look at how to make a simple smoker for bees with your own hands. To work you will need the following tools :
Metal shearsDrill bitAnvilHammerPuncherGood wire cuttersHacksawSharp knife
As for the necessary materials , they are as follows:
- stainless steel stand for toilet brush;
- leather (can be replaced with other dense material);
- ship nails;
- self-tapping screws;
- branched copper tube or brass sheet;
- bolts with nuts (can be replaced with copper rivets);
- empty candy jar;
- a pair of pine boards 5x90x150 mm;
- big spring.
Step 1 . First, disassemble the jar into a brush and remove all the plastic elements so that you end up with an empty pipe. Cut it to a height of about 170-200 mm, then take a candy jar and make the bottom out of it. Both elements should have approximately the same diameter. Use self-tapping screws to secure the bottom.
There should be empty space between the ignition and the bottom for more even combustion of the fuel. To do this, cut a circle from a metal mesh, bending it along the edges. You can, as in the example, not do this, but drill a hole and screw the mesh, although this is not necessary.
Step 2 . Cut out the funnel-shaped spout using a hammer, then drill holes and rivet the seams. Use a hammer to lap along the bottom edge to secure it to the lid. The last one is a lid from the same toilet brush. Use tin snips to widen the hole to securely attach the funnel from the inside and then secure with rivets.
Note! The spout can also be made from a curved copper pipe of at least 2.4 cm in diameter. To secure the lid, make 2 snap clips - attach them on both sides of the structure and snap them onto the lid.
The nose of the future smoker
Once you're done with the snaps, use a buffing pad to buff off any excess. Don't try too hard to make the smoker neat and beautiful, as it will already heat up. Plus, you use recycled materials. But the finished device will still lose its homemade appearance.
By the way, instead of rivets, you can use small bolts or self-tapping screws.
Step 3 . Take one of the boards, move 5 cm from the base and drill a hole approximately 1.5 cm in diameter. Nail a piece of leather on top. The board will serve as a lid on the inside of the bellows and at the same time as a one-way valve (air will be let in, but not released).
Take another piece of wood, move 3.8 cm from the base and make a hole 1.2 cm in diameter. Take the tube (brush handle) and insert it into the hole. The tube expands in one direction, and therefore there is no fear that it will fall out. Although, for extra security, you can add a little glue around the edges.
Step 4 . Cut a few coils from the spring, heat the ends with a torch and straighten them. Drill small holes at different ends of the boards into which the branches of the spring will fit. In the photos below you will see exactly how the spring should be attached.
Step 5 . For furs, it is better to use leather, although other dense material will also work. Cut out a piece of canvas 10x50 cm, sharpen each edge by 3.5 cm, so that the shape ultimately resembles an elongated diamond. In the middle there should be at least 8 cm of material of the same width, i.e. 10 cm is the future upper part of the furs, which should be flat. After cutting the fabric, trim the ends to prevent premature wear, and then fasten it along the edges of the frame (use furniture rivets with a pitch of about 12 mm).
Expert opinionPonomarev Sergey StepanovichBeekeeper with 30 years of experience, Candidate of Technical SciencesHaving secured the edges of the canvas, install the spring. In the example, the length of the edges of the spring is 3.5 cm, and therefore they just need to be inserted into the holes without any additional fastening.
Step 6 . Take brass strips 2 cm wide, fasten one end with buttons to the outside of the bellows, and screw the other to the sides of the fumigator. It is important that the bellows are located 3.5 cm from the body. The upper part of the bellows is also removed from the fumigator (about 3.5 cm), so that sparks and ash will not fall on them.
Combining bellows and fumigator
Armed with a chisel, punch a hole in the fumigator with a diameter of 1.2 cm, 6.3 cm from the bottom. The outlet tube should extend approximately 3 cm into the bellows, which, in turn, are attached to the body with strips of brass.
Make sure that nothing is loose and there are no gaps - it is important that the outlet tube fits snugly into the hole in the housing.
Step 7 . Check the smoker. Open the lid, place moss, leaves and brushwood inside, compact them, but not too hard. Light the fuel, and then if the fire starts, put the lid back on. You can use some green herb to increase the volume of smoke. By the way, we recommend pumping up the bellows from time to time to maintain the fire, even when there is no need for smoke.
Actually, that's the whole process. A homemade smoker for bees is assembled, tested and ready for full use!
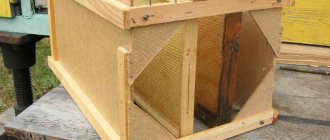
Ready-made beekeeper smoker, made by yourself
Structure
The tool for calming bees consists of several elements:
- A metal cylinder that consists of two layers;
- A device for supplying a stream of smoke into the firebox;
- A lid with a spout, which is most often called a “proboscis”.
Each of these elements performs a specific function - a metal cylinder produces smoke, has a closed bottom and a lid that hinges and has a proboscis. The elongated spout helps deliver smoke even to the most difficult to reach places. Using a mesh installed at the bottom of the cylinder, the refill does not come into contact with the smoke. If the beekeeper needs to introduce medications into the hive, then it is necessary to take a smoker with an extended nozzle.
How does a smoker work?
The design of the smoker is quite simple: these are two cylindrical containers of different diameters that are inserted into each other. The smaller container has a lattice bottom: fuel is placed there, and the ash can freely fall through the holes to the lower bottom.
Adding fuel to the smoker
A handle and bellows are attached to the body, which help to force air into the body; a cone-shaped tube is installed on the lid through which smoke comes out.
Furs are made from two wooden plates covered with dense material (faux leather is used more often than others, natural leather or dense fabric is used less often) and connected by a hinge.
To prevent sparks from flying out along with smoke, the design includes a special grille.
Modern manufacturers produce smokers with a built-in fan, powered by a battery or a spring mechanism; smokers in the form of a smoking pipe and others.
Components:
- Metal body in the shape of a cylinder (stainless steel or galvanized metal);
- An internal glass with a lattice bottom where fuel is placed;
- Lid with a folding mechanism and a hole for supplying smoke;
- Bellows for blowing;
- Check valve;
- Protective casing on the body;
- External lattice body.
Depending on the model, the design may vary slightly.
History of invention
The credit for the invention goes to the ancient Egyptians. They initially used a lit torch to scare away bees, and then began to use a more advanced design. It was a vessel with two pipes, made of clay. Fuel (manure) was placed inside, which was lit and then blown into a pipe. Thick smoke came out of another tube located at the opposite end. In some regions, smokers of this design are still used to this day.
It was only in the 19th century that the smoker could be significantly improved and made more convenient. Hamet, an American beekeeper, built a smoker with bellows in 1870. The disadvantage of the new product was its significant weight, which made it difficult to work with the tool and required the participation of both hands.
In 1883, his fellow countryman Quinby modified the model, making it lighter and more convenient to use. He told beekeepers around the world about his development, etching his name in history.
Soon Bingham (America) added direct draft to the design, creating a smoker in the form in which beekeepers around the world use it today.
Design
Next, you should familiarize yourself with the design of the smoker. It is not as complicated as it seems at first glance. The main element of the device is an outer casing in the form of a cylinder with a lid, inside of which a metal fuel cup is inserted.
The glass is slightly smaller than the body, so there is space at the bottom to collect ash. The lid has the shape of a cone, inside it there is a spark arrester so that the flame inside does not flare up too much. On the side are the so-called bellows; they consist of two planks, usually made of wood, fastened with a piece of leather.
Fuel is placed in the glass; it can be rotten vines, dry horse manure and other materials that produce thick smoke when smoldering. The fuel is ignited by air, it is accelerated by squeezing the bellows, and smoke begins to be released, which comes out of the lid.
Ignition
Next, we’ll look at how to light a smoker for bees. Working with an apiary device begins with placing flammable material inside the grate, which produces smoke when smoldering. How to light a smoker? Typically, rotten trees, dried mushrooms, and dry manure are used. Healthy wood is not placed in the beekeeper's smoker, since it produces little smoke when burned, and it turns out hot, which can cause aggressive behavior of bees. They also do not use gasoline, diesel fuel or kerosene.
The grate with fuel filling is inserted into the body of the device and closed with a lid. It is located at a distance of 30 mm from the bottom, under it on the side there is a hole that connects to the bellows. Squeezing the bellows causes air to be pumped into the beekeeper's device and smoke begins to form, which subsequently comes out of the device's lid.
How to light a smoker for bees
Lighting a regular beekeeper's smoker is as easy as shelling pears. The inner glass is filled with dry fuel. They set fire to a piece of crumpled paper and lower it into the body on top of all our rotten pieces, splinters, etc. Close the smoker with a lid. Using bellows we add air into the flask. Slowly at first, then as it heats up, maybe a little stronger. The rotten things begin to smolder, emitting thick smoke. This is the whole trick.
Another “old-fashioned way” (this phrase is infuriating, the only thing worse than using the word “extreme” to mean “last”) is adding pieces of propolis to the smoker. Allegedly, bees behave calmer with such smoke. I haven't tried it myself, so I can't say anything.
And finally, what to do if you urgently need to check on the bees, but you don’t have a smoker at hand - it’s broken, lost, borrowed by a neighbor, but who knows what, it doesn’t matter. A sprayer and mint drops will come to your aid.
Another smell that bees really love is the smell of lemon balm. It's an inconspicuous weed, but its smell reminds bees of the queen, and it's not customary to misbehave around the higher authorities. Therefore, you can rub your hands and face with lemon balm and it will be a little easier to work with bees. As you understand, this will not give you a guarantee against bites.
If you are interested in the design of a smoker for bees or how to make one with your own hands, as well as what types of smokers you can buy, then all this will be in the next article.
Varieties
There are several types of beekeeping devices.
- The most common is an ordinary manual smoker. It is valued by beekeepers for its ease of use. Despite the fact that this device is manual, since the air is supplied manually by pressing the bellows, working with it is no more difficult than with other electrical and mechanical devices.
- The electric smoker was created to make the life of the modern beekeeper easier, since this device operates from a battery. There is a fan inside that is driven by an electric motor. It is easier to work with such a device, but beekeepers note some disadvantages: high price and difficulty of repair.
- The next variety is a mechanical smoker (Similar to a manual one). To start working, such a device must be started with a key, and the blades located on the bottom begin to move. According to beekeepers, mechanical smokers occupy an intermediate place between manual and electric smokers. This device has a removable bottom, so it can be very easily cleaned and the mechanism lubricated if necessary. There is a lever at the bottom of the body with which you can adjust the intensity of the smoke supply. All of the beekeeping devices described above are used in apiary work; the choice depends only on the cost and individual preferences of the beekeepers.