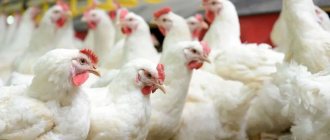
Chicken is a sensitive poultry. She needs a warm and comfortable home. The owner of the poultry house must take care of insulating and heating the chicken coop so that the chickens winter safely and do not have health problems. If there is electricity on the site, the heating problem will be solved by installing electric heaters. What if it is impossible to install the wiring? There are several ways to heat a chicken coop in winter without electricity. They will help you heat your bird house economically, without energy costs.
Do chicken coops need to be insulated?
If you are serious about raising chickens, consider the air temperature at different times of the year. This way, you will keep the birds healthy, and they will lay eggs all year round. The favorable temperature for chicken is from 12 to 15 °C, and at 18 °C the bird lays eggs intensively. The temperature in the chicken coop should not be allowed to drop below 10 °C: the birds will begin to get sick, and feed consumption will increase. In the cold, a living creature spends vital energy to keep warm, so it needs more food.
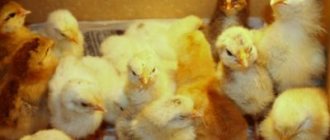
In the first 21 days of the chickens’ life, the temperature in the chicken coop should be at least 21 °C, then it is gradually reduced to 16 °C.
Avoid high temperatures. It can lead to overheating and death of birds.
Basic rules of use
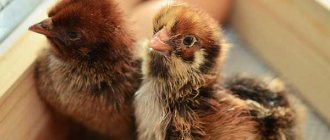
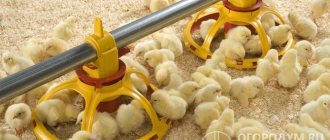
You should use a thermometer to control the temperature. Newborn chicks require a high temperature - 35-37 degrees. Subsequently, it is recommended to reduce it by 1-2 degrees. At 9 weeks, chickens feel comfortable at a temperature of 18-21 degrees.
Which chickens can lay double-yolk eggs, reasons and how to solve the problemRead
To regulate the temperature, you can remove or bring the lamp closer to objects. To select the lamp power, you should focus on this ratio: 1 kilowatt of energy is required per 10 square meters. If the temperature in an unheated room is 10 degrees, 10 square meters will require 1 light bulb with a power of 600 watts.
The distance at which the heat source should be located is also important. Initially, this is done at a distance of 30-40 centimeters from the chicks.
After some time, the temperature is measured. If it exceeds 37 degrees, the heat source is moved higher.
You should have 2 lamps in your arsenal. If one gets damaged, it should be replaced in a timely manner. This will help keep the chicks healthy.
How to heat a chicken coop
There are two ways to heat a chicken coop in winter:
In regions with warm and humid climates, poultry farmers use a natural heating method. They install heating devices and insulate the chicken coop with their own hands, even at the stage of its construction. The finished building can also be insulated by covering its walls with insulating material. An important point is the insulation of the floor in the room. There are cracks in the wooden floor, and the concrete screed becomes cold in winter.
Artificial heating methods are used when natural insulation is not enough. In cold regions, poultry farmers combine both methods. They insulate the chicken coop during its construction, and when cold weather sets in, they use artificial heaters. Even if electricity is supplied to the room with the birds, professional chicken breeders provide “backup options”. They are indispensable during power outages, from which no farmer is insured.
Natural heating methods
Natural heating of the chicken coop is planned at certain stages of its construction. There are synthetic materials that retain heat due to their low thermal conductivity. To insulate the walls of a room, poultry farmers use:
- polystyrene foam (or polystyrene foam);
- mineral wool;
- glass wool
Polystyrene foam is an inexpensive material. It looks like light slabs. Expanded polystyrene is hygroscopic: it absorbs moisture and retains heat. When insulating walls with this material, you must remember that it is flammable and follow safety precautions. You can use regular and extruded polystyrene, but the permeability of the processed material is worse. The low permeability of extruded polystyrene leads to increased humidity in the chicken coop, but small rodents will not appear in such material.
Mineral wool is also a cheap material, but its quality is better than expanded polystyrene. It is sold in slabs or rolls. This form is convenient for work. Mineral wool is lightweight, does not burn, and has high thermal insulation. It is used to insulate wooden buildings, placing the slab between the outer wall and the cladding inside the room. If you built a chicken coop out of brick, you can fix polystyrene boards to the outer walls.
You cannot insulate the chicken coop with plastic film. Unlike foam plastic and mineral wool, it is not permeable. Moisture will not leave the room, and fungus will quickly appear in it.
The floor in the chicken coop is insulated with a layer of expanded clay. It should be 15 cm. It is poured under the concrete screed during the construction of the floor. Deep litter is used as the top layer. It is made from natural ingredients:
Natural materials retain heat and are sources of constant biological processes. For this reason, the temperature of the litter is always kept at 20-25 °C. In winter cold, it saves the bird from the cold. Peat absorbs unpleasant odors, and in the spring they fertilize the garden or vegetable garden. Sawdust and straw are easy to change. Lay fresh litter in a thick layer (20 cm), and when it becomes dirty, add new litter (5-10 cm).
There should be no drafts in the chicken coop to prevent the birds from catching a cold. A draft in a room can be determined by observing the light of a lit candle. If the flame deflects strongly, you need to take measures: look for cracks and caulk them with cotton wool or insulation. When building a chicken coop, make sure that it has a good door that closes tightly and has no gaps.
Artificial heating methods
In the absence of electrical wiring on the site, poultry farmers use the following methods of artificial heating:
- gas;
- water;
- stoves
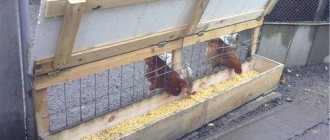
Gas boilers are installed in large agricultural enterprises and farms. The water heated in the boiler enters the radiators and pipes, and the temperature in the rooms becomes higher. Installation of such equipment requires the intervention of professional specialists. If you have a small chicken coop in which you keep 30-40 chickens, there is no point in using gas heating.
Stove heating is used by owners of small poultry houses. In a village or village, it is always possible to find fuel for a simple “potbelly stove”. You need to know how to handle it to avoid fires, and constantly monitor the heating process. For the stove to work, you need to make a chimney in the chicken coop. There should be no surfaces made of materials that can ignite in the room.
It is better to insulate the oven by installing it in a separate metal box.
Diesel stoves run on diesel fuel, which must be purchased separately. Unlike “potbelly stoves,” such stoves are safe to operate and do not require constant monitoring. You can buy a stove called “Bulerian”. It runs on diesel fuel and other types of fuel. Any fuel burns quickly, providing high efficiency of the installation.
If the chicken coop is made as an extension to the house, you can allocate a thermal circuit for it. It is carried out from a water boiler installed in a living room. Two metal pipes are suitable for the circuit, and you can make the insert yourself. Two water radiators are installed in a chicken coop with a high ceiling. The piping is made of metal-plastic pipes.
Heating systems in the first days of life
In order to provide heating for their chickens, many owners place various devices in the place where they are kept, which work well in practice. In a cage or box you can place electric or water heating pads, bottles filled with warm water, which are wrapped in a couple of layers of cotton or wool material, or cotton wool. Incandescent lamps or a couple of reflectors will also help create heat, the fastening of which must be carried out in a place where curious kids cannot reach.
Remember that regardless of the choice of heat source, air heating usually occurs unevenly. And the temperature near the device will always be 3–6 degrees higher than at the other end of the box or cage. To save energy and help the chicks conserve strength, it is recommended for egg-laying chickens to divide the house into parts. Heating is necessary for babies up to one month of age. Next, the cells should be kept at a temperature of +18 degrees. When kept on deep litter, it is usually possible to maintain the indicator at + 15.
Useful tips
When insulating a chicken coop, here are some useful tips to help you:
- insulate the door of the room inside and outside to avoid drafts;
- if there are large gaps in the ceilings and walls, seal them with polyurethane foam so as not to waste insulation;
- when choosing a heating system, consider the area of the chicken coop and the number of birds;
- if the birds live in a brick building, you can put a “potbelly stove” in it. It is better not to install it in a wooden chicken coop;
- When building a home for chickens, first do natural insulation (walls, floors, doors, ceilings), and then install artificial heating. This will help retain heat and avoid heat loss in the future.
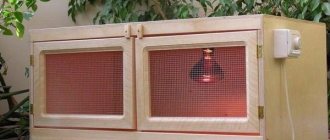
How to make a brooder for raising chickens with your own hands
The type of structure and its dimensions can vary significantly depending on the type of poultry being raised, as well as its quantity. The floor should not be slippery or wet, and a tray should be placed under it. A prerequisite is the presence of high-quality ventilation in the absence of drafts. The source of heating is most often a closed fluorescent lamp.
Select an option
There are different options for brooders that minimize the percentage of waste and provide chickens with full growth and development in the first days of life. The most budget option is a fenced part of the utility room and a lamp installed for heating.
The dimensions for 100 chickens are 200 x 100 cm with a height of 50 cm. This type of brooder, such as boxes and crates, does not always have a positive effect on the health of the young, so special designs are most often made.
Dimensions and drawings
It is very difficult to achieve comfortable conditions in cardboard boxes and ordinary boxes. Small chickens are extremely susceptible to any changes in external factors, including temperature fluctuations, changes in humidity, insufficient lighting or drafts, so building a simple structure with your own hands is very important.
Tools and materials
Before you start making your own “house,” you will need to prepare high-quality and durable material, as well as all the tools necessary to complete the work.
Material:
- sheet plywood - two sheets measuring 1.5 x 1.5 m;
- metal corners;
- steel mesh with cells 10 x 10 mm;
- wooden slats – 50 x 15 mm;
- fasteners – galvanized self-tapping screws;
- door hinges - four pieces;
- lamp socket, 60 W electric lamp, plug and cable;
- feeders and ready-made drinkers.
Tool:
- wood saw or jigsaw;
- construction tape and level;
- hammer;
- drill;
- screwdriver or screwdriver;
- pliers and wire cutters;
- marker.
Depending on the design features, the number and type of tool may vary.
Manufacturing stages
The simplest and at the same time most convenient design option is to create a brooder box:
- to create a frame you need to cut the plywood sheet in half;
- one of the resulting halves is sawn in half again, which will allow you to get a pair of plywood squares, measuring 75 x 75 cm, to create side walls;
- the three remaining plywood pieces measuring 150 x 75 cm will be used to create the upper and lower parts of the structure, as well as the back wall;
- the frame is assembled using galvanized screws and metal corners;
- fasteners are inserted into pre-drilled holes;
- for the manufacture of the floor, fine mesh and a frame made of wooden slats are used;
- the doors are made similarly to a mesh floor and are hung at the front of the frame.
The final stage is screwing guides made from slats onto the side walls and then installing the mesh floor. Under the mesh you need to install a metal tray, which can be covered with paper or covered with small wood shavings.
Heating to maintain temperature
Ensuring a comfortable temperature inside the brooder is a prerequisite for raising chickens at home. For every square meter of area there should be 0.28 kW of heating. You can evaluate the quality of heating by observing the behavior of the chickens.
At a comfortable temperature, the bird actively eats and drinks. If the birds become too cold, they gather in large groups. Increased temperature inside the “house” causes difficulty breathing in chickens and is accompanied by a large mortality rate.
Relative humidity plays a very important role in ensuring thermoregulation, and during the first three days it should be 60-70%. During the first three days, it requires lighting for 23 hours a day.
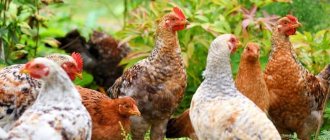
Keeping poultry in winter
A heater for chickens in winter is not the only device that regulates the temperature in the barn where birds are kept. A chicken coop is not just a place for chickens to spend the night, but also a shelter for the entire season for young and adult birds. In winter, birds rarely leave their shelter. To achieve good heating, the walls are insulated, flooring is made and an additional device is purchased. A heater is an expensive item, so before purchasing it, you should decide how to care for your bird in winter.
The chicken coop is equipped for cold weather in the fall, while the temperature outside remains high. The sooner the farmer starts arranging the barn and heating it, the easier the chickens will transition to winter. The heater for household needs differs in power and dimensions. In winter, any problems with heating devices can cost a farmer his entire poultry population. A lamp for chickens that were born closer to autumn protects the young from low temperatures. You won't be able to do without such a lamp.
For heating, the chicken coop is remodeled from the inside and outside. The heater is installed in the corner of the shed and is protected from damage. For birds, especially in winter, human care is important. A barn for chickens, which is warm, cozy and dry, is an ideal place for wintering. It is not so important how powerful the heater is used to keep birds. A combination of nutritious feed with vitamin supplements, clean water and adequate heating will help chickens survive the winter.
Temperature conditions during chick growth
In the first days after the chicks appear, maintaining the temperature regime is especially important , so it must be constantly monitored. To avoid having to check the readings every few hours, it is better to use an electronic control system that maintains the temperature within a given range. As for specific indicators, they are:
- In the first week, it is worth maintaining the temperature from 32 to 35 degrees around the clock.
- In the second week, you can reduce the indicators, the minimum limit is 29 degrees, the maximum is 32.
- In the third week, the average daily temperature should be from 25 to 29 degrees.
- The fourth week - here it is worth maintaining the readings from 22 to 25 degrees.
- In the fifth, sixth and seventh weeks, optimal values range from 21 to 24 degrees.
- Further, chickens are no longer so demanding on the temperature regime, but it is impossible for the indicators to drop below 18 degrees.
At first, not only temperature is important, but also lighting.
In addition to temperature, it is necessary to ensure the correct lighting regime, since it also affects the development of the bird. Here you need to follow simple recommendations:
- In the first 2-3 days, the brooder should be illuminated for 21-23 hours, that is, almost around the clock.
- Over the next 3 weeks, you can gradually reduce the duration of daylight hours; by 21 days it should be approximately 16 hours.
- Next, you need to transfer the chickens to standard conditions with lighting for 10-12 hours.
The red and orange spectrum ensures normal growth of chicks, preventing avian cannibalism and improving reproductive function in the future.
Methods for heating a chicken coop
Heating a chicken coop concerns every farmer. In order for the heating of the chicken coop to be reliable and inexpensive, it is necessary to provide natural and artificial methods of heating the box in which the chickens live. A coop heat lamp is only used when the farmer is concerned about the fate of the chickens. For adult chickens, a regular heater with or without a built-in lamp will do. The price of such a device depends on the configuration and performance. How can you heat a chicken coop in winter if there are several barn rooms in it?
One or several separate pens of one box are heated using the following equipment:
- lamp (red, ceramic, halogen and ultraviolet);
- IR;
- heater;
- blowing with warm air;
- stove;
- insulation.
There are natural and artificial heating of premises. Electricity can be used to heat most chicken coops. The lamp warms up small cages, especially those with small chickens. In a barn where adults are located, this type of device is also effective. Choosing heaters for poultry housing is difficult, and even impossible for new farmers. How to deal with a lamp or stove? The price, equipment and versatility of the heater help you choose a device. Skilled farmers insulate chicken coops with their own hands, maintaining the natural warm flow in the room.
Heating lamp options (heat lamp or incandescent lamp) for small boxes are selected at any time of the year and are used for hatching on cold days of summer or autumn. This lamp can be used all year round and for adult chickens who have suffered serious illnesses or after hypothermia. Animals, especially domestic birds, need to create special conditions; it is important that warmth and comfort be present all year round, regardless of what the weather is like outside the window.
Types of Infrared Lamps for Poultry Raising
Birds are highly sensitive to light, but in the dark they see practically nothing. They can navigate well only in sufficient light. These features are widely used in poultry keeping technology. By changing the lighting intensity, you can help chickens find water and food, manipulate the bird without stressing it, and more.
Let's look at the different types:
- Fluorescent lamps. The lamps are economical, but the frequent flickering, invisible to the human eye, can irritate birds.
- Energy saving. They are free of flickering, economical in energy consumption, have a long service life, but are quite expensive. The brightness of the lamps cannot be adjusted.
- LED. Good light spectrum, low power consumption, long service life. The disadvantages are that the lamps are expensive, but they pay for themselves much faster than energy-saving lamps.
- Combined. They produce both infrared and ultraviolet radiation. They are a good option for installation in aviaries with chickens. Ultraviolet radiation disinfects the room where young animals are kept, has a positive effect on the nervous system, and stimulates the physical development of chickens.
- Infrared. They help you save on electricity and are reasonably priced. According to poultry farmers, they are one of the best heat emitters, and as a type of heating, they are most suitable for birds.
- Regular incandescent lamps. The most “budget” option in price, a good spectral range of light along with spot heating. You can regulate the degree of incandescence using thyristors. Protective devices are required to prevent bird burns. High energy consumption.
How to heat a large chicken coop
Popular and inexpensive ways to heat chicken coops. For an adult brood of birds, barns or boxes with combined heating methods are suitable. For both humans and animals, the heat emitter must be absolutely safe and reliable. Power surges, power outages, severe bad weather - the farmer must be prepared for any situations that jeopardize the health of birds. Without insulation, the chicken coop will not be warm (even a heater will not save the situation).
Birds can keep warm with the onset of cold weather if the following is combined in the box (greenhouse):
- flooring and wall insulation;
- insulated ceiling;
- heating using a potbelly stove;
- radiators or gas guns;
- special lamps that heat up quickly.
Ceiling, walls, floor - all parts of the room need additional insulation. Without a flooring, it will not be possible to retain the heat from a heater or lamp. It is important for the bird that not only the body, but also the legs remain warm. Heater options that you can install at home on your own are better and more reliable than large household devices. The farmer needs to focus on his own needs and capabilities. If the farm is small, then the heater is selected in the appropriate size.
At home, birds calmly survive the winter and even lay eggs. The egg production of birds, when the box (barn) is warm and dry, differs significantly from the productivity of chickens in a cold box. The ceiling is also insulated, because creating the right microclimate involves complete insulation of brick or wooden surfaces. Home device options (the most popular) won't break the bank. Caring for poultry whether it is warm or cold is the responsibility of the farmer.
Natural heating
Insulating cages or chicken coops allows you to maintain high egg production in females and weight gain in broilers. In conditions where the heat remains at the same temperature level, the birds continue to hatch eggs. The health of the future brood depends on how warm it is in the house. Laying hens lay eggs in early spring. Birds need certain conditions: constant dryness of the floor and walls, as well as sufficient food. It is better to make an insulated poultry house separately from the room that the birds use in the summer.
How to heat a chicken coop without special devices? The optimal temperature regime (the poultry house is not heated additionally) is up to 10°C. A temperature of 15°C is the most suitable for birds of any age. Moderate warmth helps birds grow quickly and lay eggs.
What are the best natural heating options? The poultry house, which does not require additional electrical heating, includes:
- Deep litter. Before starting work, the farmer covers the floor of the room with slaked lime. It is better to calculate the amount of powder per square footage of the room. Sawdust or ordinary straw is laid on top of the lime. Dry layer options may vary. It is impossible to make a poultry house without a layer of insulation (the thickness is about 10 cm). To heat chicken coops, several floorings are laid as the layers become saturated with moisture. The dry material changes periodically. Natural processes lead to the litter releasing heat on its own. An economical option with a cheap thermostat is useful for small farms.
- Insulated walls. The ceiling and walls must be properly treated before winter. To do this, the poultry house is insulated using different methods of controlling the microclimate in the room. Polystyrene foam or cotton wool are useful for finishing work. Thick fabric is used to insulate doorways and windows. A film or mat will also come in handy (such insulation methods are the most reliable). Energy-saving methods protect hens and roosters from moisture, cold weather and precipitation.
How to properly organize a brooder with your own hands?
In this case, you should pay attention to a brooder (English brood - sit on eggs) - a house for chickens, specially equipped and organized for raising young animals. The brooder must be equipped with:
The brooder must be equipped with:
- A good heating system, lighting, high-quality feeders and drinkers. Strength and ventilation are provided by fine-mesh gratings on the sides and floor of the cage (mesh size about 10 mm).
- All chick waste should easily fall through the floor grate into a metal or plastic waste container that can be quickly removed, washed, or disinfected. The entire structure of the brooder should also be well and easily cleaned, washed and treated with disinfectants.
- To raise young animals in the first days of life, protect them from drafts and maintain a higher temperature, it would be good to provide removable side walls made of easily washable materials, PVC panels or fiberboard, plywood, thick cardboard in cases of one-time use. For the first time, it is possible to install additional removable mats with dry bedding for half a cage.
- The brooder should be equipped with several infrared lamps; it is also desirable to have a thermostat that responds to changing conditions outside and adjusts the temperature inside the brooder.
- The door should be of such a size that it is possible to clean the inside of the brooder without much difficulty.
Well, the last point: the correctly calculated area of the brooder for the number of young birds. If the planting is too tight, it is possible that they may peck at each other, die, or develop leg pain due to insufficient movement.
IR heaters
An infrared heater for keeping birds at home will be a salvation for the farmer.
Video instructions demonstrate all the advantages of a device for heating a room with chickens. You don’t need a lot of power or a lot of space, a large number of heating lamps: 1 infrared heating lamp will heat an area of up to 20 square meters. m. Heaters and lamps do not need constant replacement. A heater or infrared lamp has been used for several years in a row, so it is considered an economical option.
An infrared heater for heating a chicken coop is also called a flask, with a large radius for heating the poultry house. How to heat a chicken coop in winter using such a lamp? Heat lamps only heat the objects that the light hits. There is no point in warming up the air in the entire room. This device maintains the humidity level at the desired level and additionally dries the flooring. A ceiling lamp that uses infrared radiation is needed for high ceilings. A gas lamp cannot heat large areas without using radiation.
A safe way to heat the air in a box with a light bulb is suitable for day-old chicks.
It is not necessary to turn off the lamp: it warms up the air and does not burn out due to prolonged use (low power). In addition, you may need a mirror lamp that enhances the effect of the heating emitters. All costs for operating the heaters are covered.
Poultry often does not tolerate prolonged drops in temperature well and in most cases requires substantial housing for a safe winter. Therefore, no farmer can do without a high-quality warm and heated chicken coop. However, not all methods of heating a home for domestic chickens are effective. Therefore, in this article we decided to describe in detail the most popular of them, as well as determine their main advantages and disadvantages.
Types of heating lamps
A brooder lamp must meet a number of requirements. Therefore, you should not use ordinary incandescent light bulbs, as some poultry farmers do. It is better to use one of two options that provides the necessary conditions that are safe for the bird.
Infrared
The red lamp must be made of impact-resistant material.
A red lamp for heating chickens is a common solution that is popular among users for several reasons:
- This is a large lamp with a mirror reflector, emitting light in the red and infrared ranges, which is screwed into a standard base, which is convenient.
- The device emits soft light, ensuring normal visibility for chicks around the clock, which is very important in the first day after birth.
- Infrared radiation heats the surrounding surfaces and thereby provides a suitable temperature for the chicks. In order not to constantly monitor temperature indicators, an automatic regulator is usually purchased along with a red lamp.
- This option is more affordable in terms of price. The lamp life is approximately 5000 hours, which is not very much.
Since this option is turned off from time to time to maintain the temperature at the desired level, it is not worth using it without additional lighting elements. White LED light is best.
Ceramic
The ceramic version can be distinguished by its appearance.
A new type, which is used only as a heater, as it is made of ceramic, due to which it is highly durable. The features are:
- The ceramic lamp is screwed into a standard E27 socket, which is very convenient. This is a fairly large element with a wide bulb that emits infrared heat, heating all surfaces around.
- Due to the material used, the design can withstand quite strong impacts, is not afraid of vibration, and works normally under changes in air humidity.
- The service life is much longer than that of red lamps and ranges from 10 to 30 thousand hours. Performance characteristics remain the same throughout the entire service life.
- The efficiency is 98%. This means that almost all the electricity is used to heat the chicks.
- There are models with power from 25 to 200 watts, which allows you to choose a lamp for a brooder of any size.
By the way! If necessary, you can combine several ceramic lamps into one system, which allows you to heat even large areas.
From the video you will learn which is better: an infrared or a ceramic lamp for a brooder.
Is it possible to do without additional heating?
In most cases, additional heating is the only way to provide the most optimal conditions for keeping chickens. This issue is especially acute for regions with a cold northern climate, since in such conditions, with a lack of heat, the bird can become seriously ill or even die.
But in temperate climates and other warmer climate zones, the chicken coop does not require additional heating, since natural heating will be quite sufficient for these birds. To do this, you just need to provide the chickens with high-calorie nutrition.
But in order for the birds to feel comfortable, the chicken coop should be thoroughly insulated. To do this, all cracks must be carefully caulked, leaving only a small ventilation hole. In addition, walls, floors and roofs require enhanced insulation. The walls and roof are made double, with a small cavity between the inner and outer parts of the structures. It is necessary to lay insulation (foam plastic, mineral wool, etc.) in the cavity with a thickness of at least 10-15 cm. The floor is also made double. On top of the main covering it is necessary to lay an additional insulating ball with a thickness of at least 15 cm. For these purposes, peat, sawdust or straw are most suitable.
The end result is that the design of the insulated chicken coop should resemble a thermos. The heat released during the life of birds becomes the main source of creating a favorable temperature in the room, which, thanks to the insulation ball, is maintained for a long time. In this case, an insulated chicken coop allows the birds to safely withstand seasonal frosts down to -10-12 °C.
Chicken behavior
Whether the chicks are housed correctly can be judged by their behavior. When the babies are quite active (energetically rummaging in the litter), eat well, consume a sufficient amount of water, it means that the conditions for their keeping are close to being close to the mother hen. When placed comfortably, chickens sleep on their tummy, stretching out their necks and spreading their wings. After a short sleep, they reach for food and drink. Even at night they are active, but sleep is a little longer.
When there is a lack of heat, the chickens huddle in groups, trying to stay closer to heat sources and trying to keep warm. In such a chaotically formed heap, injuries are possible, and often, under the multi-layered weight of their fellow birds, the death of a bird is possible.
To monitor temperature conditions, keep a thermometer on the floor of the cage or box where the chicks are kept.
How to heat a chicken coop with electric heaters
Often, for most farmers, natural heating of the chicken coop is not enough to create comfortable wintering conditions for domestic chickens. In this case, the safest and fastest way to achieve the necessary microclimate for keeping poultry is to heat the room using a variety of electrical devices. They make it possible to instantly, and most importantly, safely achieve the desired temperature. Next, we will consider the main advantages and disadvantages of the most popular types of electric heaters.
Heater
An electric heater is a ventilation-type circulation heating device. The device contains a heating element (heating element) and an air circulation system. Under the influence of electric current, the heating element is heated, which is circulated with air using a powerful fan. As a result, with the help of constant circulation of heat, the room is gradually heated to the required level.
Lighting mode for young animals
The lighting system, along with proper heating, is important for the normal growth and full development of young animals. The creation of daylight hours within 9 - 10 hours is carried out in stages by the time the babies reach the age of 2 months. At the same time, the little ones benefit from walks in the fresh air and the opportunity to receive solar heat.
This is an excellent prevention of rickets and an opportunity to harden growing organisms. Creating the recommended temperature, sufficient lighting system, and a balanced nutritional diet will allow you to raise viable and healthy chicks.
Is it possible to do without electrics?
An alternative to electric heaters are gas and stove heating systems that are traditional in our region. Each of them has its own advantages, disadvantages and conditions for rational use, but in any case, such heating of the room will help cope with any sudden drops in temperature.
Using a potbelly stove
An ordinary heating stove is the easiest way to heat a chicken coop, regardless of the climatic conditions of the region. This heating system consists of a metal combustion chamber (boiler) and a chimney. During the combustion of fuel, heat is released, which heats the surrounding air through the walls of the stove.
This heating system is quite practical. It does not require additional maintenance costs, and absolutely any non-toxic material can be used as fuel. However, building heating using a potbelly stove is not so simple. In addition to the boiler and ventilation pipe, the system requires strict compliance with all fire safety standards, since the potbelly stove requires heating with an almost open flame.
Advantages of a potbelly stove:
- cheapness;
- low fuel costs;
- practicality and ease of care;
- ease of installation of the heating system.
Disadvantages of a potbelly stove:
- low fire safety;
- you need to add fuel yourself;
- emits an unpleasant odor during operation.
Heating a chicken coop with gas
Gas heating is the most effective way to create the required temperature in the chicken coop. Gas heating systems can be of two types: water and convector. The water system is a chain of a boiler, heating elements and a flammable gas exhaust system. During the combustion of fuel, heat is released, which is used to heat water.
As water circulates through the system, it gives off its heat to the radiators, which directly heat the room. Convector heating is a system of point heating elements - convectors. They function like electric convectors, but the heating element is heated by burning gas in a sealed chamber of the device.
Advantages of gas heating systems:
- quick heating of the room;
- energy efficiency;
- high fire safety;
- absence of unpleasant odor during fuel combustion.
Disadvantages of gas heating systems:
- high cost of equipment;
- the need for constant monitoring of the health of the gas supply system;
- high cost of fuel.
Heating a chicken coop is one of the most important processes in caring for and raising poultry. Optimal climatic conditions for chickens throughout the year are the key to their good health and high egg production. This process must be approached as carefully as possible, since this directly affects the farming value of each individual on the farm. Therefore, the choice of the optimal heating system should be made not only on the basis of personal preferences, but also according to the efficiency and feasibility of the funds spent on it.
How to set up a brooder for chickens
A brooder is a spacious box in which the brood is kept for several weeks after birth. It should create optimal conditions for raising chicks:
- humidity 60% (no damp feeling);
- heat according to the table above;
- Illumination (at 1 week) is constant, general, then decreases.
Brooder of suitable design: inside view
You can buy the device at specialized retail outlets. But in order to save money, it is better to make a brooder yourself. You will need simple tools and materials:
- jigsaw;
- self-tapping screws;
- screwdriver;
- plywood 20-25 mm thick;
- timber beam 30x30 mm;
- 2 piano hinges for doors;
- plastic cloth (bottom of the litter tray);
- floor mesh with a cell of 10x10 mm;
- plastic or metal mesh for door inspection windows;
- electric lamp;
- cable with socket for electric lamp;
- thermostat.
Typical brooder design
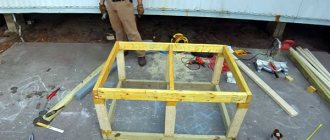
How to make a brooder from scratch:
Step 1. Calculate the dimensions depending on the number of chicks. For example, a box 70x50x40 cm can contain 100-150 chickens. Make a drawing.
Step 2. Cut the plywood according to the drawing.
Step 3. Cut 4 equal strips for the walls and 2 for the end. They should be 2 cm shorter than the walls.
Step 4. Install slide guides for the bottom grille on the back and side walls: fasten the slats along the edges of the walls (1 cm from the side cut, 3 cm between two slats). Fasten the bars to the sides to create stiffening ribs. The top edge of the bar should be level with the edge of the side walls, the bottom should be 3 cm above the top bar.
Step 5. Assemble the 3 sides of the box so that the grooves line up.
Step 6: Cut out the front piece from plywood. Attach the door hinges to the sides of the frame. Screw the blind parts of the doors into place. Mount the structure completely.
Step 7: Make a removable mesh bottom. The mesh is attached between plywood slats like a frame to make the structure durable and practical.
Step 8. Make the litter tray in the same way as the mesh bottom, only a light, hygienic plastic panel is used as the base.
Step 9. Replace the bottom grid and tray.
Step 10: Remove the front panel with doors. Use a jigsaw to select the central part of each door and attach a mesh to the resulting frames - these will be the windows for monitoring.
Step 11. Secure the front panel with doors in the same place.
The brooder is ready! But a “bare” box is not enough for chickens - additionally, adjustable lighting and heating need to be provided. How many lamps are needed and what power they should be depends on:
- box dimensions;
- its location;
- external conditions.
There are no special requirements for the starting material - the brooder can be made from old furniture, boxes, etc. The finished structure must be comfortable and warm - these are the only conditions that must be met.
The next stage before introducing birds is the installation of drinkers, feeders and thermometers for precise temperature control, as well as pre-heating of the structure.
The box will be used for 3 weeks - after that the birds are seated in different rooms. The recommended number of chickens in each jigging “batch” is 50 pieces.